30th Birthday Present Idea

It’s about that time… my girl friends that are close in age are starting to hit the BIG 30!!! The first one turned 30 yesterday so I scoured Pinterest for a fun idea to help her celebrate this milestone birthday. I loved this Young at Heart turning 30 basket from , so I hit the stores to make my own version. You can see another spin on it from Loves of Life here.

I purchased a cute basket to contain all her birthday goodies, wrapped it in ribbon and labeled it with the young at heart saying…

“Kayce, now that you’re 30 you may be wondering where the years went. Well this emergency kit is filled with items to keep you feeling young at heart!”

Milestone Birthday Gift Idea

Then I made a little label to match each little goodie inside. I even if you’re in a hurry and don’t want to create one yourself. Just be sure to edit the name to that of your recipient. 😉

30th Birthday Gift Idea

Take a Bubble Bath – I attached it to a bottle of fancy bubble bath.
Play Dress Up – Hoop earrings and a pretty bracelet
Have a Slumber Party – That’s a pretty little satin nighty rolled into a ball and wrapped with ribbon. 😉
Drink from a Sippy Cup – How cool is the wine “glass” with a straw that I found! You could do any kind of cup with a straw though.
Draw a Picture – A cute journal.
Give Yourself a Makeover – I wrapped ribbon around a set of different lip glosses and nail polish.

Gotta say, if I were turning thirty, or any other milestone birthday, I would be thrilled to get something like this…. 😉 Hint, hint… Not that my birthday is anytime soon.

How have you celebrated your milestone birthdays? Best gift received??

FYI, we’re linking this to these fun parties.

Girls Graduation Gift Idea

A couple of months ago I was given my very first church calling! I couldn’t have been more excited to be called to serve the Young Women of my ward as the secretary. I always had the best time when I was involved with the Young Women’s youth group as a young woman myself and can’t wait to share my ideas and work with the young ladies in my area.

My first real task as secretary was to be in charge of the graduation gift for the two young ladies graduating high school this month. The caveat, something fun but nothing too expensive. We’re on a budget after all… My solution, a Cooking Gift “Basket” since the girls will be on their own in their very own kitchens for the first time.

Young Womens Graduation Gift Idea

Items for a Cooking Gift “Basket”:

  • Small white colander for the “basket”
  • Kitchen Utensils to fill the basket, I used a whisk, a spatula, an ice cream scoop, tongs, and a grater.
  • A brightly colored kitchen towel
  • A coupon folder for a recipe card holder. I cut each girl’s name in bright colored vinyl with my Silhouette and put it on their folder. Then we filled the folders with recipes from the other Young Women leaders.
  • Then top it off with a bright ribbon!

Girls Graduation Gift Idea

Both baskets together cost around $20. So that’s two graduation gifts for about $10 each! Plus, I think they’re so bright and fun. I would have loved something like this when I was graduating. What do you think??

Linking this to these fun parties.


A Sweet Gift for a New Mommy and Baby

Hey there!! Long time no talk!!! Thank goodness for Fancy This Fridays or you wouldn’t have heard anything from me in weeks!! We’re finally past #weddingbonanza2013 and I’m starting to feel caught back up with everything!!!

So today I’m back on the bloggy-blog to share one of the sweetest gift ideas… Klara recently received her very first Christmas ornament from my friend, Jerri.

baby first christmas ornament

Jerri is also a blogger, she blogs at Simply Sweet Home, and she is the owner/creator behind the Etsy shop . When she offered to create an ornament for miss Klara I was absolutely delighted! I mean who wouldn’t want a keepsake ornament to commemorate their child’s first Christmas?!?! AWESOME Gift Idea Alert!!!

I was able to choose whether I wanted just her first name or also her middle name, the color of the ribbon and the cute little charm! Don’t you think the rocking horse is so fitting?!?! The other charms include a Christmas tree, baby bottle, baby feet, pacifier, high chair, or a ducky.

charms

The ornament itself is made of two hand stamped aluminum disks that will not rust and thus hang beautifully on your holiday tree for many years!! I really, really believe this would make a beautiful gift for your new mommy friend, a baby shower gift, Christmas gift for your own new little one… As a new mommy myself I was touched by the simplicity but lasting quality of our ornament.

IMG_6271

Plus it makes a darling photo prop!! 😉

You can get your own from Jerri’s shop at that link. She also creates hand stamped necklaces and key chains as well as other lovely handmade jewelry.

Your turn: My family has always had the tradition of a new Christmas ornament every year for each of the kids. I plan to carry on that tradition with Klara. Do you have any ornament or other special Christmas traditions?

UncommonGoods: Unique Gift Ideas

Hello there dolls! I have a fun new website to share with you today! Have you ever heard of UncommonGoods?

I recently had the opportunity to review two products from their unique selection of gifts for men, women and children! The site is literally overflowing with all kinds of fun gift ideas together all in one place, gifts that you’d be hard pressed to purchase together at any other location!! I pondered the site for a really long time trying to decide what to choose! For example they have tons of sweet surprises for little ones even grouped by age! You can see the options for children 0-3 years old here.

I finally decided on the ‘A Year of Gratitude’ kit and the ‘Cake Pops’ kit for my two products.

My package arrived just a few days from the time I placed my order. Both products were securely wrapped and well packaged, peace of mind coming from a site where you might order a delicate or breakable item!

The A Year of Gratitude kit includes 52 thank you cards with envelopes, one for each week of the year, tips on writing a good thank you letter and a journal to record all the little things you’re thankful for.

Everything comes packaged neatly in a nice keepsake box. The thank you notes and envelopes really are classy, not some cheap, poorly printed papers. The journal so far has been a real asset in helping me remember to be thankful for even the little day to day things. And come on, who doesn’t love to receive a little snail mail once in awhile!?! Sending out the thank you notes has been and will continue to be a treat for me and my recipients!

You’ve heard of Bakerella, right!?! The Cake Pops kit was developed by the cake pops queen herself!

It includes a cake pops stand, shown above on the far right, enough bags, pop sticks, ribbon and tags to make 48 cake pops and a cake pop instruction booklet. The booklet includes ten fun cake pop how to designs, everything from basic cake balls to intricate rubber duckies! With all of the big events I have coming up, everything from baby showers to weddings I can’t wait to try out all of the cake pop designs!

Either of these items, the gratitude kit or the cake pops kit would make a fun gift for a lovely lady in your life! You can find other unique gifts for women on this page.

Your turn: What is the most unique gift you’ve ever received?

Disclosure: I received the two products mentioned from UncommonGoods in exchange for my honest review. As always opinions shared are 100% my own!

Secret Santa and 12 Days of Christmas

I love blogger gift exchanges… It’s so fun to pick out something to send to a new blogger friend and then receive a little something from them in return. For just about any holiday you can find a blog gift exchange to join so of course, Christmas is no different!

This year I joined two, Secret Santa for Bloggers and the 12 Days of Christmas Blogger Exchange.

For the Secret Santa Exchange I received a gift from Miss Karen of .

My gift included a set of yummy smelling lotions, a foot spa kit and a delicious Frosted Cookies Glade candle!
Thank you so much Karen! I love it all!!!

She also sent a sweet Christmas card with pictures of her little man! Such a cutie!!!

For the 12 Days of Christmas Exchange I was partnered with Miss Alyssa of Sincerely Truly Scrumptious. This was a fun one because you got to choose TWELVE little gifts to send and then open on each of the 12 days before Christmas.
Once MY 12 gifts arrived from Alyssa they got a special place under my Christmas tree until they could be opened one at a time. 😉

Alyssa did such a good job! Each of the 12 gifts she sent were so fun to open and receive!
They were all marked with a little tag to be opened on their designated day.

Day 1: CUTE To Do List Notepads
Day 2: ELF Eye Shadow
Day 3: Little apple and orange juice glasses
Day 4: Nail Polish

Day 5: Soft socks
Day 6: Funny mustache notepad
Day 7: Yummy smelling candle
Day 8: Snowman mug and hot chocolate

Day 9: Kiss and Make Up Bag (Fun, right? 😉
Day 10: ELF lip gloss
Day 11: Candy ornament
Day 12: 2013 planner (perfect timing!!)

Thanks SO much Alyssa!!! I had such a fun time opening and using each of my gifts so far! :)
And peeps, if you’re looking for fun inexpensive gifts to give these were all great ideas!!!
Alyssa has a FUN fashion blog if you’re interested in checking it out. I’ve enjoyed seeing her fun outfits since becoming her 12 Days partner.

Thanks to Jessica and Britney for planning two fun blogger gift exchanges!

A Gift Guide for Sisters

Hey there!
We have a lovely lady for you to meet today!
Amanda from Dragonflight Dreams!
She’s an XL ad sponsor of Truly Lovely for October and has a fun Gift Guide for Sisters to share with you dolls today!

Take it away Amanda…
__________________________

Hi Truly Lovely readers! I’m Amanda from Dragonflight Dreams. I was struggling to think of a guest post idea when I suddenly though of something so apt. This lovely blog is run by two sisters, and I have three sisters myself, and I thought with Christmas coming up a sisters-themed gift guide would be perfect! So I’m here today to share some of my gift-giving strategies for sisters.

I’m the type that likes to give multiple gifts instead of one big gift. So each sister will get one thing especially for her, but then I also like to sometimes buy things that are a set but with a unique aspect for each sister, so we all have the ‘same’ thing but it’s still individual. Because sisters all share the same blood, but we each have our own personality as well.

My sisters & I aren’t the overly sentimental type, so I’m not going to buy them things plastered with the word ‘Sister’ or their names. We run on a more practical bent. And to me, there are three things that my sisters (and a lot of women) are guaranteed to love: wine, chocolate, and jewelry. So here some of my picks for ways you can buy each sister a similar thing but with a unique twist for each one:

Wine

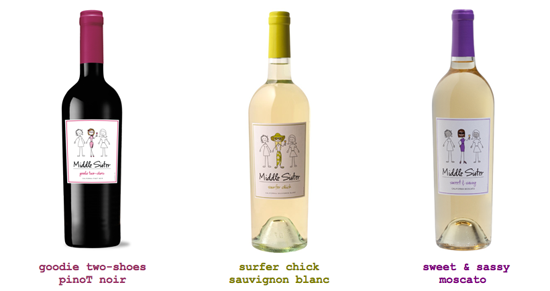
Middle Sister Wines

Middle Sister Wines

This is particularly appropriate for me, since I am the middle sister, but I don’t think you have to be the middle sister to have some fun with this. Each wine has its own personality – the moscato is the Sweet & Sassy sister, the malbec is the Wild One, the chardonnay is the Smarty Pants. Pick a wine to match the personality of each of your sisters. And if you’re all able to get together in person, have fun seeing if everyone’s taste buds match up to their wine personality. Bonus? These are available at Target.

Other sister-themed wines: Four Sisters and Wine Sisterhood

Chocolate

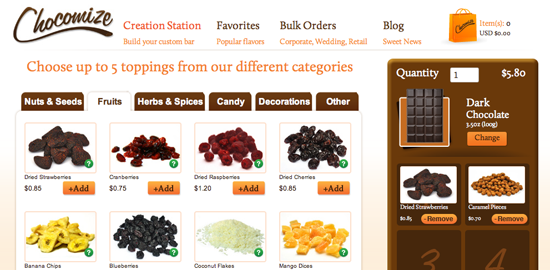
Chocomize

Chocomize

I haven’t tried this out yet, but I really want to – build a custom chocolate bar for your sister! They’ve got dozens of different ingredients to chose from (everything from normal bits like peanuts to more exotic things like candied violets). They are about the same price as a fancy European chocolate bar, and you don’t have to buy bulk – you can just buy one. Bonus? They donate a portion of each purchase price to your choice of three charities.


Custom M&M’s

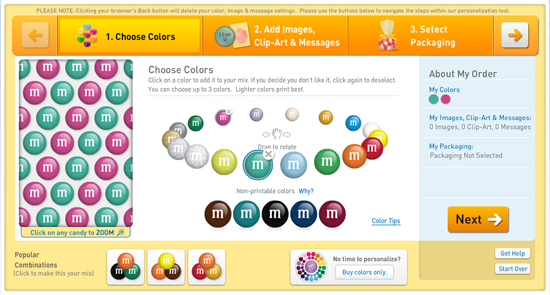
Custom M&M's

Pick your color of M&M’s, and up to 4 custom text messages to be in the mix, and voila! Personalized M&M’s. This one I’ve actually done. I got a big batch one year for all my sisters, my mom and myself with the custom text being ‘Cobb Women’ on some and ‘Love You’ on the others. My sisters thought it was cool, and my mom may have teared up a bit.

Other chocolate options: gift boxes of chocolates from

Jewelry

Birth Month Flower Necklaces

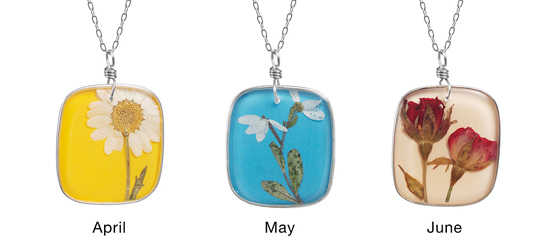
Birth Month Flower Necklaces

A little more unusual than doing a birthstone or zodiac themed gift, but still personalized for each sister. These are handmade and quite pretty, and there are earrings to match if you want to do a whole set. Each necklace is unique (even compared to other necklaces for the same month), and they come in 100% reclaimed cotton jewelry pouches, which is also a cool touch.

This one makes the bookworm in me so happy. My sisters are all voracious readers as well, so it’s doubly fitting. You can choose a book from her list of what is readily available, or contact her about using a different book. There are a couple different bracelet finishes/settings to choose from, AND you get to pick which words from the book if you want to get really specific. Bonus? You are supporting a handmade shop on Etsy, and she accepts the new Etsy gift cards.

Do you have sisters? If so, what are some of your gift-buying strategies or favorites?
__________________________

What a great gift guide, right!?! Well done Amanda!
Several of these items are gifts that both Kayli and I would LOVE to give and receive!

Happy shopping lovelies!!!

Connect with Amanda: Blog | | | |

Market Tote and Clutch Set

Since Mother’s Day is long gone for 2012 and we’re actually approaching Father’s Day, I decided it would be safe to share the gifts I made for my Mom and Tammy  (hub’s step-mom).

I have really been enjoying sewing lately and was excited to create a handmade gift for each of the mothers in our life!

zip top clutches

I sewed two zipped clutches based off this Michelle Sewing Pattern. The only difference in the two was the color of the zippers. One was black, one was white.

I also made my mom a market tote using a Market Tote Simplicity Sewing Pattern.
I was excited that the black paisley fabric and purple floral accent fabric paired so well together!
The lining of both the clutches and the market tote was the purple floral.

fabric tote

Inside each clutch I also included a brand new Layers by Scentsy shower gel for an added surprise!

These were so fun to make! I really enjoy giving handmade gifts!
Hopefully they were as gladly received as they were lovingly made! 😉

handmade tote and clutch

So what about you? Do you like to sew? Enjoy gifting handmade?

Happy sewing lovelies!

Linking this here and here and .

P.S. We’d love if ! Thanks new friend!!

Secret Blogger Swap – What I Received!

Hey there lovelies! I love a good package swap! Don’t you?!?

Today’s post is about what I received in the Framed Frosting Secret Blogger Swap from the lovely Tiffany of Blabbering Thoughts. It just so happened that she was MY swap partner too, so you can click that link up there to see what I sent her.

Snail Mail Gift

Based on the information I shared about myself, I received the loveliest set of gifts from Tiffany!!! :) She even included a little sticky note to explain about each item!!

The frame – For being a newlywed!
Nail Polish – Something pink
Cute little dotted  flower pot – Something turquoise
WASHI tape!!! – Something fun!

Gift swap

LOVE it ALL!!! I am so excited to try the paper tape… I’ve been meaning to order some (we don’t have a Target here), so I am thrilled she thought to include that! :)
Such a sweet and thoughtful gift!

THANKS TIFFANY!!! Excited to call you my new bloggie friend!!!

Interested in joining a package swap? Check out Cheers, Bethani’s Snail Mail Social.

Have a lovely rest of the week dolls!!!

Linking this to the Framed Frosting link up. :)

Pallet Welcome Sign

Today I have a fun DIY/Craft to share with you dolls.

The hubs and I made Pallet Welcome Signs for some friends of ours and I’d love to share the tutorial with you!

First, hubs cut up an old pallet into several similarly sized pieces. We decided three pieces would make a decent sized welcome sign. Next, I cut out some words in vinyl using my Silhouette SD to make some stencils.

I stenciled the words onto the pieces of pallet using the vinyl stencils, a small paint brush and some black acrylic paint.

We let them dry for several hours.

Once they were dry, we took the three stenciled pieces (per sign) and connected them using two Strong-Tie straps purchased from Home Depot, and a few well placed screws.

 You can also see our sign “hanger” in the above photo. The barbed wire was the hubs’ genius idea. Adds to the rustic look, don’t you think?? We simply cut a small piece of barbed wire, bent it to our liking, then screwed each side down on the back of the sign.

So…. What do you think??

Hubs’ was a great help on this one… It would appear he’s got an eye for rustic design. 😉

Have you jumped on the pallet crafting train?? If you have I’d love to see what you made!
Feel free to share a link in the comments!

Linking this here and here and .

Visit thecsiproject.com

Happy crafting lovelies!

P.S. We’d love if ! Thanks new friend!!

Etched Glass Drink Set

Remember the I made?? Well I got a little braver and went a little bigger with this one and made an Etched Glass Drink Set for my friend!
*As first seen on The Simple Things. Thanks for letting me share, Angela!

etching glass
Etching glass REALLY isn’t that hard! It just takes a little bit of time and patience…
As well as the RIGHT etching cream!
First off, you’ll need the glass you plan to etch…
For this gift I chose a glass wine pitcher and four glasses. You can etch just about any type of glass though… For example you can to see those candle holders I etched awhile back…
You’ll also need etching cream. I have tried a few different kinds, but the EtchAll etching cream has worked the best for me so far.
Please keep your hands safe by wearing protective gloves and keep your table top safe by laying down at least a layer of newspaper.

You’ll also need the shape or words you plan to etch on the glass. I use sticky backed vinyl cut with my Silhouette SD for my stencils. This time around I cut out my gift receiver’s name for the pitcher, and ‘her’ glass, and some pretty swirly shapes that were included with my Silhouette software.

Glass etching is really as easy as sticking the stencils to the glass, smoothing it down… Then (while wearing gloves) use a small sponge (I used a makeup sponge) to apply* the etching creme inside the area you’d like to be etched… And wait.
*The key is by apply I mean really glob that stuff on there!
(The etching cream does come with directions for how long to wait, etc.)
Finally, you’ll peal the stencil off, rinse in cold water, and viola!
You have pretty, personalized, etched glass.

Just so you know… Sort of a disclaimer…
Etched glass is CRAZY hard to photograph! haha.
You can click the picture to enlarge it and really get a good look if you’d like. :)
Happy etching lovelies!!