Archives for March 2011

Bloggie Bestie Blog Swap with Melissa of MeloMomma

Hello lovelies!!! Happy almost the weekend… heehee

Today we are excited to introduce you to Melissa of MeloMomma!!!

Alternative Name

She has a fun kids craft to share with you all today!
Please show her some Truly Lovely Bloggie Bestie love, would ya?! :)

In the meantime, I am also posting over at her blog…
A new tutorial! :)
So you can see me over there!!
Thanks friends!!

Here’s Melissa…

A blog? How cool! I want to start one! Hmmm… what shall I write about?

My crazy and exciting life!

And BAM! Just like that MeloMomma was born.

Hi, I am Melissa. Author of, MeloMomma. As a mother of two young boys, life can get a bit harry at times which makes for some really awesome blog posts. However, not only do I share with you all my crazy and hilarious stories, but I share steps by step craft tutorials (all kid friendly), and top notch kid friendly recipes.

Today thanks to Kassi at Truly Lovely, I am sharing a very easy and kid friendly craft.

I LOVE YOU FLOWER:

What you will need:

Plaster of paris

Construction paper (2 different colors)

Popsicle sticks

Glue

Scissors

Pen

Container for mixing

Container for flower

Directions:
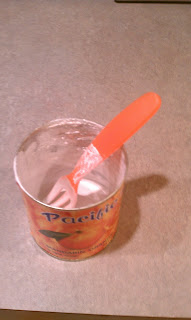
Mix 1 cup of plaster of paris and 1 cup of water in a container. (this container will be trash after mixing the plaster; I recommend mixing it in an empty veggi can) Use a popsicle stick or an old baby spoon to stir.

Pour mixture into play dough container or veggi can of choice. Allow it to start hardening while you make your I Love You Flower.

Glue two popsicle sticks together.

Lightly coat one piece of paper with glue.

Lay the other piece of paper on top of it.

Trace your hand and cut it out.

Glue down the middle two fingers.

Glue the hand onto the popsicle stick.

Cut out 2 leaves.

Glue onto the popsicle stick.

Place the finished flower into the plaster mixture.

Prop it up if needed until mixture is completely hardened.

I can not thank you enough for having me Kassi!

Thanks for being this week’s Bloggie Bestie Melissa!!
And thanks for blog swapping with me today!!
Have a lovely Thursday friends!!

DYMO Label Maker Review {CSN Stores}

Hey lovelies!!!
This last weekend I finally got the chance to try out my new
DYMO LetraTag Plus Label Maker and Labels
that I received from CSN Stores!!
DYMO - LetraTag Plus Label Maker, 1/2” Labels
I’d been waiting until I had a really good label project come up to try it out… But since we’re STILL waiting for our new house to close, that might take awhile… So I decided to try it out anyway!
Remember where I talked about being invited to review an item from CSN Stores?
Well, CSN is the best place to find those hard to find items that you can’t find elsewhere… They have EVERYTHING!!
The hardest part of ordering from them was deciding what to order!!

I finally decided on a new DYMO Label Maker and some fun metallic labels!

The item shipped quickly and arrived nicely packaged and in perfect condition!

Upon opening it up I found the label maker to be the PERFECT hand held size! It even has a little holder you can mount to the wall!
After we move, that little lovely will have a permanent home in my new craft room! For right now it fits in nicely just chillin’ in my ! 😉

So… Since I didn’t have anything DYING for a new label at the moment, I tried out some of their fun fonts and backgrounds on a Truly Lovely label.

*Please pardon the blurry pictures…
I need a better camera I’ve decided… 
But until then I got a little creative with the photo editing over at Photobucket. 😉

You can see it has a LARGE easy to read screen, and a nice little snip button to cut your label once it’s printed!

I used the Shadow Effect and a Banner to get this label, but there’s TONS of options to choose from!

Later in the weekend, my future-father-in-law brought home a bag of Christmas tinsel that he’d had from decorating his office….
It needed to be added to the stash of Christmas decorations in storage…
but FIRST…

How about a NEW LABEL!!!!

In a few seconds, I had a “Christmas Tinsel” label printed and stuck right on the bag, so next year it will be easily identifiable!!

The label cartridges are so easy to pop out and replace!
And they have several colors and styles to choose from!!!
The label maker came with two cartridges, and I also chose the Metallic three pack for fun.

So… My overall review of the DYMO LetraTag Label Maker…

Recommended!

The only downside is like I’ve mentioned…
It’s not an item that you’ll use everyday…
Unless you’re continually changing the labels on things…
But I digress.
However, it was so handy to have when we needed a small, sticky backed Christmas Tinsel label!! :)

Thank you CSN Stores for allowing me to review an item!

Happy shopping lovelies!

*I was not monetarily compensated by CSN Stores for this Review.
The opinion is my own, honest viewpoint.
The only items received was the actual Label Maker and Labels.

Announcement: A WEEK of Truly Lovely GIVEAWAYS

Hello lovely friends!!!
We have an EXCITING announcement today!!
We are almost to 200 followers here at Truly Lovely!!!
YAY!!!
To celebrate, as soon as we reach 200+ we will be hosting…
A WEEK of TRULY LOVELY GIVEAWAYS!!
We have some awesome prizes lined up from some of our sponsors
and Bloggie Besties!!

It’s looking like at least one giveaway EVERYDAY for a WHOLE WEEK!!

Why you ask?
Because we are SO EXCITED that 200+ people stopped by our little corner of blogland and cared enough to push that little follow button!
You guys are AWESOME!!
And because you’re awesome, you deserve some fun stuff!!!
Stay tuned to see who will be offering up some of that fun stuff that you will have the chance to win!!!! :)
And if you’re not already a Truly Lovely follower, we would love to have you!!
It’ll be required that you are a follower to enter the giveaways…
So what better time to join than now!!
Here’s our new GIVEAWAY button if you could please share it on your blogs to spread the word!! :)
Thanks friends!!

Homemade Strawberry Shortcake :) + some excuses.

Well Lovelies, the elusive little sister has returned…. again. :) I really hate that I can’t contribute more but I hate the phrase “After basketball you’ll have so much time to do stuff!” even more. Why? Because it’s a major lie. haha I thought I’d have a ton of time too- yeah, not so much.
ANYWAY, on to baking!
Okay so my life right now tends to be filled with a lot of guys… in the worst way possible. haha My four best friends are guys, I have two brothers and my dad. And most days I’m convinced they only love me for my kitchen skills. That aside, I do like to bake and when it comes to my friends at school- the boys get something good to eat in their locker for their birthdays. Which leads me to this post, because usually I just make cake or cupcakes- but Marc’s birthday gift needs to be in his locker on Monday.. and he HATES cake. Serious. I had to come up with something good- so in the process of experimenting I remembered I make a MEAN homemade strawberry shortcake. So here’s how it’s done… Kayli Style :)


Here’s what you’ll need:
Topping
A few packages of fresh strawberries
Sugar


Shortcakes
1 1/3 cups of milk
Vanilla
1 egg
1 1/2 sticks (12 tbs) butter
4 cups of flour
2 tbs baking powder
6 tbs sugar


So first you’ll need to prepare your strawberries, clean them and cut them in discs like this.


Then sugar them and put them in the fridge to chill.


So now you move on to the shortcakes. Whisk your milk, vanilla and egg together in a small bowl. (right here is where my secret ingredient comes in: I put MAPLE flavoring in, and quite a bit- I think it makes them taste a little less biscuity and a little more desserty) I completely just made up two words…


Then set that aside and cut your butter into small squares like this. It’s a lot easier to do if your butter is frozen…


Sift your flour, baking powder and sugar together in a fairly large bowl. Then toss your butter squares in. You’ll need to mix it until you have a pebbly consistency. I used a pastry blender, but you can use your fingers if you don’t have one.


Once you it looks and feels powdery/pebbley you can pour your liquid mixture over it- use a fork to work your dough until it’s soft. You might need to turn it over with your hands a few times to get it to mix well.


Put them on cookie sheets in medium sized lumps. The sheet on the top shelf is done, the bottom shelf is just put in. (I know the whole “bake one sheet at a time!” rule… don’t care) haha


Bake them at about 375 F for around 15 minutes, or until golden on top. You can serve them immediately. :)


If you try it, let me know how it goes. So much better than the store bought cakes, I think! And happy birthday to my buddy Marc! (Even if he probably won’t see this :)


Crazy Love,

Fancy This Features #17

Hello lovelies!!!
Another new week! Already!!! I had a GREAT weekend!
My future brother-in-law’s family came down and spent the weekend with us!!!
We had a really fun time!!
How was your weekend?
Do anything fun or exciting??
We had 32 link ups this week at Fancy This Fridays!
The most viewed link of the week, hands down….
This ADORABLE Kite Wreath from Carlee at Lady Bird Lane!!!
I love her spin on the Spring wreath!!
Definitely a fun new idea!!! :)
Check out this LOVELY chair makeover from Britt at Ben & Britt Stanley!
I have some chairs I’m thinking of making over…
And I love the way she did hers!!!
Finally check out these adorable Carrot Cutlery sets that Hollie of the Seven Year Cottage put together!!! Easter is only a few weeks away!
Time to start gathering ideas!! And this is a fun one!
Thanks for linking all you lovelies!!
For those that were featured today, here’s a button for your blog to show you’re readers that you were featured on Truly Lovely!


I’m excited for the posts coming up this week!
Just FYI… I have it on good authority that Miss Kayli might be making an appearance… haha!!
Have a lovely week sweet friends!
And please go pay our features a visit! :)
P.S. We’re getting SO close to 200 followers!!!
Once we get there, we’re planning an
AWESOME week long giveaway!!
I’m still looking for friends to contribute to the giveaway, so if you’re interested please shoot me an email for the details!!!

Fancy This Fridays Edition #17

It’s FINALLY Friday again! YAYAYAYAYA!!!
And the 17th installment of Fancy This Fridays! :)
Last week we had 50+ linkups!!! Made my whole week.
Seriously. That was a HUGE week brightener in Kassiland. haha.
So… What did you Fancy up this week friends?
Did you see the coasters I made for a bestie’s birthday?
(Click the pics to go see those posts… After linking up of course…)
:)
Did you have the chance to say hello to Miss Andrea,
this week’s Bloggie Bestie?
Wanna see a CUTE gift tag and card?
AND PLEASE , so you are no longer a “No-comment blogger”
and then I can write your lovely comments back directly!
Thanks to Alisha for that Guest Post!!
So that was my week… Let’s see yours!!!

Fancy This Friday Rules:

1) Must be YOUR OWN project (we’ve had a few sharing other people’s stuff… That’s awesome, but we wanna see what YOU did!)
2) Must be linked to that project’s specific post within your blog,
not the blog itself
3) Grab our party button so others can party too!
4) Share some linky love with the other participants, by visiting and commenting on their projects as well! We ALL love comments!!


Thanks for linking lovelies!!
And have a WONDERFUL weekend!!!


Poker Card Tile Coasters

Today is my sweet friend, Kayce’s birthday!!
I wanted to make a fun gift for her that she would enjoy, and would also be inexpensive. We’re about to close on our new house!! YAY! But that means there’s not any a whole lot of extra money floating around for birthday gifts….
Anyway… Miss Kayce is a Poker playing fool!
I know the idea of tile coasters isn’t new…
Remember these  that I made for some friends using my Silhouette??
Well…
I put a new spin on them for my poker playing friend!!!
Luckily, I already had everything in my craft stash…
So really it didn’t cost my anything… :)
But if I had gone out and bought the supplies just for this project…

They would’ve cost LESS than $5 to make!!
The materials needed for this project are:
1 Sheet of black scrapbook paper
Deck of playing cards ($0.99 new)
Four tiles (I got mine at Home Depot, ($0.14 apiece)
Mod Podge
Foam Brush
Mod Podge Spray Sealant
1 Sheet of Felt
Glue Gun
Scissors
I cut four black squares out of the scrapbook paper and Mod Podged them to the tops of the four tiles. Then I chose a few cards from the deck of playing cards and Mod Podged those on top of the black paper.
Then I sprayed a couple layers of the sealant on top!
Finally I cut four squares out of the piece of felt and hot glued them to the back of each of the four tiles to create a soft surface so that they won’t scratch my friend’s table!! :)
There you have it!
An inexpensive, but SUPER fun gift for a Poker playing lady!!
HAPPY BIRTHDAY MISS KAYCE!!!
Me and Kayce in South Padre, Texas :)
These would make a GREAT addition to your guy’s poker night table too!
No more glass stains on your table…
But the guys don’t have to use girlie coasters either! Win win! :)
I’m linking these Poker Card Tile Coasters to the
$5 Challenge at The CSI Project!
Visit thecsiproject.com
P.S. Please go say hi to Miss Andrea! This week’s !! :)

Bloggie Bestie Blog Swap with Andrea of Keepin It Thrifty

Good morning Lovelies!!!
We would like to introduce you to the lovely
Miss Andrea of Keepin It Thrifty
as the Bloggie Bestie for this week!

She is so fun!
She too is in the middle of planning her wedding and has lots of great ideas!!!
I am over at her place Guest Posting today, so please pop over and say hi and roam around… She’s got some awesome posts that you’ll wanna see! :)

Here’s Andrea…

Hi everyone!!

I’m so excited to be the guest blogger today
here at Truly Lovely
I’m Andrea, the girl behind the blog Keepin it Thrifty.
My blog is about all things crafty & fashion-on a thrifty budget.
I’m addicted to Goodwill’s and dollar stores, crafting and fashion doesn’t have to cost a whole bunch of $$$.
So if your looking for quick, easy & cheap, I’m your girl!
Here are a few thrifty things you will find on my blog.
I hope you have enjoyed my post, don’t be afraid to stop by and say hello
I love meeting new people!
Thanks Truly Lovely for having me!!

Thanks Andrea!!!
She really does have some AWESOME thriftiness going on over there!!
And she’s a FUN twitter friend, if you’re on twitter!!!
@KeepinItThrifty
While you’re there, my twitter is @kassarie!! :)

Hope you’ll leave her some comment love!!!

If you’re interested in being the Bloggie Bestie of the week, shoot us an email!!
We have a new one every Thursday and your button will be up all week!!

Have a lovely day friends!!

Fun Gift Tag and Card Using the Silhouette SD

One of my BESTEST friends
(yes, bestest is a real word when referring to friends),
Miss Tracey Lou,
had a new baby boy recently…
But she lives FAR away…
So I had to wrap up her gifts and mail them to her…
She also has an older little boy already…
And the #1 Rule when gift giving to little ones…
You can’t give one without the other!!
It’s only fair!
Baby Boy Gifts
They live where it’s STILL really cold… So I sent a hand crocheted beanie for the new baby boy… In white and blue. And a matching outfit.
Blue and white onesie with little blue jeans. SO CUTE.
I also sent a baby blanket and stuffed snowman that I won around Christmas from a giveaway over at somewhat simple.
For the big brother… A fun Cars coloring book and crayons!
Even if it’s something simple… Like I said…
It’s not fair to give one kid and not the other!!
The real fun when mailing a present…
The packaging!!!
For the big brother’s present…
I used my Silhouette SD to cut out a cute gift tag.
I used the free guitar shape and typed his name inside with a fun font, then cut it out of green scrapbook paper.
Screen Shot of Silhouette SD Software


Once it was cut out, I poked a hole in the end of the guitar and attached it to the gift with white ribbon.

Gift tag using Silhouette SD


For the new little brother, I used the same free card shape that I used to make my , and the same font for his name.


Screen Shot of Silhouette Card cutout
I cut the card out of green scrapbook paper and backed his name with blue paper to make it stand out.
I used two-sided tape to attach the blue to the green.
I also cut out a smaller guitar to add to the front of his card.
(Also stuck on with two sided tape)

Silhouette SD Greeting Card

 Then I tied the card, with more white ribbon, to his bigger present.

What do you think??
The little guitar shape within the Silhouette software is SO cute!!
There’s SO many things you could do with it!!
P.S. I’m linking this project and several others to the
I Love my Crafty Cutter Party
happening over at Serenity Now!
Hope you’ll link yours up too!! :)

Guest Post: All About Us

Hey lovelies!!
Let’s give a warm welcome to our SUPRISE Guest Poster,
Miss Alisha of All About Us!

All About Us

Over at their blog, her and hubs, Tommy, share some AWESOME tutorials, tips and tricks for using blogger, so who better than to share a tip with all of us?
I asked and Alisha said YES!

*It helps that she’s actually one of my few “real life” blogging friends…
Even though I haven’t seen her in a very long time… ahem …*

So… SEVERAL of our followers here happen to be the dreaded…
*dun, dun, dun*
“No-comment bloggers
So Miss Alisha is going to share with you all how to go about fixing that, so that when you comment on Truly Lovely, or anywhere else for that matter, we can reply to your comment via email so that nobody feels left out or forgotten… Something that happens when you are a…
*dun, dun, dun*
“No-comment blogger”
We still love you though…

We just want to be able to comment back!!! :)

So… Here’s Alisha…

 
*************************
Hey All!
My name is Alisha and I am from the blog All About Us.
Over at my blog, we do quite a few tutorials on how to improve your blog, technically and aesthetically. 
There are so many things about blogger, it’s hard to know them all!
Today, Kassi asked me to share a tutorial on how to attach your email address to your comments.
This will allow the author of a blog to reply directly to your email when you post a comment. 
It’s super easy!

Step One:
Log on to blogger.com and select Edit Profile.


Step Two:
Under Privacy, select the box that says, “show my email address” then scroll to the bottom and click “save.”


That’s it! Easy, right?!
This is not a feature that is automatically selected by blogger in case the user doesn’t want their email shared.
It is, however, a very convenient tool to use when you want to respond to someone directly without sharing with everyone.

Hope this helps you out!

Thanks Kassi for having me!
************
There you go friends!!
Hope you’ll follow Alisha’s quick and easy steps so that we can respond to all of your lovely comments!!
THANKS so much to ALISHA for sharing this tip with us!!
Have a great day all!