Archives for April 2011

Fancy This Fridays Edition #22

THANK GOODNESS its FRIDAY!!!
This has been SUCH a LONG week!!!
Work was craziness… We’ve been getting our house worked on!
And I’ve had all week to look forward to my first bridal shower on Saturday, and BIG moving on Sunday!
Don’t you think the week is longer when you have a fun weekend to look forward to? :)


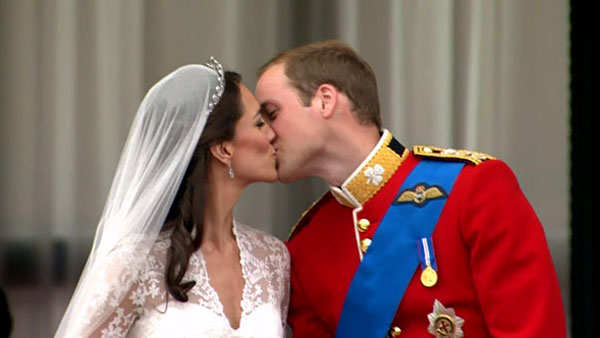
And of course, I must mention, the ROYAL WEDDING this morning was SO neat!!! Granted, I didn’t wake up at 2 am my time to watch the Live show, but I did catch the replays while I was getting ready for work…
That is truly a HISTORICAL event that people will be talking about for years to come!!! Whether you’re into that kind of thing or not!!!


Congrats to Prince William and Princess Kate!!
***

This week has even been busy on Truly Lovely!!!

We have a FABULOUS Bloggie Bestie this week:


Katie @ Eye Spy DIY! Def. go pay her a visit, please!


*If you’re interested in being the Bloggie Bestie at Truly Lovely, contact me at
!

I shared my !


AND


So… if you missed those, you can check them out at the links above.


This morning, I posted a FUN REVIEW and GIVEAWAY that you don’t wanna miss as well!!! You can scroll down to check that out, or .
A winner will be drawn next Friday, May 6th!

Now… Let’s Party!!!

Fancy This Friday Rules:

1) Must be YOUR OWN project (we’ve had a few sharing other people’s stuff… That’s awesome, but we wanna see what YOU did!)
2) Must be linked to that project’s specific post within your blog,
not the blog itself
3) Grab our party button so others can party too!
4) Share some linky love with the other participants, by visiting and commenting on their projects as well! We ALL love comments!!
(And it would be SUPER COOL of you to say your stopping by from the Truly Lovely or Fancy This Fridays link up!)


”Fancy  
Thanks for linking lovelies!!!
Can’t wait to see all the INSPIRING items linked up this week!!

FRESCHETTA Simply Inspired Pizza Review and GIVEAWAY

This post brought to you by FRESCHETTA®. All opinions are 100% mine.

My fiance and I love a good pizza at our house!
Especially one that you can take out of the fridge, pop in the oven and have a tasty dinner ready in less than 20 minutes!! That’s why I am SO excited to share a review and giveaway of the new 
FRESCHETTA® Simply…Inspired™ pizzas
  with you AMAZING Truly Lovely readers!!

I was given the opportunity by the makers of FRESCHETTA Pizza to try out one of their new eight distinctive flavor varieties and share my experience with you all!
Being that each flavor is unique and interesting, I had trouble deciding which one to try!
I literally stood in front of the freezer at my grocer forever choosing my flavor!

I finally decided on the Limited Edition Chicken Bianco pizza!

The pizza was SUPER easy to prepare! I was especially impressed with their new FRESH-TASTE SEAL Packaging! It was WAY cooler than your old run of the mill pizza box!! It locks in the vibrant flavors of the pizza all while using 30% less packing material! 
You just peel the top back and your pizza is ready for the oven!

It smelled SO delicious cooking that I had to try a bite before the pizza could even make it to the table!

Crispy pizza crust is my favorite, so I LOVE the Thin & Crispy crust style of the Chicken Bianco!
The pizza itself was SO GOOD!!! My fiance even liked it and he’s a SUPER picky eater!
We felt like we were eating a gourmet restaurant pizza!
The toppings were unique, and so tasty! Red peppers, black olives, spinach and the chicken!!
I really enjoyed the signature Alfredo sauce!! My fiance thought it was tasty as well, and he usually doesn’t go for anything but tomato sauce on pizza!

Needless to say, we enjoyed trying something new, and were excited that it met our craving for something out of the ordinary!

Now, it’s YOUR turn to try out a FRESCHETTA Simply Inspired Pizza!!!

It’s GIVEAWAY TIME!!!
 

I’m excited to announce that I have ANOTHER coupon for a FREE Pizza!!!
AND
This fun Bamboo Cutting Board for ONE lucky Truly Lovely reader!!!!

To Enter to Win:
PLEASE leave a comment and link for EVERY entry completed to have that entry count in the giveaway:

Mandatory Entry 1 – Be a public follower or become a follower of Truly Lovely

1 – Visit freschettasimplyinspired.com and let us know which of their 8 flavors you would like to try

1 – Follow on twitter

1 – Follow Kassi @ Truly Lovely on twitter at

1 – Like on Facebook

1 – Like on Facebook where you will have access to their SUPER COOL weekly giveaways and coupons!

That’s SIX ways you can enter to win!!

This giveaway will be open for ONE WEEK from today!!!


*Thanks to the makers of FRESCHETTA Pizza for giving me the opportunity to review their product!
I was provided with the products to review, however the opinions and thoughts shared in this post are strictly my own!
 

Bloggie Bestie Guest Post from Katie at Eye Spy DIY

Happy Thursday Dolls!!!
Today we would LOVE to introduce you to the lovely and talented Miss Katie of Eye Spy DIY!! She is a long time linker to Fancy This Fridays and a sweet blog friend!!! I’m guest posting over on her blog today as well, so when you’re done here it would be AWESOME if you would pop over there and say hello!
And please, show her some Truly Lovely comment love!!!
Here’s Katie…
Hi All!  I’m so excited to be here today!  My name is Katie and I’m stopping by today from Eye Spy DIY!  I love to try all sorts of new crafts and DIY projects; and my blog is where I share them all with you.


One of the many things that I like to do is make jewelry.  I thought I would share with you today how to make a wire wrapped bead bracelet. 


What you will need:
  • Needle nose pliers and wire cutters
  • Jewelry wire
  • Beads
  • Clasps


First you will need to cut your piece of wire to wrap around the beads.  It may take a bit of trial and error to find the right length of the wire for the beads you are using, but it is usually around 3-4 inches (can you tell I don’t like measuring?!).  Take your pliers and start making a spiral of wire.

Once you get about half way down your piece of wire start making a spiral toward the center at the other end.  You will end up with an ‘S’ shape that should look something like this:

Next fold your ‘S’ shape in half.

Now using your pliers again pulling out from the center of one of your spirals.

Turn it over and do it to the other side.  You should now have a cage for your bead.

You can open up your cage in the middle, slide a bead in, then pinch it closed again with your fingers.


Make enough of these for your bracelet, this will change depending on the size of your beads but will most likely be somewhere between 5 and 10 beads.  For the bracelet pictured I only wrapped every other bead.  Now we get to assemble the bracelet.  You will cut a piece of wire about 3/4 of an inch long and run it through your bead. With your pliers make a loop on each end of your wire.

Continue doing this for the rest of your beads.  Next hook all your beads together by the loops you just added.

On the very last bead of your strand add a clasp so you can latch your bracelet shut.  And there you have it, your very own wire wrapped beaded bracelet!

You can even play around with different colors of wire too!

Kassi, thank you so much for having me here today!!!
Thanks Katie for sharing this CUTE bracelet tutorial with us!!!
And thanks for being this week’s Bloggie Bestie!!!
Have a lovely Thursday friends!!!
And again, you can visit me at Katie’s place, here!!

My What Would Journal Contribution

Surely you’ve heard of Scenic Glory?
If you have anything to do with the FABULOUS For the Love of Blogs, then you HAVE to have seen Miss Lindsey around???

If not, when you’re done here I have two requests…

1. Get yourself over to FTLOB and JOIN! You’ll be so glad you did!


2. Visit Scenic Glory and check out all the loveliness that is Lindsey and her creations! She does lots of fun stuff you’ll wanna see!


Thank you in advance. haha.

So like I said, Lindsey comes up with some really fun stuff…
One fun thing in particular is the What Would Journal Project.
You can click that link to go read all about it…
But in short, she bought some really cute little journals and mailed them to some different people with the premise of,

“What Would you Like to Share Today”.

I was lucky enough to be drawn in the first round of the journal send outs!
I would like first to share Lindsey’s post of my project.
And a few pictures of my own.

This was my submission on Lindsey’s blog.
Click the picture to go see all the other AMAZING submissions!

The quote says, “If someone thinks that Love and Peace is a cliche that must be left behind in the sixties, that’s his problem. Love and Peace are eternal.”
~John Lennon.

When trying to decide what to do for the project… It just felt like love and peace would be a good thing to share. Why not?! Right?!

“My” Journal Cover
So I did.
To make the picture I just took a black marker and drew random squiggly lines all over… Making sure they were all closed at some point to form fun shapes.
Then I colored them. With crayons. It was SO FUN!

When was the last time you just colored? It’s actually crazy relaxing!!
You should try it!

Then I found that AWESOME John Lennon quote to accompany my picture.
And shared it on the next page.

Thanks for the opportunity to share Lindsey!!

I think she’s going to send them out again and again, so if you’d like to participate, contact Lindsey at Scenic Glory!

Have a LOVE and PEACE filled day friends!!!

Our New Home! The Before Pics!

So, I just wanted to take a minute and share with you the BEFORE pics of our new home!! AND I mean WAY BEFORE!!
I snagged these pics from the realtor’s website before she took them down, because really… They pretty much say it all. :) Since she took them, they are obviously before we moved in, before we made in changes, and well BEFORE anything!!
So, here it is in all its pre-Truly Lovely makeover glory, the grand tour!!
This is the front obviously. You like that BRIGHT green door, don’t you!
That will be the ABSOLUTE first thing to GO!!! BYE BYE ugly green door!!
This is what you see when you walk in that ugly green door!
We have a fireplace!!! I am SO EXCITED to decorate that little mantel!!!

This is the dining room! There’s also a sitting/breakfast area in the kitchen…
So I’m not sure what we’ll do with this space yet…
This is the view from the kitchen as if you’d walked in the back French doors.
I’m really excited about all the counter and cabinet space! There really is alot!
View of the kitchen from the other side. LOVE that the sink is in the middle island!
Oh… and you see there’s no microwave, refrigerator, or dishwasher… Ya… those are on our list!
These are the French doors in the kitchen leading to the back.
I would say backyard… but there isn’t one… yet…
And you can barely see in this picture, but that wall to the left is ALSO green!
These people must’ve really loved them some GREEN.
Yes, before you ask… THAT WILL GO TOO!!!
 
This is the view of the master bathroom doors from inside the master bedroom.
You can’t see them obviously, but there are LOTS of windows all around to the right.
The master bathroom. Bright blue wall in here… Spot for a little t.v.
Yep, my mister was sold on the fact that you could watch tv in the tub! :)
There’s also a really neat electric fireplace.
Master bath vanity. Two sinks!!
And a rather large, LOVELY closet that makes me really happy! :)
This is the smaller of the two other bedrooms. Yep… it’s yellow.
Ok… So they liked GREEN and YELLOW!
The other bedroom. Hoping to make this one into a craft room/office space!!
And finally, the laundry room. It’s a pretty decent size for a mobile!
We’re planning to put a doggie door in that door for our girls…
And maybe a small deep freeze up against that wall.
So… That’s the grand tour of our new home!!!
Before we move in and redo! :)
What do you think??
I’m SO EXCITED to get moved in and start making things our own!!!

Fancy This Features Edition #21

Monday? Again?? haha… Time for another batch of Features from our Fancy This Fridays link up!! This week we had 33 link ups! Not bad for a Holiday weekend, I say! :) So, here we go… Faves from this Friday…
 
First, check out this COOL Glass Jug Lamp from Megan at Cut the Craft!Such a creative idea!! And it turned out so beachy and fun!    How cute are these little birdie burp cloths from Tinkeranniebelle!! Perfect for a Spring baby shower gift!!    Check out this easy peasy candle makeover from Lauren at The Elephant’s trunk!! She has a great idea for making your candles with unflattering labels easily match your decor!    THANKS for LINKING LOVELIES!!!Can’t wait to see what you come up with next week!!!  Until then, here’s a Featured on Truly Lovely button for you three fabulous ladies!Hope you’ll grab one and share it on YOUR blogs!It links right back to this post so that your readers will know where to find you!  ”Featured

I’ve got a BUSY week ahead of me friends!!!
We are getting ready to move into our NEW HOUSE!!!
The GRAND tour is scheduled for tomorrow, so come back then to check that out!!!
I’m SO EXCITED to share it with you!!!
Keep in mind that it’ll be BEFORE anything is moved in, changed or updated!
My first Bridal Shower is this coming Saturday as well!
So getting ready for that…
AND there’s a fun review and giveaway coming soon as well!!!
So be sure to pop by Truly Lovely to see all the excitement! :)
Talk to you again soon! :)

Saturday Sponsor Spotlight: April #2

It’s time again to share with you some of our
AWESOME Truly Lovely Sponsors!
They are the ones that help make this little blog possible!
First up, we have MY Mary Kay lady!! Lacy!!

She’s my real life Mary Kay lady even!!!! 😉
Some of the products that I’m loving right now are:
TimeWise Targeted Eye Revitalizer
Travel Roll-Up Bag

SPECIAL ALERT:
For the month of April, if you buy at least $40 worth of products, you can then either choose the Free Gift or get 10% off your entire order!
Also, Mary Kay has a join as a consultant special for
$50 instead of the normal $100 to join.

***************
Next we have CMI Fixed Assets.
Every business has assets, from small Etsy shops to large corporations!
Those assets depreciate and need to be tracked for tax purposes!
That’s where CMI Fixed Assets accounting software comes in!
It can track your assets, calculate your deprecation and then help you produce the tax forms you need for your business depreciation!
Visit the link above to try the FREE DEMO!
It’s a working software program that just limits you to 50 assets.
That means if you’re a small Etsy shop with only a few items to track you never need to purchase! You can just use the FREE VERSION!

There’s several different versions with different price ranges to fit into every business budget!!

***************
You must have heard of Miss Bella of Bella Before and After!?!
Bella Before and After
She has a SUPER fun blog where she shares crafting tutorials, beautiful photos, decorating and home projects, recipes, etc!!
She also decorates the MOST beautiful CAKES!!
Some of my favorite Bella projects are:

BEFORE
AFTER
(Using just a little clean up and paint)
BEFORE
AFTER
So… if you haven’t already be sure to go check her out!!!
She also hosts a linky party every Tuesday that you don’t wanna miss!
Amaze Me August
***************
Do you love crafting, free stuff, product reviews, etc??
If you do than Simply Sweet Home is for YOU!!
Simply Sweet Home

Miss Jerri hosts a blog that shares all these amazing things on a weekly basis!
She is my go to for reviews of the latest products!

She also designs and sells the most lovely jewelry in her Etsy Shop,
Simply Sweet Creations!
Some of my favorite items right now from her shop are:
This SUPER CUTE Chocolate and Strawberry Cupcake Necklace
Chocolate and Strawberry Cupcake Necklace

and this darling Pink Bracelet!!

Pink and Chic Pearl Bracelet
Pink and Chic Bracelet

So that’s it for this Saturday’s Sponsor Spotlight!
Please pay a visit to one or all of our featured Sponsors this week and tell them that the Truly Lovely girls sent you! :)
 
THANKS!!!
 
Here’s wishing you a
HAPPY and FUN FILLED EASTER SUNDAY
with your LOVED ONES from us at TRULY LOVELY!!
AND

Fancy This Fridays Edition #21

HAPPY FRIDAY!!!
Fancy This Fridays can now legally drink alcohol… HAHA!

***
Ok, I thought it was funny… 😉
SO… All the winners for our Truly Lovely Week of Giveaways have claimed their prizes! And their info has been sent on to the sponsors!
I think that makes our first ever BIG giveaway a success!!!
The winners of those giveaways are posted over there…
<————————————-
And will be there until Monday, so if you wanna see who won quick and easy, click over there.

Oh, by the way….
PLEASE make sure you go say hello to this week’s bloggie bestie, the lovely Lauren of Young Nester!

Until then…
We wanna see what you fancied up over this week before Easter!!!
Remember to check back on Monday to see if your lovely was featured in our weekly features post! We have a button and everything! 😉


Fancy This Friday Rules:

1) Must be YOUR OWN project (we’ve had a few sharing other people’s stuff… That’s awesome, but we wanna see what YOU did!)
2) Must be linked to that project’s specific post within your blog,
not the blog itself
3) Grab our party button so others can party too!
4) Share some linky love with the other participants, by visiting and commenting on their projects as well! We ALL love comments!!
(And it would be SUPER COOL of you to say your stopping by from the Truly Lovely or Fancy This Fridays link up!)


”Fancy


Thanks for linking lovelies!!!


***
Have a FABULOUS and JOY FILLED EASTER weekend!!!

Bloggie Bestie Blog Swap with Lauren of Young Nester

It’s getting closer to the weekend friends!!!
And that means it’s time to meet a NEW Bloggie Bestie!!!
This week we would LOVE to introduce you to the FABULOUS
Lauren of Young Nester!!
She is a doll, creates some awesome thriftyness
and is new bloggie buddy of ours!!
So please check out her fun, SUPER CUTE magnet tutorial and don’t forget to leave some comment love!!!
Here’s Lauren…
I know you all are probably like, “where is KASSI??”  Well, we’ve hijacked each other’s blogs today to mess with our amazing readers. 😉 Kassi is keeping my blog seat warm over at Young Nester today so go check her out!
She’s getting married in TWO months and is making all kinds of goodies!
I’m Lauren from Young Nester!


The year 2011 has been insane for me (the expression “when it rains, it pours” might as well be tattooed on my forehead) and Kassi has been so amazingly patient with me and my woes! I love great bloggin’ friends. I have always been obsessed with crafting and decided to share what little input I could on the craft blog community early this year by starting my own blog. I’m all about not spending money and created Ten Buck Tuesday (a link party every Tuesday) to help inspire everyone to keep their crafts and recipes under $10 with me!


I just finished up my new magnets and wanted to share with you all FIRST!
Note: taking pictures of clear glass beads with an old camera is very difficult.
So, here’s what you’ll need:
Glass floral beads: (I got mine at Michael’s for $1.99)
Pictures (I used old magazines because I’m a hoarder and can find at least one in every room): free (or you can pick up old used magazines for 50 cents at a Half Price Books Store)
Glue: (I used Aleene’s glass & bead bond – just make sure it dries clear; Michael’s $3.99)
Cardstock paper for backing: free (use any strong paper)
Total: $5.98
First I flipped through my old magazines and reread articles I had forgotten about and cut out a bunch of pictures I liked.
I then did a rough measurement of how big I needed the circles to be and cut them to size. I then cut out a piece of cardstock (yellow was the closest to my hand so I went with it…) and glued it to the back of the picture to make it sturdier and so the glue wouldn’t seep through and ruin all my hard work (cutting circles is time consuming). :)
I used a tooth pick to spread a small amount of glue on top of the picture and pressed the bead down onto the picture. I held tight for a couple of seconds and then glued a small strip of magnet to the back and WALAH! Done!
Recognize that title? Cosmo made it after meeting Kassi 😉
(This is Kassi interrupting… AW! YOU JUST MADE MY DAY LAUREN!!! AND I LOVE COSMO FYI!!!)
Make sure you pick marbles that aren’t incredibly blemished (like mine) so they turn out super clear and awesome.
And that’s it! Super simple! You could use small family photos or logos of your favorite foods or even words that say “Don’t eat that” and put them on your fridge. At least I know I need to do that!
Thank you for letting me entertain you all for a day!
The amazing Kassi will be back tomorrow, I promise!
THANKS LAUREN for stopping by Truly Lovely and being the Bloggie Bestie!!
Told you she’s a doll!!!

Recycled and Reused Team Roping Ropes

I’ve shared with you before that I am making rope vases for my wedding centerpieces.
But in honor of Earth Day tomorrow…
I want to re-share the idea with you… with a better explanation of how I actually make them.

First, check out this HUGE pile of old team roping ropes.


This is what becomes of them once they’ve reached the end of their useful life.
Before you would’ve seen them in use by this guy, my fiance…
Like this… He’s a heeler, and a  pretty awesome one if I do say so myself! 😉


But once his ropes have been used several times they become too soft and pliable to stand up as a heel rope and they get discarded to the retirement pile in the backyard.


Again, in honor of Earth day…
I’ve discovered several ways to recycle and reuse these poor old discarded ropes. One way, that I’ve been doing alot lately since our wedding is less than two months away…


Rope Vases!


To make a rope vase you need an old, unloved, past its prime rope.
The ones discarded by my fiance are perfect!
Since they’ve become soft that makes them easier to shape into something new and once again loveable!


I picked one out of the pile with a pink tint to it so my vase will look slightly pink as well.

First thing to do is cut off the strings at the end of the rope, right below the bottom knot.
The knot will be used to start the vase.


To make the vase, I use a wood burner to melt the rope to itself.
You can see I wear leather gloves to protect my hands from the heat of the wood burner.
I also put newspaper down to protect my work surface from drips, etc.


I start by coiling the rope around the end knot and melting it together, like so…


Continue coiling the rope around itself, melting as you go.
Once you have the base the size you want it to be you can start coiling upward to form the sides of the vase.
Now it’s up to you how your vase will be shaped.
It all depends on how you melt the rope as you go up.


Once I come to the end of my rope (no pun intended…haha), I simply hot glued the loop I left at the other end of the rope to the side of the vase for a fun look.


So that’s how those old, no longer loved retired team ropes become a once again loved rustic/western home decoration, or wedding centerpiece.
Recycled and reused!


I’m linking this up to these awesome linky parties! 
As well as the AMAZING linky parties on my

 Hope you’ll check them out and link up too!

Visit thecsiproject.com