Archives for October 2012

Happy Halloween!!!

Happy Halloween lovelies!!!!
To celebrate one of my most favorite holidays, here’s a couple of the CUTE pumpkin photos I took of my friend, Meghan Jo’s baby boy!

He was an absolute sweetheart for these fun photos… Guess he felt really secure cradled in the pumpkin. :)

Such a sweet boy!

Have a SAFE and Happy Halloween friends!
Preferably with lots of candy! 😉

Halloween No Tricks Just Treats Jar

Happy Halloween Week lovelies!!!

Since Halloween is tomorrow, here’s a quick and easy craft you can whip up this evening!
A No Tricks, Just Treats Jar!
I made mine as a cute place to stash those candies that come unwrapped…
Things like candy corn. FYI – I love candy corn. :)

You only need a few materials for this cute craft!

  • Small jar with a lid (again, I chose one with a lid to store candies that aren’t wrapped)
  • Small sheet of black vinyl or stickers if you don’t have a craft cutter
  • Glow in the dark spider ring
  • Glue gun

 I designed my vinyl using my Silhouette SD software. The font is Chiller, a fun font for Halloween projects!
The spiderweb was a free shape in the software.

I cut my design out using my Silhouette SD, then used transfer paper to apply the teeny tiny lettering and the spider web, an intricate design, to my jar. Sure, you could peel and stick, but with something as small as this, it’s just WAY easier to use transfer paper!
{See all those teeny tiny cutouts for the web!!!}

To add another touch of cuteness/fun I hot glued a spider to the lid of my jar, after applying the web.
I just cut the ring part off the spider then glued it down. {Like I did with these spiders}

Next, fill your cute treat jar with cute treats!!!! 😉
Happy Halloween friends!!!!

Linking this here and here and .

P.S. Hope you enjoyed this post! If so, we’d love if !

Fancy This Features #99

Happy Monday and Happy Halloween Week!
Today the features from Fancy This Fridays #99 are fun ideas for the last few days before Halloween, and even later into fall of course!

Before we dive into that though, have you entered the October Group Giveaway yet? Lots of fun prizes to be won!!!

Now onto the fun fall features! 😉
How fun is this Family of Ghosts from Christine at The DIY Dreamer!?! I have these on my to do list every Halloween and just haven’t gotten to it yet. Next year for reals this time!!!!!

Pretty sure my Halloween morning will include one of these tasty Banana Pumpkin Smoothies from Stacey at Glued to My Crafts!!! YUM YUM!!!

And last but not least, this is a tasty treat you can whip up right before or after trick or treating!!! A delicious Pumpkin Cream Cheese Braid from Allison at Feeding my Temple will make a fun dessert for Halloween!

Here’s a featured on Truly Lovely button for you dolls!

Don’t forget, every feature from our Fancy This Fridays parties gets pinned to our Pinterest board!

Have a HAPPY HALLOWEEN week lovelies!!!
What are your Halloween plans?

We’d like to invite you to….

sponsoring a blog

in November!!!!

For more blog stats and information check out our Advertise page.

And a few words from two of our current and longest standing sponsors….

Thank you ladies!!!

If you’d like to check out a few examples of past sponsor features posts, click here.
To see a past group giveaway click here.
To see our .
And our Klout Sponsor List here.

Hope to see you on our sidebar next month! 😉
Princesses, Ghostbusters and other Halloween Favorites!

Today we’d like to introduce you to our XL and Large Ad Sponsors!
October’s Sponsor Spotlight theme is, of course, HALLOWEEN!!!!

You’ll find each of our sweet friends has shared a Halloween photo and a few fun Halloween interview answers! Take a sec, see what you have in common with these lovelies and click over for a quick hello!
____________________

Amanda’s costume shown here is her as Phedre from the Kushiel series by Jacqueline Carey. Costume inspiration from here.
Blog | | | |

____________________

Blog | |

____________________

Blog | | | | Shop

____________________

What was your favorite candy to get while trick or treating?
We had a neighbor that made popcorn balls… LOVED them!!!

Fancy This Fridays #99 and Oct. Group Giveaway!

Happy Friday friends!!!

Let’s celebrate this last Friday in October with our 99th Fancy This Fridays AND the October Group Giveaway!!!
One lucky winner will win…..

Blog
____________________

Blog |
____________________

Blog
____________________


Blog
____________________

Blog
____________________

Blog
____________________

Blog
____________________

Blog
____________________

What a SWEET group of prizes, am I right!?! :)
Enter using the Rafflecopter form below, entries WILL be verified!
Good luck!

a Rafflecopter giveaway

Now on to Fancy This Fridays #99!!!!

Fancy This Fridays Rules:

1. Please link directly to the project post on your blog.
Not the blog itself.
2. Please link only your OWN posts.
We prefer to see what YOU have been up to… not someone random.
3. Please grab a button and display it somewhere on your blog. On your sidebar, on your posts, on your linky party page. We aren’t picky!
4. We would LOVE if you would comment on at least one other link.
Just pop over and say “Hello, coming by from Truly Lovely”, or something more clever… You know…
Thanks for linking lovelies! And for entering our October Group Giveaway!
Have a great weekend!!!


Happy Birthmonth Kassi! Sister Wish Box

Happy Thursday friends! I know this is up a little late, but this is what happens when you go to school! (:

So this is one of our final installments in Kassi’s Birthmonth Party on the blog. I wanted to finish off with a fun tutorial for how to make a sister Wish Box. I made this for Kassi for part of her birthday gift and it was fairly easy. The idea is- I made a paper box and then I wrote down wishes I have for my sister. I made one for every year old she is, then I added a few little whimsical things: confetti, tissue paper, a ribbon. And I put the wishes in the box and tied them up for her to read as she wanted.

So this is how it’s done. Prepare yourself for LOTS of pictures because these paper boxes are no joke.

Starting with a practice box is HIGHLY recommended.

You’ll need two pieces of scrapbook paper. (It needs to be square, but make sure it isn’t stiff, you’ll be doing lots of folding and stiff paper pulls and makes rough edges)

Start with the paper you want to use for the bottom of your box.

Step 1: Fold your paper in half, print side in. Then unfold it and fold it using the other sides, print in still, so that you have two lines. See the line from my first fold in the middle?

Step 2: Unfold your paper so that it is laying flat, pattern down. Take a corner of the paper and bring it to the middle of the paper so that it matches the corner your folds in step one made. Then fold it down.

Step 3: Repeat Step 2 with your remaining corners so that your paper looks like this.

Step 4: Leaving your paper just like it is (no unfolding yet) take one side and fold it in so that it touches where all of your corners meet, like this.

 Step 5: Take the opposite side and fold it in so that it matches with step 4 like this.

Step 6: Now open the two flaps you just folded, and then unfold your paper so that it looks like this. (Note that the corners that are still down have no folds in them yet.)

Step 7: Now take one straight of you paper and fold it in like this so that the edge of your fold matches the tip of the corner still down.

Step 8: Repeat Step 7 with the other side like this.

Step 9: Now release the two flaps you just folded so that your paper looks like this.

Step 10: Now it’s time to actually form the box by pulling in one of your ends like this. Then push the corner down so that it lays in the bottom of your box.

Step 11: Repeat step 10 with the other side.

To make the top of your box you’ll do the exact same thing with only two alterations. For Step 4 and Step 5 you won’t fold completely into the middle but out a little farther like this.

like my sad doodle arrow? I tried. haha

Then for Step 7 and Step 8 you’ll want to do the same thing and fold out a little farther again like this.

This will make the top of your box a little bigger so that it fits over the bottom.

Then fill your box with wishes, confetti, and a little bit of tissue paper and voila!

So there it is! Should you decide to go on an epic, box-making journey; let me know how it goes for you!

And happy, happy, happy birthday sister.

xoxo,

A Gift Guide for Sisters

Hey there!
We have a lovely lady for you to meet today!
Amanda from Dragonflight Dreams!
She’s an XL ad sponsor of Truly Lovely for October and has a fun Gift Guide for Sisters to share with you dolls today!

Take it away Amanda…
__________________________

Hi Truly Lovely readers! I’m Amanda from Dragonflight Dreams. I was struggling to think of a guest post idea when I suddenly though of something so apt. This lovely blog is run by two sisters, and I have three sisters myself, and I thought with Christmas coming up a sisters-themed gift guide would be perfect! So I’m here today to share some of my gift-giving strategies for sisters.

I’m the type that likes to give multiple gifts instead of one big gift. So each sister will get one thing especially for her, but then I also like to sometimes buy things that are a set but with a unique aspect for each sister, so we all have the ‘same’ thing but it’s still individual. Because sisters all share the same blood, but we each have our own personality as well.

My sisters & I aren’t the overly sentimental type, so I’m not going to buy them things plastered with the word ‘Sister’ or their names. We run on a more practical bent. And to me, there are three things that my sisters (and a lot of women) are guaranteed to love: wine, chocolate, and jewelry. So here some of my picks for ways you can buy each sister a similar thing but with a unique twist for each one:

Wine

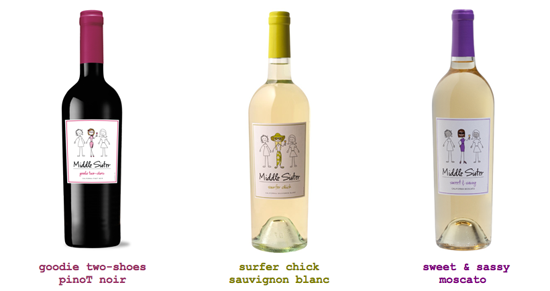
Middle Sister Wines

Middle Sister Wines

This is particularly appropriate for me, since I am the middle sister, but I don’t think you have to be the middle sister to have some fun with this. Each wine has its own personality – the moscato is the Sweet & Sassy sister, the malbec is the Wild One, the chardonnay is the Smarty Pants. Pick a wine to match the personality of each of your sisters. And if you’re all able to get together in person, have fun seeing if everyone’s taste buds match up to their wine personality. Bonus? These are available at Target.

Other sister-themed wines: Four Sisters and Wine Sisterhood

Chocolate

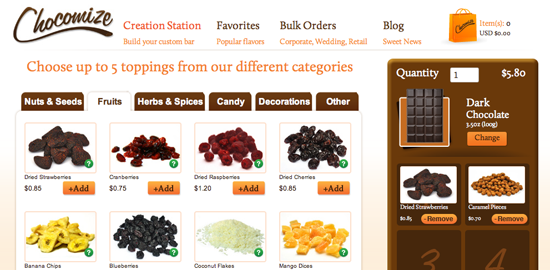
Chocomize

Chocomize

I haven’t tried this out yet, but I really want to – build a custom chocolate bar for your sister! They’ve got dozens of different ingredients to chose from (everything from normal bits like peanuts to more exotic things like candied violets). They are about the same price as a fancy European chocolate bar, and you don’t have to buy bulk – you can just buy one. Bonus? They donate a portion of each purchase price to your choice of three charities.


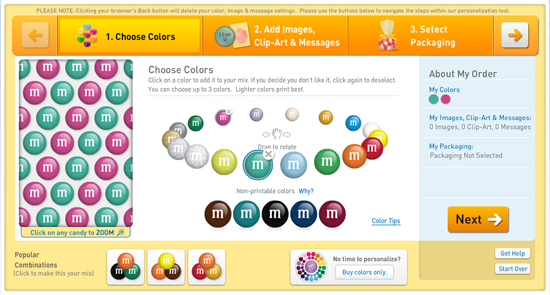
Custom M&M’s

Custom M&M's

Pick your color of M&M’s, and up to 4 custom text messages to be in the mix, and voila! Personalized M&M’s. This one I’ve actually done. I got a big batch one year for all my sisters, my mom and myself with the custom text being ‘Cobb Women’ on some and ‘Love You’ on the others. My sisters thought it was cool, and my mom may have teared up a bit.

Other chocolate options: gift boxes of chocolates from

Jewelry

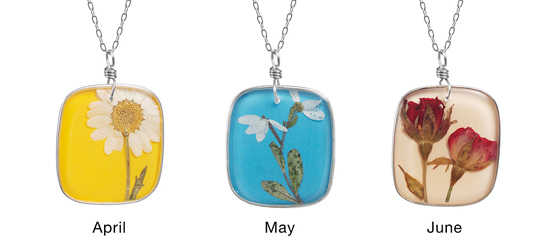
Birth Month Flower Necklaces

Birth Month Flower Necklaces

A little more unusual than doing a birthstone or zodiac themed gift, but still personalized for each sister. These are handmade and quite pretty, and there are earrings to match if you want to do a whole set. Each necklace is unique (even compared to other necklaces for the same month), and they come in 100% reclaimed cotton jewelry pouches, which is also a cool touch.

This one makes the bookworm in me so happy. My sisters are all voracious readers as well, so it’s doubly fitting. You can choose a book from her list of what is readily available, or contact her about using a different book. There are a couple different bracelet finishes/settings to choose from, AND you get to pick which words from the book if you want to get really specific. Bonus? You are supporting a handmade shop on Etsy, and she accepts the new Etsy gift cards.

Do you have sisters? If so, what are some of your gift-buying strategies or favorites?
__________________________

What a great gift guide, right!?! Well done Amanda!
Several of these items are gifts that both Kayli and I would LOVE to give and receive!

Happy shopping lovelies!!!

Connect with Amanda: Blog | | | |

Roasted Pumpkin Seeds

Actually this should be called The Roasted Pumpkin Seeds that Weren’t…
But we’ll get to that…
So, one of the things I love most about carving pumpkins is getting to roast and enjoy the pumpkin seeds.
After years of attempting to get it right, I think I’ve almost got it…

how to roast pumpkin seeds

It’s simple enough in theory… Cut your pumpkin open. Clean the pumpkin guts and seeds out separating the seeds as you go.

Once your seeds are separated, soak them in a bowl of water for a few hours.

Swish them around a little to get the rest of the pumpkin guts off.

Then lay them out to dry at LEAST overnight.

FYI – They roast 100% better if they’re dried out!

Then to season your pumpkin seeds, use about a tablespoon of melted butter, and your seasoning of choice. I prefer garlic salt…
Mix the seeds, seasoning and butter in a bowl until they’re fully coated.

Lay them out on a baking sheet. And bake for about 25 minutes at 325 degrees.


Here’s the key though…. stay in the KITCHEN. Keep an eye on those suckers….

Because apparently… it’s really easy to burn them if you don’t pay close attention and stir them once in awhile…

Just keepin’ it real! 😉
Like I said… I’ve ALMOST got it right….

What’s your favorite pumpkin seed seasoning???

Fancy This Features #98

Hi there friends! Welcome to another new week on Truly Lovely!!!
Do you ?? If not, we’d love to invite you!
We just hit 1,000 fans over this last weekend and can’t wait to have you join us!!!

Let’s start this fun new week with the features from Fancy This Fridays #98!!!

So Halloween is just over a week away… Here are a few fun ideas that make use of an easily accessible ‘craft’ item…
GOOGLY EYES!!!!

First up, this Googly Eye Halloween Wreath, from Want to Get Crafty, would be a fun addition to the front door!

A cute Googly Eyed Ghost Costume would be easy to whip up for your little miss at the last minute… Michelle at Scobell Expressions tells us step by step how to make your own!

And a fun activity to do with the kiddos… Add Googly Eyes to these fun Hand Print Spiders from Transatlantic Blonde!!!

Thanks to all those who linked with us on Friday! Hope to see you back here this week!!!

For those featured, here’s a featured on Truly Lovely button just for you!!!

Don’t forget, every feature from our Fancy This Fridays parties gets pinned to our Pinterest board!

Do you have a favorite GOOGLY EYED craft??