Family Photo Outfit Coordination

Hello dolls!
In leiu of our weekly Bloggie Bestie post this week, we have a special guest post from our AMAZING sponsor,

Alisha Hunsaker Photography!!!

Today Alisha is going to share a few ideas with you on how to coordinate your outfits for a family photo shoot!

_____________________

Hello Truly Lovely readers!

My name is Alisha Hunsaker and I am a photographer for Alisha Hunsaker Photography. I am so happy to be sponsoring Truly Lovely! If you would like, please check out my website, my blog or me on Facebook!

As a photographer, I often get asked what to wear for a photo shoot. Let me tell you, the combinations that you could come up with are endless! To help you out a little, I have put together a few idea boards for what you could wear for your family photos.

Hopefully, if you are in an outfit rut, this will provide a little inspiration.

First of all, we have a classic that I love. The Primary Colors. Any combination of this works and it always looks nice.

Next, we have Pink and Gray. A family I took photos of a while back used these colors and I have loved them ever since!

Third, Teal and Black, and Green and Black. You can pretty much use any color with black and it would work. These just happen to be two of my favorite colors!

Last we have Purple, Green and Blue. One of many combinations that works with more than just one or two colors.

Well, I hope this gave you some ideas, or at least gave you motivation to create your own unforgettable combination! Good luck!

_____________________

I’m loving the teal and black combo…
What about you? What’s your favorite color combination for family photos?
Alisha has a fun portfolio over on her website that includes lovely family photos, sweet engagements, beautiful weddings and more! If you’re looking for a photographer in the Phoenix, AZ area, we HIGHLY recommend her!
Let her know we sent you. 😉

Bloggie Bestie Blog Swap with Becky of Reinventing the Ordinary

Hello dolls!!! 
We have the first Bloggie Bestie of 2012 to introduce you to today!!! 
Becky of Reinventing the Ordinary

How cute is her pup there on her blog button (above)! 
She loves her pets as much as we love ours! 
Today she has a fun pet idea to share with you! 


Take it away Becky!!!


Hi, I’m  Becky from Reinventing the Ordinary

 I want to thank  Kassi  here at   for allowing me toGuest Blog and also for her agreeing to Guest on  my little site.
A little about me
With degrees in Art Architecture & Interior Design I have always enjoyed
rebuilding reworking and restoring.
I absolutely hate boring and really like to shake things up whenever possible
of course I gotta do it myself and always on a budget.
  features things I’ve made for my own home and pets … then decided to share with others.Today I thought I’d share with you my latest addition to the shop.
I’ll be adding this  Fleece Crate Cover  next week  so I thought I’d share a quick DIY for you guys.
Materials Needed:
1  1/3 yard fleece Color 1
1/2 yard fleece Color 2
*** this is for a small 12″ x 14″ x 18″ crate***


From  Color 1
                                        Piece A)   Cut one piece  26″ x  48″ (sides and bottom)
                                       Piece B)   Cut one piece  20″ x  20 ” ( liner for front door)
From  Color 2
                                        Piece C)   Cut one piece 52 ” x 20 ”  (back, roof, and front door)


Piece A
At corners  cut out 4″ x 4 ” squares  as shown.


Fold under one long edge of Piece A for a 4″ hem.This will be the front of the cover.
On the other 3 sides cut slits 2″ wide and 4″ deep.


Sew Piece B to front short end of Piece C.
Cut 4″ x 4″ square from corners on Piece C as shown …
then fold under  a 4″ hem.
On the remaining  3 sides slits cut 2″ wide and 4″ deep.
Wrap Piece A  around bottom and sides of crate.
Hemmed edge should butt up along front edge of crate.
Wrap Piece B/C  across back/top/front.
Align the top and back of the two sections.
Tie the top section to the side section.

As you can see I also used the same tie method to make a pillow.This is just only a short tutorial.  I just gave you a thumb nail explanation. It’s is a quick project about 1 hour. If you have any questions you can leave a comment atreinventingtheordinary.com…  and I’ll be happy to give you further directions.Starting next week this crate cover will also be on my  . 
 I hope you get a chance to visit my little  blog  some time. 
Thanks again .


Thanks to Becky for sharing her cute crate cover and pillow with us today!
AND of course, for being the Bloggie Bestie at Truly Lovely this week!
To learn more about being a . 

Have a lovely Thursday!


You can find me….

Here today….


I’m sharing a brand new tutorial on how I turned handkerchiefs from my wedding centerpieces into pretty pillow covers!
Hope you’ll take a minute to pop over and say hello!

Make it Merry – Unique Wreaths

Hello lovelies!!!
Hope everyone had a BLESSED and yummy food filled Thanksgiving!!!
Today it is my pleasure to be a participant in Make it Merry!
My topic… Wreaths & Door Swags!
Please be sure to visit the other participants as the festivities roll on! 
You can actually click over to their blogs through this image by the way!


nifty thrifty things the blue velvet chair homework project possessed meridian road modern country style home sweet homemade Jill Ruth & Co. Rustique Art hello lovely inc. Decor to Adore Ladybird Ln


OK, so wreaths… Wreaths are always a HUGE part of the Holiday season!
ANY season really… Especially if you tend to mingle in blog land!
There are a ton of great wreath ideas out there!
But what I would like to share today has to do with the main part of your wreath and making it unique!


You can use just about anything to make a fun and unique wreath! I’ve always been a fan of taking an idea and making it your own, so here are a few unique wreath ideas to get you started!!!


Here at Truly Lovely, I like to use my husband’s old discarded team ropes!


My

--> -->


My


There have been several Christmas ornament and yarn ball wreaths floating around blog land, but here’s one that combines BOTH elements!

Source: via on


OR! How about a wreath made completely from CANDY!!!

Source: rubberstampingdiva.com via on


Got an old picture frame just hanging around??? 😉

Source: via on


Want a unique wreath while recycling at the same time??
Check out this wreath made from reused tin cans!!

Source: ripegreenideas.com via on


Or how about a wreath made from materials purchased at the hardware store!?!
Something like this metal wreath would be fun!

Source: soyouthinkyourecrafty.com via on


You can click on each of the above images to be taken to my Pinterest and then onto their subsequent links. 


I definitely think a FRAME wreath is in my Holiday future!! 
How about you? Any other unique ideas for a fun wreath??? 
Please, share the links in the comments, or do tell! 
I’d love to hear what you come up with!!!


HUGE thanks to Diane of Home Sweet Homeamade for putting this together and inviting me to participate!!!

P.S. The Shabby Apple Dress Giveaway is ! :)

P.P.S. If you’re here to link up Fancy This Fridays is open below!

Meet Ashley of The Shine Project!!!

Hey lovely friends… We’d like you to meet a special girl…
Ashley of The Shine Project!!!
We’ve mentioned this , but here’s Ashley to introduce herself in her own words. 
And can we just say… she is lovely!!!


Dress- Vintage (I sell vintage clothing online HERE)

Hey new friends! My name is Ashley, and I blog over at The Shine Project.
It’s inevitable. I meet someone new, and during our obligitory small talk, they ask me what I do for a living. This moment is where things get a little sticky. You see, THIS is what I do for a living. This little blog right here, The Shine Project, is my creative space, my outlet, and my full time “job”. I’m not the kind of person that can sit behind a desk and answer phones all day. I just can’t.
I also can’t work for other people. I don’t like people telling me what I can, and can’t do.
So, back to the moment when someone I have never met before asks me what my job is. I never really know how to respond:
“I’m a blogger. Who raises money for inner city highschool students, tries to motivate people to be happy, an event planner, started an online vintage shine shop, constantly makes Shine necklaces, does a lot of marketing, has to be sure to have creative content every day and good lighting so my husband can perfeclty capture some outfit posts (insert sarcasm), and when I make any sort of food I have to document every step so people will “pin” it.”
See, told ya it gets a little difficult.
During a conversation I was having last week in one of these inevitable encounters, I realized something. I don’t need to justify what I do. Because, unlike most people, I can honestly say that I LOVE what I do. Being a small business owner has this stigma of lots of labor with no money coming in. I realized it doesn’t matter if people think that. My goal has been to impact the world. This is how I can do that.
Many nights I can’t sleep thinking about the kids I’m trying to help, how to raise more money, how to better market The Shine Project, how to better connect with you…and oh how the list goes on!
But then morning comes. And I’m EXCITED to start my day, excited to move forward, and excited to create something that didn’t exist before. More relationships, happiness, ideas, and motivation. I guess I can’t really sum up my “job” in a one word answer. But I don’t have to.
Come join me in my journey to change the world… I’m currently turning The Shine Project into a nonprofit organization and need all the outside support I can get!
I know most of you don’t do it fulltime, but how do you explain blogging to your friends/family? Come let me know HERE!
xoxox


Huge thanks to Ashley for sharing with us here on Truly Lovely!!! :)
She’s one of our favorites, so we’re positive you’ll enjoy her blog as well!


OH… AND if you’re looking for Fancy This Fridays, just scroll down to link up! 

Bloggie Bestie Blog Swap with Heather from A Mom Without Facebook

Good morning sweet friends!!
Yep…. You read that right…. this week’s Bloggie Bestie is 
Heather from A Mom WITHOUT Facebook!!
She is an absolute doll and really shares an intriguing story as to why she vowed to give up Facebook for a year, and how that vow changed over time! 
Please read til the end, you’ll be so glad you did! :) 
Then leave her some bloggie lovin’ and pop over to her place where I’m guest posting today! :)

Take it away Heather….
I’m absolutely honored to be here today. This is actually my very first guest post. Can we say rookie?! Rookie I am, but I am quickly learning and falling in love with this little blog world. So here goes.. and I’m sorry if this is longer than the typical “guest post.” I do hope you stay with me.

My name is Heather Hawthorne and I blog over at A Mom Without Facebook

I used to be a sports writer for my local paper, here in San Diego, covering everything from the X-Games to high school football, but when motherhood hit, climbing bleachers up to press boxes with a baby bump was just not in the cards. My writing was going to have to take a backseat. 
My amazing husband and I own a family auto repair shop and I also run my own spray tanning business along with being a mommy – the most important hat that I wear.

I started this blog in January of this year when I felt the Lord more than nudge me to put a halt to the biggest time waster in my life. Facebook. Not just for a small fast, but for an entire year. Funny thing was I felt compelled to blog about the journey. I remember putting up my last post on Facebook even asking for advice on what blogsite to use to start. I had never read blogs. Ever. Completely freaked out, because Facebook was part of who I was, I stepped out in faith and started. Ahh… it felt good to write again, I had to admit. So then I attempted to explain myself to my family, friends, and most importantly to my Facebook community where I had well over 900 “friends.” I posted my first blog post on Facebook afraid of what everyone was going to say. I got a mix of responses and then the very next day shut down my personal page. I had no idea where I was going, but trust me, it has been an amazing journey so far.. let me give you a glimpse..
At first I was a tad prideful, I’m not gonna lie. I really didn’t like a lot of things about Facebook, so I posted about them and how I was so happy to rid myself of Facebook. I knew Facebook wasn’t the “devil” but I also had this love/hate relationship when I thought about it. I posted about how much more spare time I had and how I was cooking more meals… bragged about how productive I was being. I quickly felt another tug at my heart that this was not the way I should respond. The Lord was the one that even put this conviction in my heart to start blogging, and if I’m going to listen to His calling, then I’m gonna darn well give Him the credit. So my blog was taking a new turn. As I was on this journey I was going to be writing and giving God the glory. I barely even knew what that meant. Slowly I was beginning to blog more about my faith, and not be afraid to get vulnerable. I went through some trials and some people close to me went through some trials and although not going into explicit detail, I poured out my heart into these posts. God was working on me.

On day 284 of being Facebookless I finally had my “aha! moment” with God. You can read this whole post here, and I encourage you to do so. It has brought me so much clarity. 

This is a bit of what I learned in that aha! moment…
Looking back, it’s funny how I used the word time waster. I think that was my clever way in my mind of shifting the blame of my own lack of self-control and instead, acting as the victim in many ways and saying Facebook was responsible.
For me, this issue with self-control has been long time coming… I have dealt with drinking more than I should, to being addicted to ephedra {diet} pills..among other things. Once I “managed” those issues myself, my lack of self-control showed up in different ways. Facebook being one of them.
I learned that in abstaining from what I felt was my “time waster” was actually more of a self-righteous act of sin management. That may sound harsh and you may be asking… what do I mean exactly? Well, let me give you a few examples that were given to me…
Say your husband has a problem with looking at pornography. While abstaining from it is a good thing hands down, it doesn’t stop the deeper issue of lust and discontentment that drove him to fall into that in the first place.

OR 

Working out and eating healthy is good, but it won’t stop you from dealing with insecurity. We will just find another thing about ourselves that we aren’t satisfied with. 
We make these checklists of “dos and don’t” in order to keep our sin at bay. I know the word sin scares some people. Some people don’t like to use the word. I don’t really like it either. But I think that is normal. We are supposed to hate sin. ☺ Sin is the falling short of the glory of God that we all have in our lives. It’s okay to talk about it! 
“for all have sinned and fall short of the glory of God, and are justified by his grace as a gift, through the redemption that is in Christ Jesus.” Romans 3:24. 
I realized in my first months of blogging that I did start to grasp the understanding that it wasn’t about Facebook in general, it was about my heart. I knew that, but I still wasn’t sure if I felt a change. The thing is, we can’t make this change our-self.
You can’t free yourself. It will only last a matter of time.
Rules can’t free you.
Practical tactics can’t free you.
Checklists can’t free you.
Methods, techniques, and boundaries can’t free you.
Different circumstances can’t free you.
Wherever you go, there you are.
People and situations do not determine our behavior; they provide the occasion where our behavior reveals our hearts. – Paul Tripp 
Only Jesus can. He already died on the cross bearing the burden of our sins. It is finished.
It comes down to this…

I don’t want a life that is just about self improvement.  
I want a life that is about glorifying God because only there will I find true freedom. 

Now that is something to “like”

Right now that’s what I truly feel in my heart. I feel free from the burden of self-control. I feel like I could get back on Facebook and with the Lord at my side I would be a different person. Not sure if I will, but I’ll cross that road when my 365 days are up. ☺
I encourage you to think about things that you spend your most time on…are they becoming idols? Is it really a deeper issue? Check yourself and ask God if there is something He wants to show you… somewhere He wants to do a work in you. It’s worth it. I promise. ♥
♥Heather Hawthorne


LOVE it! Told you it’d be worth it to read the whole thing. 😉 It was, right!?!?
Thanks so much Heather for sharing with us today and for being this week’s Bloggie Bestie!
Have a lovely day friends!!! And really think on Heather’s request there at the end. I will be. 

7 Creative Ways to Use Your Scarves {Guest Post}

Since it’s the first actual week of the Fall season, we have a FUN guest poster with us today to celebrate!
Meet Stacie! She’s going to share some fun new ideas for using all those Fall Scarves you’ve gathered over the years, around the HOUSE!
Besides wearing of course! 😉
Here’s Stacie!!!
____________________________

Hello! I am Stacie, and I am so excited to be posting for Kassi today. I am a new writer for Scarves.net and I have a few tips to share on some versatile uses for scarves that you may not have thought of. :)

7 Creative Ways to Use Your Scarves

When it comes to decorating, I’ve always been resourceful. I use a pair of deer antlers as a necklace holder. I stack suitcases to hold all the things I don’t use very often.

But one of my favorite things to upcycle and reuse are scarves.
Scarves are so appealing to me mostly because of their prints—a lot of times they are little works of art. By thinking outside of that *ahem, scarf box, you can turn your unused accessories into an eye-popping piece of home décor.

1. Table Runner. Drape a clean, long, rectangular scarf over a dining table length-wise.

2. Throw Pillows. Fold a scarf to a pillow-size and shape, and use color-coordinating needle and thread to hand-stitch a throw pillow cover. For those who are sewing-challenged, you can simply wrap the pillow for an equally chic effect.

3. Quilt. Sew old scarves together to create a useful and colorful blanket.

4. Wall Art. In an interesting frame, showcase a smaller scarf or a section of a larger scarf. I found this scarf at an antique fair and I just thought it was the cutest thing. I didn’t want to hide it in a drawer only to be worn occasionally, so I framed it!

Scarf Art

 5. Curtain Valance. Display a colorful scarf as a unique window valance

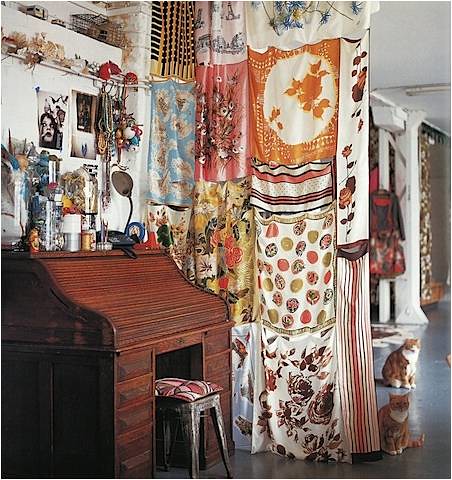
6. Drapery. Simply tack together some scarves to make a unique curtain between rooms. Thrift stores are a great place to find vintage scarves for really low prices.

Scarf Curtain

7. Liner. Use a scarf to line your jewelry box. This works well for scarves with holes or stains.

How to Store Scarves

Hopefully these tips will help you turn your scarf into a multipurpose work of art! Thanks again to Kassi for letting me write a post, she is a truly wonderful blogger. :)

____________________________

Stacie Grissom is a writer for Scarves.net where she writes about everything from how to clean a scarf to 37 ways to tie a scarf. In her free time, she loves to work on her DIY blog, run, and take lots of photos with her collection of old cameras.

THANKS STACIE!!! 

Those are some lovely ideas for making good use of that scarf collection!
What about you lovelies! Do you multipurpose your scarves?

Do You Wanna Be a Truly Lovely Bloggie Bestie???

So due to the craziness that was these last couple of weeks, there’s no Bloggie Bestie scheduled for today. 
Instead I’d like to share the links to some of our recent Bloggie Besties and extend an invitation to YOU to be a Truly Lovely Bloggie Bestie

If you’re interested in blog swapping with us, we do these every Thursday. 
As the weekly Bloggie Bestie, you get your blog button in the special BB spot on our side bar. 
<————————————
Over there. For the entire week. 

You also get shout outs on twitter! 
currently has 316 twitter followers that will see your mentions and link to your post. 

Mentions on the page. Currently at 103 Likees. 😉

AND, of course, a guest post spot on Truly Lovely! :)

We have had SOME fabulous posts through our Bloggie Bestie series in the past… What am I saying… They’ve ALL been FABULOUS!


Here are a few as of late… 

Ami of Alililly share a last week. 


introduced herself and some of her projects!


shared a pillowcase tutorial and an announcement about a GREAT cause. 
By the way, her Pillow Fight link up is now open! 
So please go link up your pillow related projects and donate a pillowcase! :)


It would be great if you had some time and are looking for some good bloggie reading… To go check out these ladies! They all are fabulous bloggers, with some GREAT posts! And would love new readers! :)

Also… I am looking for someone to design a “Bloggie Bestie” button! Either FREE or SUPER cheap would be great! :) Paying for a wedding is cutting into my blog budget! 😉
If you would be interested, let me know! 


Have a lovely rest of your week! 
And please pop by tomorrow to link up your fancies to the Fancy This Fridays linky party! :)

Bloggie Bestie Blog Swap with Ami of AliLilly

Happy Thursday lovelies!!!
For today’s Bloggie Bestie blog swap our LONG TIME BLOGGIE BESTIE, the lovely 


Ami of AliLilly has a FUN tutorial to share!!! 


Please leave her some bloggie love friends!!!
And when you’re done, check out my guest post over on her blog today!! :)


Here’s Ami!


Hello awesome TL readers!!!  It’s Ami with AliLilly stopping in!  


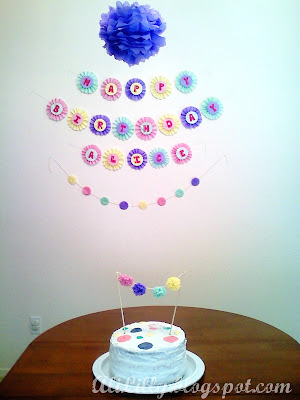
Now, since I was here a while back doing a swap with TL, I thought for the Besties Swap today, I would give y’all a fun little tutorial!!  Y’all know that Kassi is SOON to become a Mrs., right?  Did you know she is making tissue paper pom poms for her wedding??   I made some last weekend for my sweet Alie’s 3rd birthday party.  But I ALSO made some of the tiniest tissue paper pom poms for her cake.  I thought it would be fun to share that tutorial with y’all.  

SO, you could call this the “How to make the tiniest tissue paper pom poms ever!!! 


First cut your pieces.  I used a little cup for her plastic kitchen set to measure the width of the paper.  I knew the cup was about the size I wanted my pom poms to be.  I cut the tissue until I had 8 sheets laying on top of each other. 


Fold the sheets accordion style. 


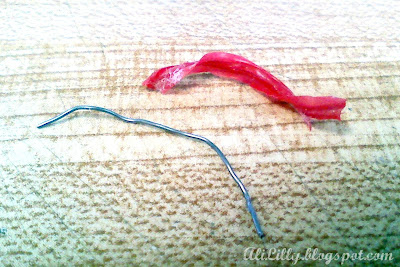
I took a few twisty ties and torn off the plastic to expose the wire.  Then cut the wire to fit. 


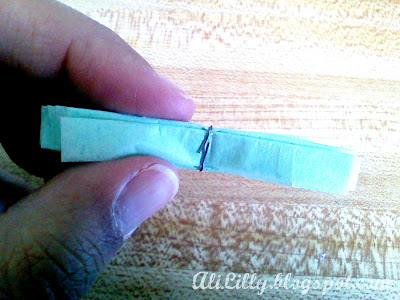
Wrap it around your folded tissue paper.


CAREFULLY lift up each layer of paper and spread out.


When your done you should have a bunch of these cuties!


I hot glued mine on to a strip of twine.


Tied the twine around some sticks…


and TA-DA!!!! You have a super cute pom pom banner cake topper!


Here is a few more pics which include my sweet lovely birthday girl herself!  My Alice Marie!!


The inside layers of the cake match all the colors of her party!!!  If you’d like to see that or up coming tutorials on the decorations of her party, please stop by my blog and say hello!!!
http://alililly.blogspot.com/


Thanks Kassi and Kayli for having me over today!! 


THANKS SO MUCH to AMI for being this week’s BLOGGIE BESTIE!!! 
And for sharing her tissue paper pom pom tutorial with us today!


Happy Birthday to Miss Ali Marie!!!


Have a lovely day all!!!


Bloggie Bestie Blog Swap with Alisha of All About Us

Good morning lovelies!!
Today we would like to introduce you to this week’s Bloggie Bestie,
Alisha from All About Us!
If you remember she shared to your account… If you haven’t already, please go do that so we can respond directly to YOUR comments. :)

Alisha is a sweetheart, a new mommy and a GREAT photographer!
If you are in the Phoenix area and need a photographer,
Alisha is the go-to gal! Check out her photography blog here.
Today she is going to share a fun photo editing tutorial with us!

Here’s Alisha!!
Hello there!

It’s Alisha here again from the blog All About Us.
I am back for another tutorial!
Kassi is over on my blog posting an awesome tutorial for my readers today.
So if you want to go see her post go here:

All About Us

As some of you might know, I am a new mom to the sweetest baby boy named Cameron.
Every month since he was born, I have been making him stenciled onsies and doing a little post about all of his milestones.
You can check out my monthly updates HERE and my tutorial on the stenciled onsie HERE. (This is Kassi interrupting… When you’re done here go check it out!!! SO CUTE!!!)
Today, I am going to show you how I edit those photos using Picnik.com.
In my tutorial, I am going to be using the free tools so if you don’t want to get an upgraded account, you can still use this.

Step 1:
Upload your photo and select the cropping tool under the edit tab.


Step 2:
Crop any excess off the photo using the 4×6 cropping constraints.
You want to make sure the picture is a good size to print in case you want to do that later.


Step 3:
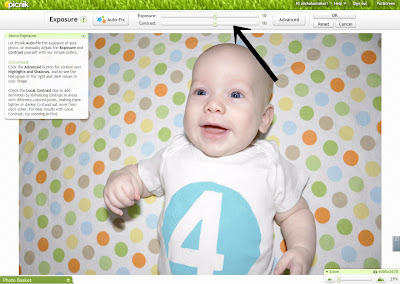
Click on the exposure tab and up the exposure and the contrast equally to a nice and bright color.


Step 4:
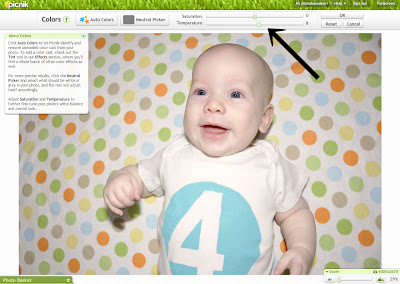
Click on the temperature tab and up the temperature.
You don’t necessarily need to do this to all photos but if there are people in them, you want to make sure they are not white faced.
Especially for a baby, which you’d want to look rosy and warm.


Step 5:
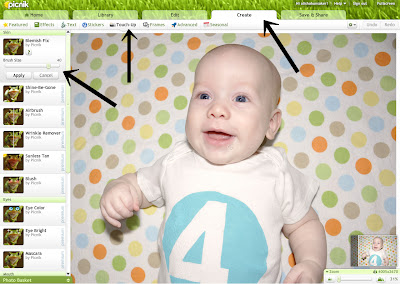
Go to the create tab, then the touch-up tab and use the blemish fix tool.
This is a pretty awesome tool to use when you are having a bad face day and don’t want everyone on the internet to know. Obviously, my baby doesn’t really need it.
There are also many free options under the effects tab, but I suggest keeping filters to a minimum.
Filters may be popular now but if you want to create timeless photos that last you forever, less is more.


Step 6:
Save your photo and share it around!
Isn’t he just the sweetest?!


I hope you enjoyed my tutorial and learned some things!
Thank you Kassi for having me and posting on my blog!
A HUGE thanks to Alisha for sharing her tutorial with us and for allowing me to post over at her place today as well!! :)
Don’t forget lovelies, the week of giveaways is still going on!!!
We’ve drawn one winner already with another to come late this afternoon!!
So, go get entered before it’s too late!!! :)