Archives for June 2011

Bloggie Bestie Blog Swap with Crystal of Homemaker in Heels

  We have a returning guest poster today for this week’s Bloggie Bestie..
The delightful Crystal of Homemaker in Heels!
Gotta love her blog name right!?! :)


Hope everyone is having a FABULOUS week!!! 
I’m busy getting wedding ready! 
9 days til the wedding!!!

Here’s Crystal!!!


Good Morning! My name is Crystal and I blog over at Homemaker in Heels.


You can also call my Crysta… :) I am absolutely tickled pink to be this week’s Bloggie Bestie!:) Sweet Miss Kassi is posting over at Homemaker in Heels today if you want to stop by and show her some love! :). She has got to be one of the sweetest, if not THE sweetest blogger I know! I’m not sure if you remember, but I was the Bloggie Bestie here a little while back. At Homemaker in Heels, I share the many ways I am turning my house into a home, one crafty decorating project at a time  (while wearing the cutest shoes possible;)). I share love finding ways to create home decor without spending a whole lot of money. My favorite projects are those that I can create for free! 

Today I am going to show you how to make your own table topiary tree.

Materials you will need:
 Spanish Moss
 Newspaper
 hot glue gun
 tape
 stick or wooden dowel
 newspaper
 small flowerpot

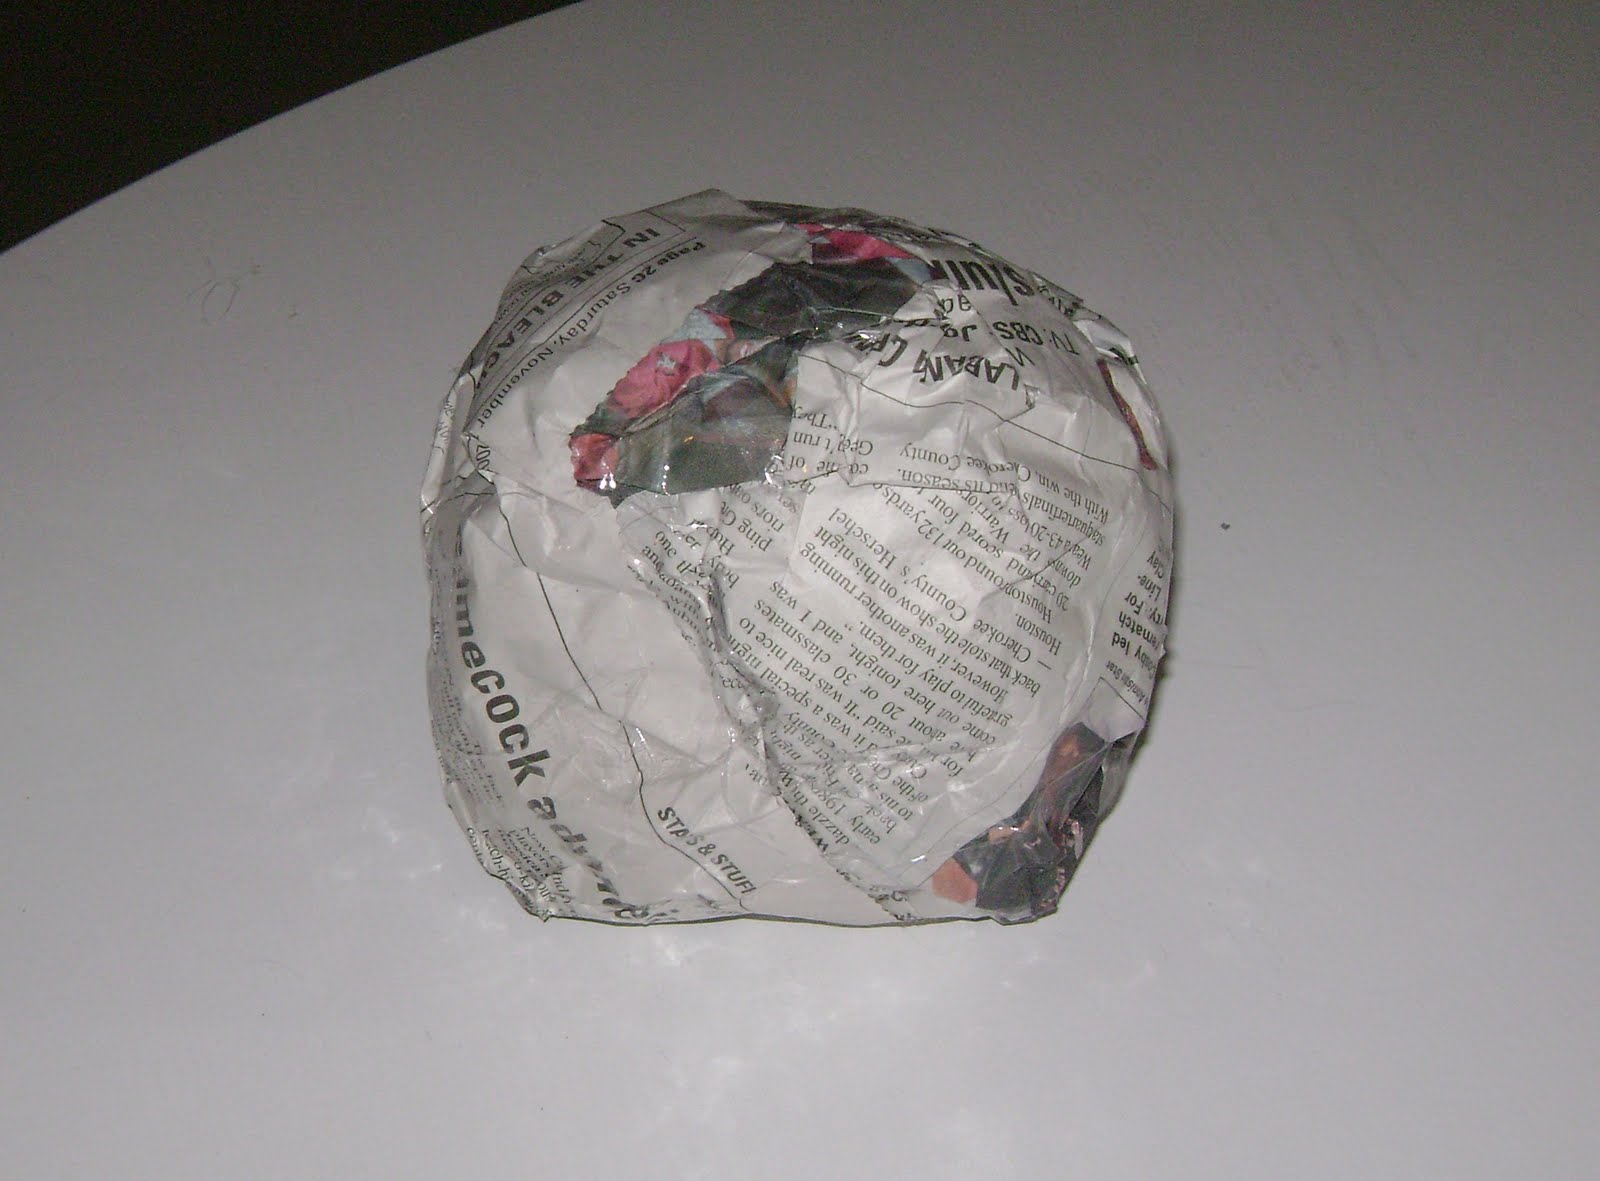
   First, crumble your newspaper in to a ball the size you would like for the top of your topiary to be. Next, secure the newspaper into the ball. I used wide packaging tape to do this. I left a small hole on one side for my stick.

   Now, just glue your Spanish Moss onto the ball until it is completely covered.  Use your glue gun to secure the ball onto the stick/ dowel to create your little tree.
   To secure your tree into the flowerpot, you can either use newspaper or foam. I used newspaper and just sort of stuffed it into the flowerpot and then glued some more moss to cover the newspaper.


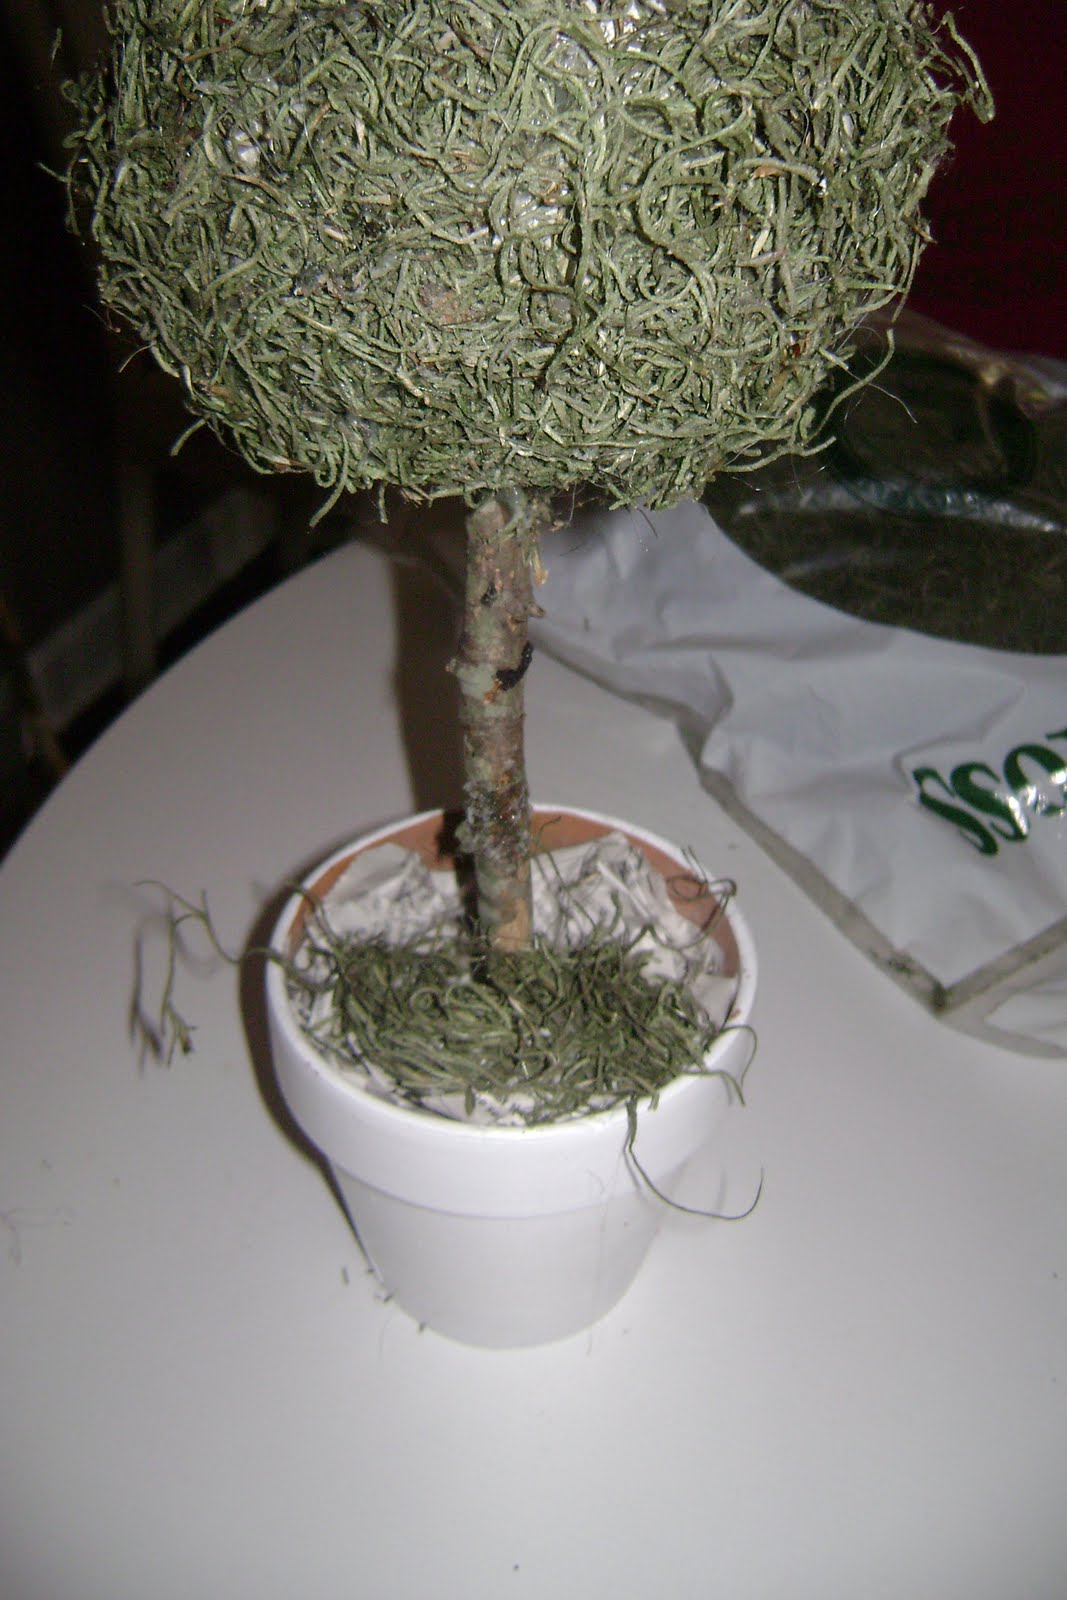
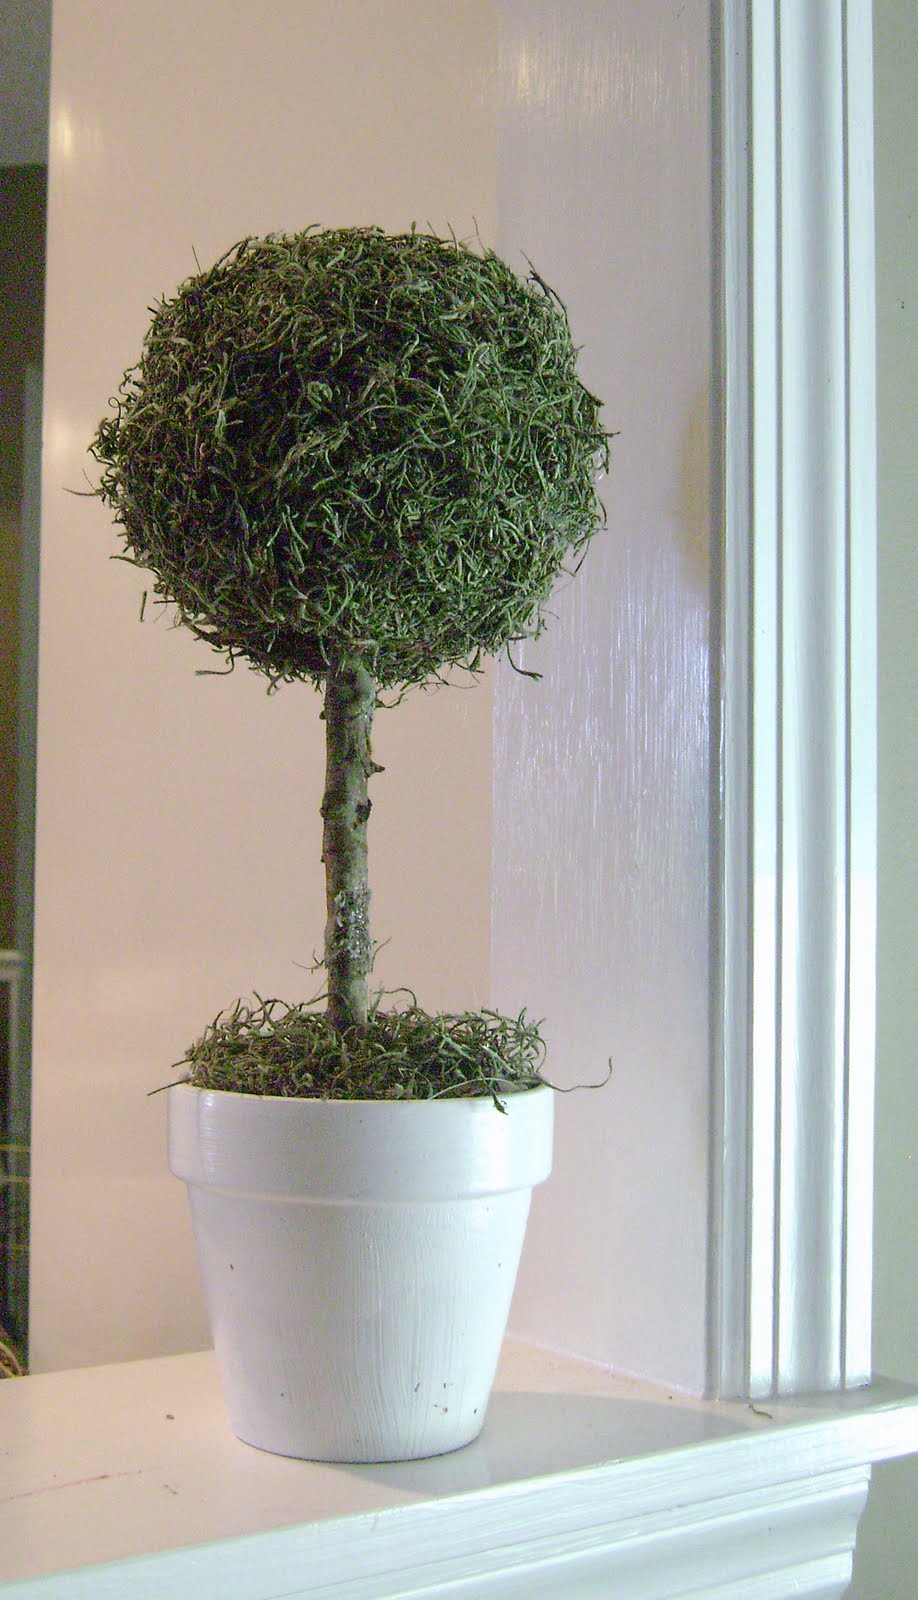
   Now I have a cute little topiary and it didn’t cost me anything at all since I already had the moss from a previous project. I hope I have inspired you just a little. :) Feel free to stop by Homemaker in Heels and say hello any time at all! I absolutely love meeting new people and making new friends! :) 
I hope you all have a wonderful day!


THANK YOU CRYSTAL for the lovely tutorial! Isn’t that topiary awesome!?!
And thanks for being this week’s Bloggie Bestie on Truly Lovely!!
Crystal is the best!! Hope you’ll go pay her a visit after you leave her some comment love here! :)
Have a lovely Thursday sweet friends!!


And please, if you haven’t yet, vote for Truly Lovely for blog of the month on For The Love of Blogs! THANKS!


Easy Pasta Salad

For a family get together recently I was given the task of pasta salad. 
I don’t know about you but when it comes to taking a salad to a party… 
Easy and quick is the best route for me! :)

So… I made an easy and quick pasta salad!


Recipe:
1 Large package of Rotini noodles
Half a bottle of Zesty Italian Dressing
Several sliced black olives
1.5 cups of grated mozzarella cheese
And just for fun…
0.5 a package of Hormel Mini Pepperonis

***

Mix all ingredients together in a large bowl and chill for at least an hour. 

Now you’re pasta salad party ready!


Happy Tasty Tuesday!

Linking to FTLOB!


Monday, Monday!

Happy Monday lovelies!!

I came back from the weekend with a VERY pleasant surprise!!!
Truly Lovely is one of the nominees for Blog of the Month over at 
For The Love of Blogs!!! :)
YAY!!!

I want to say a HUGE thank you to the sweet girls, Kym of Travel Babbles and Lisa of the Joyful Jones who nominated us for this lovely honor. :) 
Thanks so much ladies!!!

Now it’s up to you all!!
Please go vote for Truly Lovely as Blog of the Month! :)
We would be forever grateful, of course!
You can click this button to take you to the voting poll.


There won’t be features this week from the Fancy This Fridays last week because I was pleased to co-host the and chat at For the Love of Blogs. 
There are 116 link ups so far and it’s still open… 


I’m telling you friends, if you’re not a member, you should absolutely go check them out and join! :)
They do lots of fun link ups, chats and there’s a HUGE summer giveaway bash coming all through July and August! 
By the way… I will be giving away some Scentsy credit to my website one of the days during the Giveaway Bash!!! So watch for that! 😉

Hope you have the loveliest week! 


P.S. You can also find Truly Lovely here:
* *

Fancy This Fridays Meets Friday Coffee Talk at FTLOB

Happy Friday lovely friends!!! :)

So, we’re doing something new today for Fancy This Fridays… 
I am EXCITED to be co-hosting Friday’s Coffee Talk over at For the Love of Blogs today!!


So when you link up here your link will also show up on For the Love of Blogs! 
If you haven’t heard of it already, or haven’t yet signed the pledge… 


Do check it out! It’s a GREAT blogging community where I have met a large number of my really great bloggie friends!


After you’ve linked up, I hope you’ll pop over to FTLOB to join in the Coffee Talk chat!!! It “officially” starts at 1pm Eastern time, but you can leave your input in the comments section all day today! 
All participants of the chat will be entered to win an 
EXCITING Coffee Talk giveaway! 
It could be a Starbucks or Dunkin Donuts gift card, coupons for coffee items, or other coffee related surprises! :) Pop over to FTLOB to see what it is! 


Until then… You can link up here!! 
Can’t wait to see what you all have been up to this week!!!
Have a lovely day!!!

Bloggie Bestie Blog Swap with Joni of The Little Beaches

Happy Thursday Friends!!!

Have we got some AWESOME Bloggie Besties lined up to introduce to you!!!
My brought in some FABULOUS bloggers to share with you all here on Truly Lovely!!!

Today we would like you to meet a LONG time sponsor of our little blog, the lovely Miss Joni of The Little Beaches!


She’s a SUPER fun mommy to a SUPER cute little lady and has a GREAT tutorial to share!!! 
This is her first every blog swap, so please leave her some bloggie love!

And when you’re finished, I’m over at her blog today with a BRAND NEW, NEVER been seen before guest post! 😉
Hope you’ll pop over to say hello!

Here’s Joni!!!


My name is Jonique’
Most people call me Joni!


I am a wife to the most amazing man alive
The mother to the cutest, sweetest and most loving little girl.


I craft, I play dolls, I can make a mean pony tail and I love to bake.


The AMAZING Kassi let me blog swap with her today!
This is my first swap so be easy on me.


My little 1 year old is OBSESSED with the kitchen.
All my drawers are unorganized I am missing half my measuring spoons


I have to sweep at least 2 times a day


and our backyard looks like a mini kitchen- with cups, spoons and towels my little lady takes outside.


So my goal of preventing at least my towels form making it outside is to make this little beauty.


What you need:

  • Velcro
  • Sewing machine
  • white or any color of thread
  • towel(s)


Directions:

  • Take your towel lay it flat and place one of the Velcro pieces on the end of the towel
  • Sew it on there
  • Take your other end and sew the other piece of Velcro to it. 
  • **Make sure that you place the Velcro on the correct side of the towel so that it will stick together.
  •   Then Walah!

 – I know I am bad at directions you should see me drive but I didn’t take pictures.


Thank you Kassi for letting me swap with you today!
And everyone else thanks for reading!
Come Visit us at www.thelittlebeachs.blogspot.com


Thank you Joni for sharing this WAY handy tutorial!!!
I bet this saves A TON of kitchen towels from the backyard! 😉
Have a GREAT day friends!!

See you tomorrow for Fancy This Fridays!!


Bye UGLY Green Front Door

I’m not a green person. I have nothing against green… 
It’s just not MY color… :)
So… When we bought our house, that UGLY green door was the first thing that needed to go. 


More than once while talking about our house we heard, 
“Oh, the one with the ugly green door…” 

Yep.. BYE BYE Green door
Hello, crisp lovely white door.
It’s easy to paint a front door I learned. It just takes time. 
AND lots of patience from the fiance to have to put on and take off the door knob and lock over and over.

Enter a trip to Home Depot for Kilz Primer and Behr White Exterior Paint. 
Oh.. and a paint roller, brush, etc. 


 Thank goodness we decided to go ahead and get the primer! 
It would’ve taken SEVERAL coats of the white to cover up that green

After the primer
It’s already looking better, right?! :) 

After the final coat of white paint. And putting the door knocker/keyhole back on. 
The knocker/keyhole back in place
We replaced the old GOLD door knob and lock with shiny new steel hardware!
The knocker and knob didn’t even match before!!! Now they do!

From old to new!
And for the final touch I added a Command Brushed Nickel Hook to hold our Welcome sign!
(A Christmas gift that we hadn’t gotten to use yet! Thanks Meg & Kenny!!)


So, what do you think? 
I know there were several who said they LIKED the green door. 
But really, with the colors of the house as they are, it wasn’t working. 
And I DIDN’T like it. Which is what matters, right?! :)
White is MUCH better!


Maybe someday we’ll paint the whole house and it’ll get a new color… until then, this works for me!
Can’t wait for all the Holiday wreaths and door hangings to come! :)

“Smoked” Pork Chops

I received an interesting gift at one of my bridal showers recently… 
Liquid Smoke seasoning.


It came in a bag with all of the items to make a Hawaiian Meatball Recipe from my soon to be sister-in-law, Arina. :) 
Aside from the meatballs, I wasn’t sure what else to use it for though… 
So I decided to experiment. 
It says you can use it for steaks and what not on the bottle, so I thought… How about pork chops!
Forgive me if this is an old idea… but I came up with it on my own, no cookbook needed, so I was kind of excited. :)


All I did was put a few drops on each pork chop and rubbed it around with a spoon to make sure they were fully covered. I let them set for about 30 minutes so that the smoke seasoning could sink in a little, 
then just fried them in a skillet with a little vegetable oil.

After awhile I sprinkled them with a little bit of black pepper just for good measure… 


And viola! 
“Smoked” pork chops on the stove!

And they were delicious! 
I like a lot of flavor in any meal and the liquid smoke really adds A LOT of smoky flavor. Like a good BBQ! 

Happy Tasty Tuesday!
Linking to For the Love of Blogs, here…

"Smoked" Pork Chops

I received an interesting gift at one of my bridal showers recently… 
Liquid Smoke seasoning.


It came in a bag with all of the items to make a Hawaiian Meatball Recipe from my soon to be sister-in-law, Arina. :) 
Aside from the meatballs, I wasn’t sure what else to use it for though… 
So I decided to experiment. 
It says you can use it for steaks and what not on the bottle, so I thought… How about pork chops!
Forgive me if this is an old idea… but I came up with it on my own, no cookbook needed, so I was kind of excited. :)


All I did was put a few drops on each pork chop and rubbed it around with a spoon to make sure they were fully covered. I let them set for about 30 minutes so that the smoke seasoning could sink in a little, 
then just fried them in a skillet with a little vegetable oil.

After awhile I sprinkled them with a little bit of black pepper just for good measure… 


And viola! 
“Smoked” pork chops on the stove!

And they were delicious! 
I like a lot of flavor in any meal and the liquid smoke really adds A LOT of smoky flavor. Like a good BBQ! 

Happy Tasty Tuesday!
Linking to For the Love of Blogs, here…


Fancy This Features #29

Happy Monday AFTERNOON! 
Forgive me for posting late… Today has been a busy day. 
After a busy weekend of course!!! 
But it looks like you all were busy, busy bees last week too! 
We had 32 link ups! 

For this week’s features.. 
Here are a few of the ones that really caught my eye!

Check out this gorgeous upholstered headboard from Becca at From Gardners to Bergers!
She shares other posts on the planning and material seeking as well! 


Do you crochet?? If you do, or even if you don’t, you’ll want to check out this ADORABLE crochet crocodile pattern created by Annemarie of Annemarie’s Brieblog!
While you’re there, check out her amazing blog! She writes everything in English AND Dutch!!

And finally… A Father’s Day idea for next year… 
How creative is this wall art for dad! It celebrates all of the interests of
Each item represents an interest!! SO neat!!!


Here’s a featured button for you three lovely ladies! 
Hope you’ll display it on your own blogs somewhere!
It links right back to this post so your readers will know where to find you!


Thanks to everyone who linked up this week! 
Excited for next week’s link ups as we get closer to Independence Day! 
I’m sure the red, white and blue will be flowing soon!
Have a LOVELY week friends!!!

Good Fortune

I cleaned out my purse the other day and I found this fortune 
that I have been carrying around with me for weeks!! 


Perfect. :)

Have a great weekend friends!