Market Tote and Clutch Set

Since Mother’s Day is long gone for 2012 and we’re actually approaching Father’s Day, I decided it would be safe to share the gifts I made for my Mom and Tammy  (hub’s step-mom).

I have really been enjoying sewing lately and was excited to create a handmade gift for each of the mothers in our life!

zip top clutches

I sewed two zipped clutches based off this Michelle Sewing Pattern. The only difference in the two was the color of the zippers. One was black, one was white.

I also made my mom a market tote using a Market Tote Simplicity Sewing Pattern.
I was excited that the black paisley fabric and purple floral accent fabric paired so well together!
The lining of both the clutches and the market tote was the purple floral.

fabric tote

Inside each clutch I also included a brand new Layers by Scentsy shower gel for an added surprise!

These were so fun to make! I really enjoy giving handmade gifts!
Hopefully they were as gladly received as they were lovingly made! 😉

handmade tote and clutch

So what about you? Do you like to sew? Enjoy gifting handmade?

Happy sewing lovelies!

Linking this here and here and .

P.S. We’d love if ! Thanks new friend!!

My Handmade Market Tote

I have been doing a lot of sewing lately… So, today, I would love to share my most recent sewing endeavor with you dolls!!! I made this tote a few months ago and have been carrying it with me everywhere! :)

This post was first shared on Momma Go Round. Thanks Nina! :) 

My favorite accessory is always a good bag! I carry a purse or tote with me every single day! :)
I’m also really, really picky about the bags I carry… If I find one I love I will wear it completely out before going on the hunt for a new one!

So, I was due for a new bag… but instead of shopping around for weeks, I whipped one up! :)

I’m not going to give you a rundown of how it was made… If you want to make one, the pattern is available in most craft stores or online (Simplicity W2420).
But I am going to tell you that with a couple yards of fabric and my sewing machine I made myself an accessory that I’m just as proud to carry as any $100 bag!

The reasons I’m so proud of this tote? I saved my family the money it would’ve taken to purchase a more expensive bag… I made myself something that I can actually use and enjoy! All while staying in my budget!
We’ve all read how Nina (of Momma Go Round) stays within her shopping budget by carefully shopping for just the right item. Well in this case, I MADE myself just the right item! :)

Maybe you’re not a seamstress… But you can just as easily make yourself a beautiful beaded necklace or dye that faded pair of blue jeans into a bright pink pair that’s become so popular. 😉 It’s totally doable friends!

I’ll be back next week with the market tote I made for my Mom as well as a little something extra! :)

Happy Sewing Sweet Friends!!! 

Linking this here and here and .

P.S. We’d love if ! Thanks lovely!!

Bloggie Bestie Blog Swap with Maggie of Midwestern Sewing Girl

Hey friends! We are so excited to introduce you to…

Maggie of Midwestern Sewing Girl today!!!

She is just lovely and we are sure you’ll enjoy her fun wallet tutorial! I know I’ll be making some of these ASAP! :)
I’m over at her place sharing a tutorial as well. Hope you’ll stop by and check out her blog… It’s one of my ABSOLUTE favorites!!!

Here’s Maggie…

Yay! I’m so excited to be here at Truly Lovely today! Kassi is awesome (as I’m sure you already know), and I was so excited when she agreed to “blog swap” with me!

Here’s a little bit about me…my name is Maggie and I blog at Midwestern {sewing} Girl. I love to craft, cook, bake, scrapbook and redecorate our home…I would love to have you come stop by sometime!

Now, I don’t know about you, but one of the things I hate doing during summer is carrying around a big ol’ purse. Not only does it get in the way, but I’m always so afraid I’m going to leave it somewhere. And I’m not even going to mention how hard it is to get sand out of it if I take it to the beach…yuck.

My solution? A tiny little wallet that holds just the essentials…wanna learn how to make one?

This is a great project to use up some of your fabric scraps…and the completed wallet can be shoved into your back pocket or beach bag without getting in your way…

Here is all you will need to make this little summertime wallet…

*2 pieces of fabric at least 12″x5″

*fusible interfacing

*a sewing machine (or a needle & thread)

*scissors

*a ruler

Now let’s get started…

First, cut your fabric & interfacing following the diagram below…

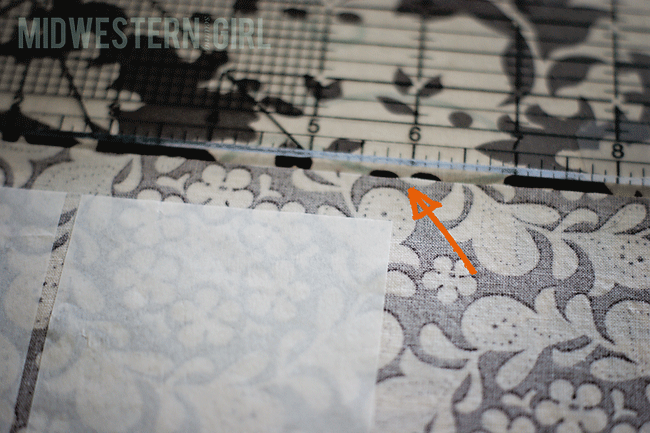
Next, take either your main fabric or your lining fabric, it doesn’t matter, and lay it right-side-down on your ironing board. Take one of your larger (3″x4″) pieces of interfacing and adhere it (per the manufacturer’s instructions) just to the left of the mid-point (6″ mark) of your fabric (right where the orange arrow is pointing). Leave about 1/2″ of fabric on both the top and the bottom of the interfacing…

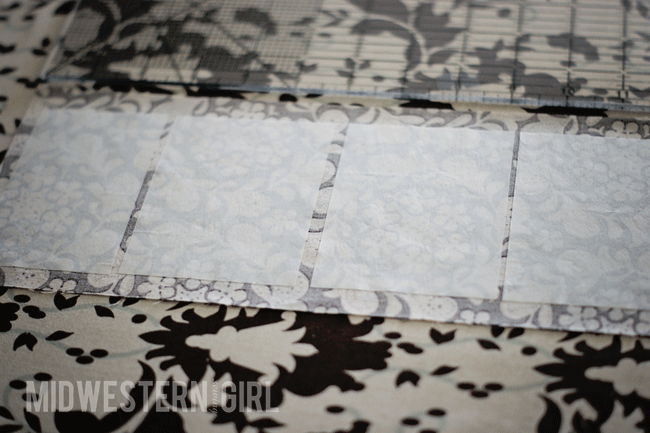
Lay one of the smaller pieces of interfacing about 1/8″ to the left of the first piece…again leaving about 1/2″ of fabric on both the top and bottom of the fabric. Don’t worry about measuring the placement of these pieces…it’s really not necessary for them to be perfectly placed…”close enough” is good enough.

Now do the same thing with the other two pieces on the right-hand side of the fabric…

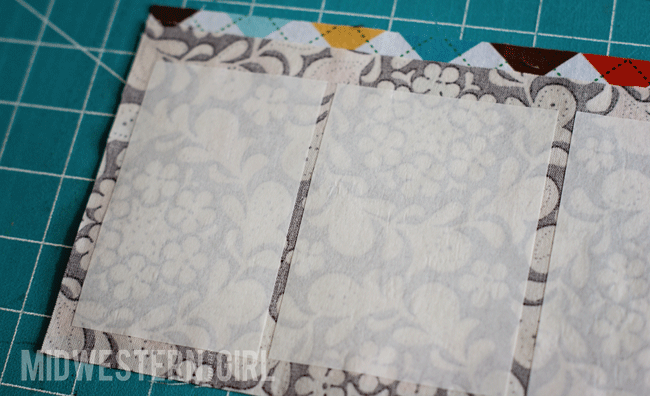
When you’ve adhered all of your interfacing, take your fabric (still right-side down) and place it on top of your other piece of fabric…make sure the fabrics have their right sides together…

Line up all of your edges and pin them together if necessary. Then sew around all four sides…using a 1/2″ seam allowance. Leave an opening of a couple of inches across one of your short sides (this will be where you turn your wallet so that the right sides are facing out).

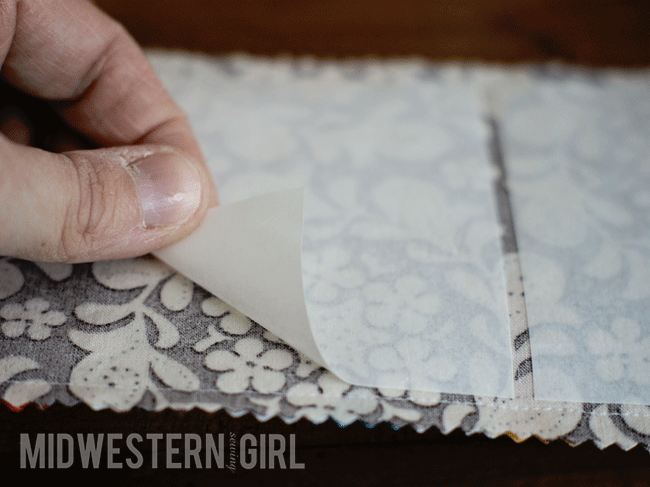
Next, remove the paper from your interfacing…you should see a sheen where the interfacing sticky stuff has adhered to the fabric…

*Next, get me a manicure…holy cow, how yucky…*

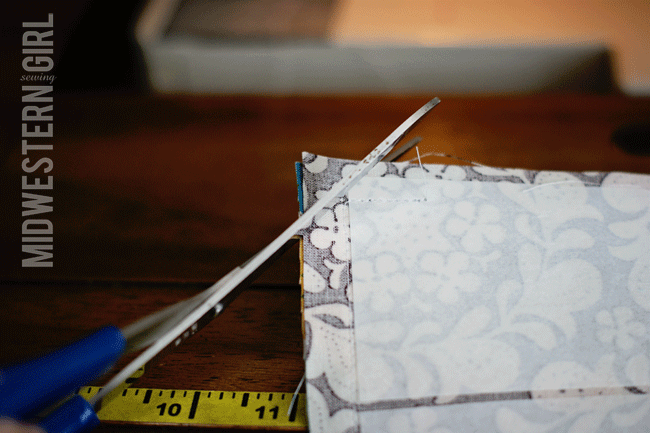
Back to the tutorial…clip the corners of your fabric rectangle…making sure NOT to clip any of your stitches…

Now, turn your wallet right-sides-out, using a chopstick or something similar to push the corners out…

Bring your fabric back to your ironing board…iron the little pouch flat…and make sure to turn in the edges of the opening on the side, so that you have a nice crisp, straight rectangle…

Once your fabric is ironed, sew the open edge together…as close to the edge as you can…

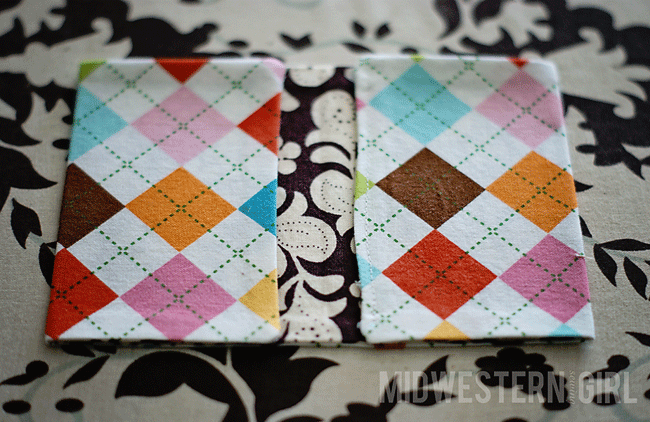
Bring your fabric back to the ironing board (again), fold it in half (making sure to keep your main fabric on the outside), and iron it.

Open your fabric back up again…take each short side and bring it in toward your middle fold…not all the way to the middle, just close…leave about 1/2″ on either side…and iron again.

Almost done!

Sew down each long side of your fabric…with about a 1/8″ seam allowance…don’t forget to backstitch when you start and finish…


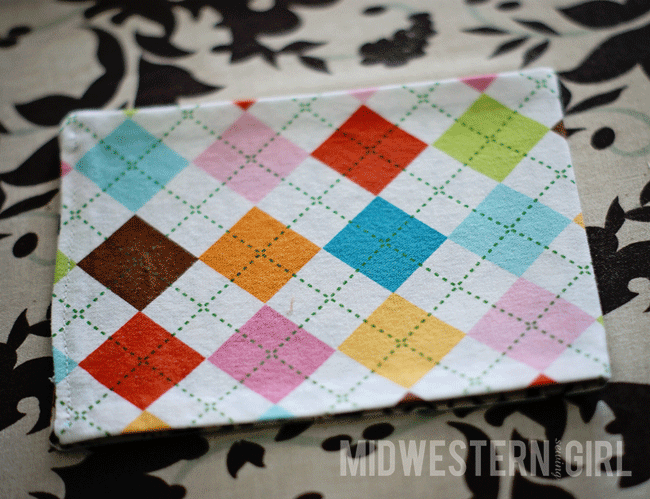
Now, fold your little wallet in half, and you. are. finished!

Woo hoo! Not so bad, huh?

These come together really quickly once the fabric & interfacing is all cut…

I think I’m gonna make some for all of my mommy-friends for Mother’s Day…

Fun and easy…and practical!

Thank you so much, Kassi, for letting me guest-post today!

Thank YOU Maggie for sharing your fun idea with our readers today! AND for being this week’s Bloggie Bestie on Truly Lovely! You’ll notice Maggie’s blog button over on our sidebar… It will be there ALL week, so if you don’t have a minute to check her site out today… It will be there when you come back by! 😉

Happy Sewing lovelies!!!

Scribble Shop Challenge – A Princess Doll Bed

Hello there lovelies! First… HAPPY FIRST DAY OF SPRING!
I’m excited to share my Scribble Shop Challenge project with you all today!
Remember about the challenge and the supplies I received?

Here’s a refresher in case you missed it…
I was sent a box of crafting supplies from the online craft store. The challenge was to make something using as many of the supplies as possible. Winner of the challenge gets a prize! :)

The supplies I received included:


And of course, some yummy chocolates! :) I also made good use of the cardboard box the supplies came in AND the packing peanuts that were inside the box!

After weeks of debating the best project to try I decided on a doll bed. I’m an auntie with no kiddos of my own yet and a limited toy selection at my house… So when the nieces and nephews come to visit I need more kid friendly entertainment!

To get started I cut the flaps off the cardboard box and made a doll headboard pattern on one flap piece by penciling on the design I wanted, then cutting it out with scissors. I traced the pattern onto one end of the box as the headboard, then on the other end (a little lower) for the foot board and carefully cut them out with an .

The freshly cut out box then received a coat of the chalkboard paint.

While my box was drying I sewed together the square pieces of fabric into a small baby bed blanket and ‘mattress’ cover. Because every princess needs a feather pillow, I stuffed two of the squares with feathers, then sewed them together as well.

A plastic bag stuffed with the packing peanuts, then tied closed makes a ‘mattress’ fit for a princess.

The princess bed received some pretty embellishments in the form of the Martha Stewart Glitter, the glitter brads, and some carefully placed feathers in blue and yellow (to match the bedding of course). Finished, all our princess bed needed was a princess girl and her princess dolly to test it out!

So, there you go! My Scribble Challenge Princess Bed! The only thing I didn’t use was the wool roving… SO my question to you is, HOW would you incorporate that into this project??
I did use the packaging though… So that should count for something… hahaha!

Oh, and of course, once our princess tried out the princess doll bed, we all shared the yummy chocolates!

Don’t forget Truly Lovely readers get 15% off your ENTIRE order at  through April 3oth using code TRLYLVLY. You can follow Scribble Shop on ,  and  as well!

Happy crafting lovelies!!!

Linking this crafty project to here and here and .
I wrote this post as part of a paid campaign with ScribbleShop.com and Blueprint Social.
The opinions in this post are my own.

Bloggie Bestie Blog Swap with Anshu of Blooms and Bugs

Good morning dolls!!
Today we’d like to introduce you to a new Bloggie Bestie of the week! 
Meet Anshu of Blooms and Bugs!!!
She has a darling skirt tutorial to share with you lovelies today! Please share some love with her here, then pop over to her place where I’m sharing a tutorial as well! 😉

Here’s Anshu….

Hello Truly Lovely readers. Kassi has got a truly lovely blog going here and I have been participating in her linky parties ever since I started blogging. So when she mentioned that she is looking for Blogging Besties I jumped at the chance.

A little (too much) about me…
I’m Anshu and I blog about my adventures with needle and thread over at Blooms And Bugs (and have so much fun doing it). I’m an engineer by education but it might have backfired because I’m mostly technology averse (or so my hyper techie husband thinks…more on that later). I’m also mom to an energetic 2 year old who feels no obligation whatsoever to try on whatever I sew for her. Frustrated, I opened an for little girls so I could sell my lovingly made clothing to other moms (so they get as frustrated as I am while trying it on their daughters…lol). My dream is to find my daughter buying one of the items from my store and wear it with pride…A woman can always dream, right?

Visit me at Blooms And Bugs, for sewing tutorials, project ideas and whenever you have way too much time to hear me rambling incoherently…about sewing, family etc. Yeah about the husband…he’s a technofile both by education and at heart and tries his best to sneak in technology upgrades in my workspace whenever I’m not looking. I, of course, get upset at all these attempts and get mad at him initially and later wonder how on earth I could live without this cool widget/gadget (but never tell him that much).

This sail away skirt came with me for this Bloggie Bestie post. She wanted to show herself off at Truly Lovely…so I prepared this tutorial.
This skirt is made with 3 coordinating knits and is embellished with a grosgrain bow.

Sail Away skirt in size 2T 

Supplies:

3 coordinating knits

Knit 1 – 24 inches wide X 7.5 inches long
Knit 2 – 36 inches wide X 5.5 inches long

Knit 3 – 36 inches wide X 4.5 inches long

Grosgrain Ribbon (5/8 inch wide) – 10 inches

Elastic (1/2 inch wide) – 19 inches

Construction:

1.


Cut three wide strips from 3 coordinating knits. Strip 1 is 24 inches X 7 inches. Strip 2 is 36 inches X 6 inches and strip 3 is 36 inches X 4.5 inches.

2.

Sew the shorter ends together on all the strips (right sides together)

3.

Fold the Strip 1  quarter inch inside an sew a seam.
Sew a seam on one side of Strip 2 and Strip 3 each with the longest stitch length, pull the bobbin thread to gather each of them until they both become equal to Strip 1.

4.

Baste the Strip 3 (the one you plan on becoming the inner layer of second tier) to the raw side of Strip 1 ( Wrong sides together). Yes these will be joined wrong sides together.

5.

This is how it will look from the right side once you’re done.

6.

Baste Strip 3 to the Strip 1 (Right sides together this time) Try to align the side seams on Strip 1 an Strip 3 while you’re at it, though its not that important.

7.

This is how it will look once both layers are attache to Tier 1. Top-stitch along the seam. I used zigzag to do it, but I would just do a straight if I were to do it again.

8.

Fold the top of the skirt 1 inch again. Sew a seam while leaving a gap of 1 inch to insert elastic. Insert the elastic and sew the opening shut.

9.


Make a bow using three ribbon pieces as shown by pics above.

10.

Hand sew it to the waistband of the skirt. Finish the raw edge of top layer with a rolled hem. Finish the inner layer with by folding the raw edge twice.

Now go make some sand castles…or chase some butterflies! Sail away!

Isn’t that skirt ADORABLE!?!?! We LOVE it! :) 
Thanks to Anshu for sharing her tutorial with us today and for being the Bloggie Bestie this week!
Interested in being the Bloggie Bestie?! ! 😉

Have a lovely week dolls! Happy Sewing!!!

Handkerchief Pillow Covers

We used turquoise and pink handkerchiefs as part of our table centerpieces in our July wedding. See…

You can see them on the tables here while Kayli is about to give her toast. 😉

I wanted to come up with an idea to reuse them after the wedding, and this is attempt number one!

I used two handkerchiefs for each pillow cover and two 16 inch pillow forms. 
I started by cutting one of the two {for each pillow} handkerchiefs exactly in half. 
I pinned and then hemmed the inside edges of the two halves on my sewing machine. 
Then I pinned the two halves to the other full, uncut {for each pillow} handkerchief. 
I slightly overlapped the two halves to make the envelope backing of the pillow cover. 
Once they were pinned, I sewed the two handkerchiefs {one halved, one full} together around the outer edge using my sewing machine. 
Flip the sewn pillow cover inside out and iron. Then stuff with a pillow form. 
On one of the pillow covers I added a ribbon to tie the open edges closed just for some added interest. 
I simply sewed it to one side, cut slits in the other side and tied it through in a bow. 
And there you have it!!!
Two handkerchief pillow covers with sentimental ties to my wedding day!

Happy crafting lovelies!!! 


Linking this here and here and .

You can find me….

Here today….


I’m sharing a brand new tutorial on how I turned handkerchiefs from my wedding centerpieces into pretty pillow covers!
Hope you’ll take a minute to pop over and say hello!

Cowboy Boot Christmas Stockings

Hello lovelies! Are you all getting into the holiday spirit?
Or are you like my buddy Bethani and had Christmas chains hung up in your house for weeks??? 😉
Well our house is completely decorated!
I’ve got another post planned for later to show you all of my decorations, but this one is about those stockings.
You know… the ones hung by the chimney with care and what not. 😉
I made our own Cowboy Boot Christmas Stockings this year!
Sure, they’re a little more pointy toed then I planned… haha. But I love them anyway. :)
I drew a cowboy boot on a big piece of cardboard for my pattern.
Sort of modeling it after my own .
Next I cut it out, traced it onto a pair of the hub’s jeans and a pair of my own jeans.
Don’t worry… they were in rough shape to begin with…. Didn’t use our best pair or anything. 😉
Traced the boot onto some green and red Christmas fabric for the lining (and some quilt batting) and cut those out.
making a Christmas stocking
Then I followed the basic instructions from for sewing the layers together and knowing which layer went where as far as the stuffing, the liner, etc.
I made my ‘hanger’ out of a strip of denim cut from the jeans as well. Taking care to make sure it was pointed down and inside per the instructions in that stocking tutorial I shared above…
And viola! I whipped them out in a couple nights of cutting and pinning fabric, then sewing on my trusty Singer. :)
What do you think???
A few things I learned… 
If you want square toed boots without the pointy look make your toes on your boot pattern much thicker.
When you sew them together it thins them out a little bit.
Obviously. :)
Also, if you’re using denim jeans for your base material, the inside seam of the jean legs make a great side boot seam! Really makes them look more like cowboy boots. :)
Happy Holidays sweet friends!!!

Personalized Initial Tote Bag

Hello dolls!!!
Looking for a fairly easy sewing project/Christmas gift idea?
How about a personalized initial tote bag???

personalized tote bag
I made two of these for my sisters in law so far and each one was fairly easy to put together.
(They were birthday gifts that they’ve already received… so no worries on a spoiler alert! haha)
Each one was also completed in just about half an hour.
You could easily whip up several of these for your loved ones this Christmas!
First, I used some of the sew-able interfacing from Silhouette America, cut it down to the size of my fabric and ironed them together per the instructions on the interfacing package.

iron on interfacing
Then you can use your Silhouette SD, Cameo, or other cutting machine to cut out your fabric initial. Or if you don’t have a cutting machine, you can trace then cut an initial with scissors.

Silhouette SD cutting fabric

Once it cuts the initial out and you peel away the extra fabric, you’ll have your letter to sew on to your tote.


The interfacing is meant to be ironed on to hold down whatever you are planning to sew on, until it’s sewn of course.
So… you’ll need to iron the initial to the tote, then you can start sewing.

iron on interfacing
Be careful while sewing not to sew one side of the tote to the other… Not that I’m speaking from experience or anything… I may or may not have done that with a pillow cover recently… 😉

sewing an initial tote bag
Once your initial is sewn on you can add some pretty embellishments like rolled fabric rosettes or ribbon around the top. For the ribbon I just hot glued one end on to hold it in place, then sewed around the top and bottom of the ribbon.
I used for my rosettes, but here’s a little tip I just figured out…

fabric rosettes
If you want an idea of how the rosettes look before gluing or sewing them on… Pin them to your tote first, then you can rearrange them to your liking BEFORE affixing them! 😉
That may sound silly to some of you, but to me that was monumental! haha

personalized tote bagpersonalized tote bag
There you go! :)
You can now stuff with goodies or gift as is for a fun personalized gift your recipient can use all year round!
What are you hoping to receive this Christmas???
P.S. Linking this here and here and .

Ruffled Fleece Pillow Cover

Hello friends! :)
Remember for my wedding I made my bridesmaids ?
Well, I have about a yard or so of material left from almost every one… 
So I made a pillow for Kayli to match her paisley fleece blanket!! 

To start with, I based my pillow cover loosely on this tutorial from Jen at Tatertots & Jello
A I’ve had saved for a long time, mind you! 😉

So in the interest of full disclosure… This is NOT a good tutorial. 
This isn’t even really a tutorial… BUT there is a good tip for you at the end… 
So stick with me! 😉
This was my very first pillow cover ever! 
If you want a good tutorial on how to make an envelope pillow cover check out that link up there from Jen!

Moving on…

My pillow form was a 12″ by 14″ purchased from Wal-Mart, so I cut my front piece with an extra inch to allow for sewing, so 13″ by 15″. 
The two back pieces (to make the envelope) were each cut a little larger to form the overlap of the envelope. 


Then I cut two, two inch wide strips, about 30 inches long to make the ruffles. 


As per Kayli’s suggestion… 
To create the ruffles, I sewed a top stitch all the way across the top of one side of each strip.
Then gently pulled the bottom thread of the stitch to bunch the material. 
They’ll look like so…


Then you just sew your panels together inside out, flip them around and sew on the ruffles! 


Viola! Fun, ruffled, fleece pillow cover! :)


So ready for some more full disclosure?
See how I purposefully made that top ruffle a little crooked for that eclectic look everyone’s been talking about? Well that’s a fib. My sewing skills failed me dear friends… 
And the COMPLETE crooked-ness that were happened on accident. 
Granted it wasn’t that crooked when I started, but check it out… 
I went with it. Sometimes you just gotta make it work. 


And sometimes… 
You just gotta listen to your sister saying, “I like it… the way it is” and roll with it!
You never know… Might even like it better that way anyway. 😉

Linking this here and here and .