Bloggie Bestie – Janine of 3 Wishes

Hello there lovelies! It’s time for another Bloggie Bestie Thursday!
Today Janine of 3 Wishes has a fun tutorial for you! You can see her first guest post on Truly Lovely here. We really enjoy this lovely lady and know you will too!
Take it away Janine!
_______________
Hello Truly Lovely readers!  I am so happy to be back as a Bestie today.  Please hop over to 3 Wishes and show some love to Kassi as she is talking about being thankful.  A topic near and dear to my heart!
I am thankful to Kassi and her sister Kayli for having me as their guest today!!Today I thought I would share a craft with you…I have two sweet friends having babies very soon, so I just finished up one of these precious name plaques and I will be creating the other one for you today.I have to admit, I am not the most crafty, but I sure love trying.  I love receiving handmade gifts so I try to give things that I can make myself that are thoughtful.My dear friend Lori is having a baby and this is for her little one.You can hang these on the wall or on the child’s door.  I have made quite a few of these as gifts.

Here are the supplies you will need.  I found everything at Michael’s craft store.

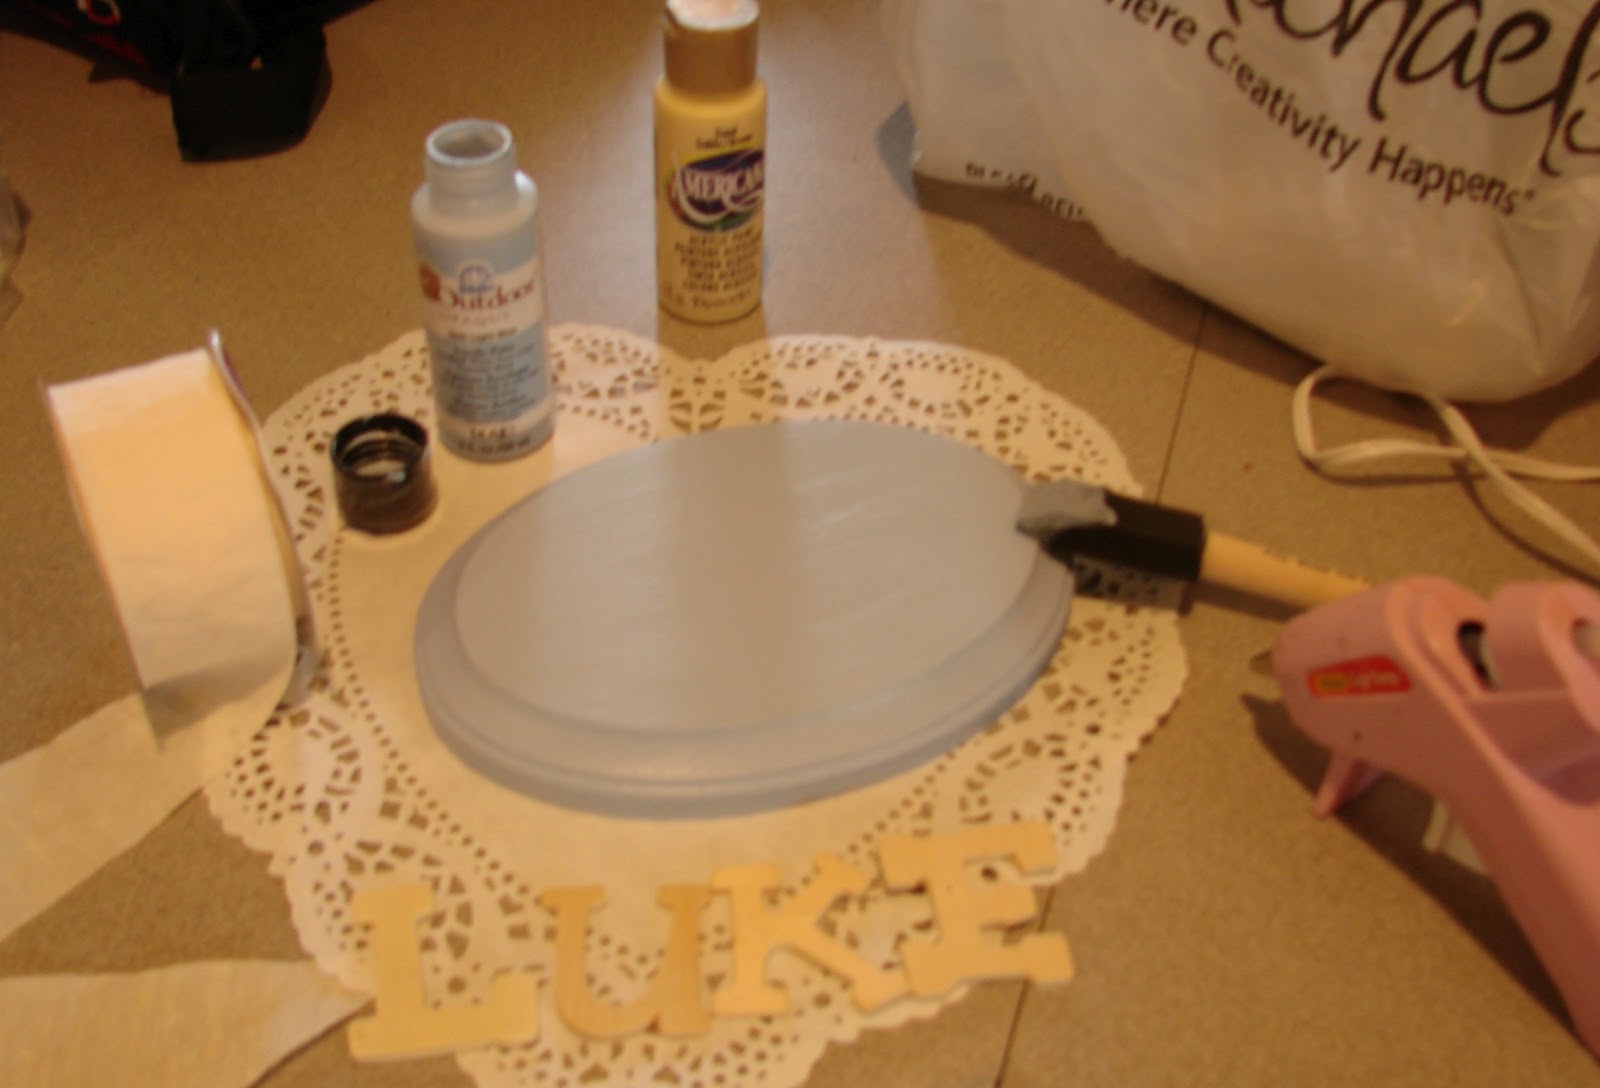
  • A plaque. Michael’s sells different shapes and sizes and they are reasonable
  • Wood letters for the child’s name
  • Paint…I am using a pale blue and beige,with pale beige for polka dots
  • A glue gun
  • Coordinating ribbon, this is what you will use to hang the plaque, you can even glue buttons, or  small toys on the plaque if you would like

First paint your plaque the color you would like.


Then paint your letters.

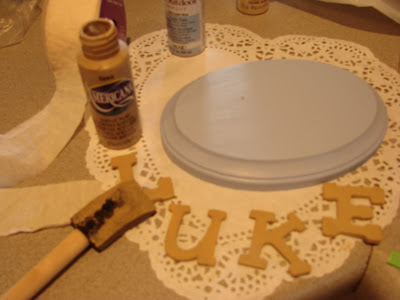
You will glue your letters on. I actually just use paint to glue them on.

I used a Q-tip to paint the polka dots.


Then you will hot glue the ribbon on the back, I found this sweet ribbon that says made with love.


As you can see it is not a difficult project, but it is adorable.  Here are some others I have created.


 For my one of my nephew’s, I found a toy skateboard and painted it, then glued it on.

Aren’t they adorbs. These would make great birthday gifts, shower gifts, even as a house warming gift for a child.
Thanks for reading along today. I hope you lovelies have a wonderful day.
Please remember to say hi to Kassi over at my place.

A big thank you to Kassi and Kayli for the hospitality. These girls are Truly Lovely!!!

________________

Kassi here… Now, how cute would that be for a baby shower gift!?! THANKS for the idea Janine! And thanks for swapping with me today! :)

Fancy This Features 76

Hello there lovelies!
We had some fun stuff going on here over the weekend! Did you happen to check it out? A fun Snail Mail Social announcement from our girl, Cheers, Bethani and a Business Card Giveaway from Printrunner!
AND the winner of our May Sponsor Group Giveaway was announced!

 Before you head off to those posts, here are the fun, fabulous features from Fancy This Fridays #76! 😉

We LOVE this striped bedroom makeover from Virginia at Live Love DIY. The chandelier adds a fun touch and the color scheme is so calming!

bedroom makeover

We’ve been enjoying a lot of strawberries in our house over the last few weeks… This Strawberry Cobbler from Rebekah at Accidentally Wonderful is on my recipes to try list very soon!!!

dessert idea

How neat are these Wine Bottle Tiki Torches from Samm at Little House in the Big D!?! I would LOVE these for my backyard!!! Perfect for summer evenings outdoors!!!

porch decorations

Thanks to all the lovelies that linked up with us again, or for the first time, this last week! :) We so enjoy having you share your fun ideas!!! Here’s a featured button for you dolls mentioned above! Hope you’ll share it on your own blogs! It links right back to THIS post so you’re readers will know where to find you!

Have a GREAT week friends!!!

Fancy This Features 75

Hey Hey Bloggie Friends! It’s Kayli! School is out for summer and somehow I survived finals week, so now it’s time to partayyyy. With three extra y’s. Cause I’m for real.

So let’s get it started with some features!

Up first is this freakin Sa-weet Tank Top from a T-shirt from Heather at Heatherly Loves. Perfect for workout shirts or just for summer. You know in case you’re like me and you make them to run, and then you nap instead. Still cute!


Next up, a gorgeous Stenciled Table  from Ashley at Domestic Imperfection. I know. Whoa right? It’s adorable and it looks do-able! DIY for the win! That, my dears is a makeover if I’ve ever seen one.


And last but certainly not least, some super cute, Felt Bookmarksfrom Christine over at The D.I.Y. Dreamer. Dudes. I love me some bookmarks. They’re just handy! These are a super simple but super cute would be sweet to give as gifts.


So there they are! Here’s a button for you nifty ladies.
(Don’t you think the word “nifty” is underused? Sort of like “spiffy” and “neat-o.”)

Thanks for linking up and Happy Monday! (:

By the way… Have you entered our MAY Sponsor Group GIVEAWAY yet!?!

Bloggie Bestie – Jessica of Morrison Lane

Hello pretty friends!
Or handsome as the case may be… But I’m almost postive the pretty weighs out. 😉
We are super excited to introduce you to the lovely…

Jessica of Morrison Lane!!!

I came across her blog several months ago and just ADORE the fun posts she shares about Lil Bit and her brothers (Jessica is their nanny!), trips with her hubs, Brad, and the most beautiful photographs of everyday life!

She’s sharing a yummy icing recipe with us today!
Take it away Jessica!!!

hey there, truly lovely fans! i’m jessica and i blog over at morrison lane. i was also raised on morrison lane, hence the name of the blog. yeah, i’m creative like that. also my last name was morrison until last year when i got married. confused yet? me too!


i am truly (lovely and)<—i’m cracking myself up! thrilled to be writing here today and getting to meet some new friends.  you know what they say, any friend of truly lovely is a friend of morrison lane…they say that, right? (Kassi here: If they don’t they TOTALLY should) 😉

after STRUGGLING to come up with something great and impressive to share with you all, the best thing i could come up with was something i just discovered monday! a sugar free and delicious recipe for icing! oh yeah! so that way when you decide to leave just a little icing left in the bowl for, perhaps, a few spoonfuls or ten, you are still all healthy and sugar free. and who doesn’t love that?


monday was my mom’s birthday and birthdays require a homemade cake in my book, so i had to put my chef hat on and get to work. after making a strawberry cake with the help of lil bit (p.s. i’m a full time nanny for a profession and i often have lil bit in tow, she has twin brothers but they are way to busy with kindergarten to hang out with the likes of me) and managing not to drop anything extra in the cake like egg shells or measuring spoons…two year old help, not so helpful…


that’s my cute husband and lil bit.

twas time for the icing. here’s what i did.
whipped icing recipe:
1 tub of cool whip
1 block of cream cheese (i said sugar free, not fat free)
2 tsp truvia

mix together until smooth
refrigerate for about ten minutes to cool the icing and let it set
ice your cake
eat

my mom does minnie pearl impersonations, so i thought we would get all crazy and try to put a minnie pearl hat on the cake. i figured if it turned out terrible, i could blame it on the two year old! i liked it, so i took full credit.


try the icing, especially if you like icing that’s not so sweet and more of a whipped icing than a sugar icing.
it was delicious and perfect topping for the strawberry cake, i thought.


thanks again truly lovely ladies for being my bff today, i am truly truly honored.
and let me know if you try the icing friends…it yuuuummmm-o!

Sounds yummy, right?!? Our thanks to Jessica for blog swapping with me today!
(I’m over at her place RIGHT now! Come visit, yes!?!)
Isn’t Lil Bit just the cutest!
Enjoy you’re sweet treats today peeps!

Fancy This Features #74

Happy Monday peeps! How was your weekend?

It’s time for another batch of lovely features from the Fancy This Fridays link up!

First up from Amber at Salt Tree, this Brooch Bouquet turned out just stunning! Save on flowers for your wedding and carry some pretties brooches instead! Lovely!

Next, this recipe for Queso Blanco dip from Chelsea of Taste and See sounds delicious! Any kind of queso is at the top of my yummy list!!!
By the way, did you celebrate Cinco de Mayo? Did you see this fun Cinco de Mayo post??

How cool is this trick from Sarah at Life on Walnut Street for using ground coffee as the dirt in your floral arranging!
Definitely going to use this one soon!

Thanks to all who linked with us at Fancy This Fridays this last week!
Here’s a Featured on Truly Lovely button for you dolls mentioned above! Hope you’ll share it on your own blogs!
It links right back to THIS post so your readers will know where to find you!

Hope you have a GREAT week friends!!!

Fancy This Features 73

Scroll down or for an awesome post from Miss Kayli on a way to save BIG BIG bucks on your textbooks this next semester!  But… before you click over check out these FUN features from our Fancy This Fridays link up over the weekend! 😉 AND if you want to see recent features you can check out our !  It’s filled with lots of AWESOME ideas you’ll want to repin and try!

So, summer vacation is getting closer and closer!!! And you know what that means… Bored kiddos! 😉
We love Nicole of Shabby Beach Nest’s 101 Idea I’m Bored Jar! It’ll keep them busy all summer long!

A few Fancy This link ups back for a fold up work table…. Well THIS week she and her hubs wrote up a FULL length, detailed how to for it! This time as a folding Lego table for their boys!

And last but not least, Dusti of Want to Get Crafty claims these are brussel sprouts that everyone will want to eat!!!
Well, if I’m going to eat them, I hope their yummy… and she says they are! 😉 SO this is going on my recipes to try list!

Here’s a Featured on Truly Lovely button for you dolls mentioned up above! We also feature great ideas and projects over on our Facebook page, so if you were featured there, we’d love for you to have a button too!!!!


It links right to THIS very post so your friends and readers will know where to find you!! :)

Here’s hoping you have a lovely week dolls!!!

OH!!! And there’s only a few more hours to enter !!!

Bloggie Bestie Blog Swap with Maggie of Midwestern Sewing Girl

Hey friends! We are so excited to introduce you to…

Maggie of Midwestern Sewing Girl today!!!

She is just lovely and we are sure you’ll enjoy her fun wallet tutorial! I know I’ll be making some of these ASAP! :)
I’m over at her place sharing a tutorial as well. Hope you’ll stop by and check out her blog… It’s one of my ABSOLUTE favorites!!!

Here’s Maggie…

Yay! I’m so excited to be here at Truly Lovely today! Kassi is awesome (as I’m sure you already know), and I was so excited when she agreed to “blog swap” with me!

Here’s a little bit about me…my name is Maggie and I blog at Midwestern {sewing} Girl. I love to craft, cook, bake, scrapbook and redecorate our home…I would love to have you come stop by sometime!

Now, I don’t know about you, but one of the things I hate doing during summer is carrying around a big ol’ purse. Not only does it get in the way, but I’m always so afraid I’m going to leave it somewhere. And I’m not even going to mention how hard it is to get sand out of it if I take it to the beach…yuck.

My solution? A tiny little wallet that holds just the essentials…wanna learn how to make one?

This is a great project to use up some of your fabric scraps…and the completed wallet can be shoved into your back pocket or beach bag without getting in your way…

Here is all you will need to make this little summertime wallet…

*2 pieces of fabric at least 12″x5″

*fusible interfacing

*a sewing machine (or a needle & thread)

*scissors

*a ruler

Now let’s get started…

First, cut your fabric & interfacing following the diagram below…

Next, take either your main fabric or your lining fabric, it doesn’t matter, and lay it right-side-down on your ironing board. Take one of your larger (3″x4″) pieces of interfacing and adhere it (per the manufacturer’s instructions) just to the left of the mid-point (6″ mark) of your fabric (right where the orange arrow is pointing). Leave about 1/2″ of fabric on both the top and the bottom of the interfacing…

Lay one of the smaller pieces of interfacing about 1/8″ to the left of the first piece…again leaving about 1/2″ of fabric on both the top and bottom of the fabric. Don’t worry about measuring the placement of these pieces…it’s really not necessary for them to be perfectly placed…”close enough” is good enough.

Now do the same thing with the other two pieces on the right-hand side of the fabric…

When you’ve adhered all of your interfacing, take your fabric (still right-side down) and place it on top of your other piece of fabric…make sure the fabrics have their right sides together…

Line up all of your edges and pin them together if necessary. Then sew around all four sides…using a 1/2″ seam allowance. Leave an opening of a couple of inches across one of your short sides (this will be where you turn your wallet so that the right sides are facing out).

Next, remove the paper from your interfacing…you should see a sheen where the interfacing sticky stuff has adhered to the fabric…

*Next, get me a manicure…holy cow, how yucky…*

Back to the tutorial…clip the corners of your fabric rectangle…making sure NOT to clip any of your stitches…

Now, turn your wallet right-sides-out, using a chopstick or something similar to push the corners out…

Bring your fabric back to your ironing board…iron the little pouch flat…and make sure to turn in the edges of the opening on the side, so that you have a nice crisp, straight rectangle…

Once your fabric is ironed, sew the open edge together…as close to the edge as you can…

Bring your fabric back to the ironing board (again), fold it in half (making sure to keep your main fabric on the outside), and iron it.

Open your fabric back up again…take each short side and bring it in toward your middle fold…not all the way to the middle, just close…leave about 1/2″ on either side…and iron again.

Almost done!

Sew down each long side of your fabric…with about a 1/8″ seam allowance…don’t forget to backstitch when you start and finish…


Now, fold your little wallet in half, and you. are. finished!

Woo hoo! Not so bad, huh?

These come together really quickly once the fabric & interfacing is all cut…

I think I’m gonna make some for all of my mommy-friends for Mother’s Day…

Fun and easy…and practical!

Thank you so much, Kassi, for letting me guest-post today!

Thank YOU Maggie for sharing your fun idea with our readers today! AND for being this week’s Bloggie Bestie on Truly Lovely! You’ll notice Maggie’s blog button over on our sidebar… It will be there ALL week, so if you don’t have a minute to check her site out today… It will be there when you come back by! 😉

Happy Sewing lovelies!!!

Bloggie Bestie Swap with Kim of A Girl and A Glue Gun

Hey lovelies! We have a treat for you today!
Do you know Kim of A Girl and a Glue Gun??? She’s this week’s Bloggie Bestie here at Truly Lovely!
So WELCOME Kimbo! 😉 She’s been on my blog reading list since… Well, since I started reading blogs!
SO I am super excited to have her here today!

And as always, it would be super awesome of you to come visit me over at her place today… If you wanna… 😉

wazzup! i’m kim.

i usually glue crap together. today i’m sewing. don’t worry though.. it’s a straight basic stitch that anyone can do! i’m super excited to be blog swapping with kassi today! (make sure to check out the yummy thing she’s cooking up over at my blog!)

so while patrolling through blog land…
i came across this tutorial….
and immediatly decided that lace is one of my favortiest things. like chevron. ruffles. pink. chocolate. hot glue. polka dots. just somethings that makes me instantly happy…
and i thought i have got to make me one. and justsohappens i had this blue shirt in my take back to the store pile. i just couldn’t justify spending $8 on a plain shirt..when i literally have a drawer full….so i was going to take it back. instead i want to joanns and bought a yard and half of pretty lace….

since it was straight on one side i decided to do two strips…(and that 1 1/2 was perfect. i literally had like 2 inches left)
(so i guess it wasn’t perfect. 1 yard and 16 inches would have been perfect.)

lined them up..

pinned them on..

(the ends were tucked underneath and sewed so no raw edges were visible from the front!)

and sewed. i sewed along the stright and the curved side (4 times total)

another reason to love lace…you can’t see your mistakes (aka stitches)

that t is on a very uncomfortable part of my bum.

anyways..thanks mucho to the cute k sisters for having me!!!!

:) She’s AWESOME right!?! Lace!?! Yep, we kinda love lace too… You know… In case you didn’t notice… i.e. look either left or right on our blog design. 😉 THANKS so much to KIM for swapping with us this week! :) AND for being the Bloggie Bestie at Truly Lovely!
You know… we want to be your Bloggie Bestie too! 😉 Just hit us up!

Happy sewing lovelies!

Fancy This Features #67

Happy Monday lovelies!

How was your weekend?? We spent Saturday visiting family and made some sweet treats that you’ll be hearing more about in a post later on… Then on Sunday evening I put the finishing touches on my SCRIBBLE CHALLENGE craft!!! Can’t wait to share it with you tomorrow!!
Did you see the video of the supplies I could use?? if you missed it!

Now, how about some features from our !

This week we’re loving RUFFLES and LACE!

This ruffled bedspread from Want to Get Crafty is just lovely! We’re loving the color scheme of the entire bedroom, and those chocolate and white colored ruffles add a pretty feminine touch!

Amanda of The Little Giggler shared the most adorable Ruffle Butt Leggings! SO cute, right!?!

We absolutely ADORE this Lace Chalkboard from Kelsey at Embracing Messy. Love the blue color, love the doilies!!
I want one for my craft room now!!!

Thanks to everyone who linked up this last week! :) We enjoy checking out all of our Fancies every weekend!!!

Here’s a featured button for you dolls mentioned above. If you were featured on our we would LOVE if you grabbed a button too!!!

Have a fabulous week pretties!!!!

Double Features Fancy This 65 and 66!!!

Happy Monday dolls!!! Another weekend down!

We celebrated our dad’s birthday this weekend. It was SO nice to go home and spend time with family!

You might also notice another happening of the weekend…. See anything different??

You know, the ENTIRE look of Truly Lovely!?! We are now a self hosted WordPress blog!!!

We want to send out a HUGE thank you to Sara of Lady Jane Designs!!! She has been the BEST to work with and did a fabulous job bringing our ideas to life! Thanks girl!!!!

So, do tell, what do you think??? Hopefully you’re still seeing us as usual in your reader, but if for some reason we aren’t showing up… Be sure to follow along… there are several ways to get your Truly Lovely fix over on the sidebar.

So as promised here’s a double dose of Fancy This Fridays features!!! Up first !

We LOVE this folding work station from Andrea at Bubblewrapp’d! Have you seen what she sells in her ??? Check it out… You’ll see why this workstation is perfect for her! I want one….

How pretty is this nursery!!! The tree over the crib is beautiful and the baby’s name hanging from the tree!?! Too cute!!!

This was shared by Jessica of Shabby Gals.

This Bacon and Cheese Hashbrown Casserole from Mrs. T at Tales of the T’s sounds so yummy! I’m sure the hubs would appreciate this for tomorrow’s breakfast…. 😉

Now the features from ….

I have been searching for the perfect ruffle bag tutorial… And this one from Kaysi at Keeping it Simple just might be it! Love her detailed instructions and how cute the bag turned out!

This Lucky In Love printable from Sassafras Salvation is perfect for St. Patrick’s Day! You can click over to her site to print this pretty to add to your decor!

AND… Last but not least, we ADORE this lovely mudroom makeover from Sarah at Life on Walnut Street.

You’ve gotta click over to see the other side!!! Do you see what she did with that old ladder?? So neat!

There you have it! :) For those of you featured above AND on our Facebook page, we’d love for you to grab a BRAND new featured on Truly Lovely button! :) It links right to this post, FYI!

Also, FYI… Today I’m guest posting a BRAND new tutorial over at Love Stitched.

Hope you’ll come by to say hi!

Have a lovely week dolls!!!