I am…


Want another sneaky peak wedding photo friends???
There’s one posted over at the I am more than just… blog today! 

Do you know Megan of Brassy Apple


We’ve featured some of her lovelies from the Fancy This Fridays link up before. 
Well, she has a new-ish blog where she is “sharing snapshots of women from all around the world”. 
Each month there’s a new theme. 
This month’s theme is ENJOYING SUMMER!

Click here to see how I am enjoying this summer! :)

Bridesmaid Tote Bags

To start my DIY wedding recaps, I’d like to share the gifts I made for my bridesmaids and hostess first.
SO… For part one of my bridesmaid gifts…
I made tote bags for each of my six bridesmaids and my hostess.
Remember my ?
I used the same method pretty much, except I added ribbon and rolled fabric rosettes!
Remember this post of ?
Anyway…
I started with plain black tote bags
(I got mine in packages of three from Hobby Lobby).
I used my Silhouette to cut each girls’ name out of vinyl to make a stencil.

personalized tote bag
I just cut around and then peeled the names off the vinyl sheet and stuck each one in the center of a tote.
Once they were stuck on well, I used a small paint brush to fill in the stencil with white paint.

painting a tote bag

I went with a black and white zebra theme with their bags.
I figured that might be something they’d be more likely to use over again than the wedding colors. That’s also the reason I didn’t add “Bridesmaid” or anything more specific than their name.
Once their names were dry (it took a few coats of the white paint to get it bright enough on the black totes), I hot glued a zebra ribbon around the top of each tote.
Each tote also got two fabric rosettes! Also hot glued.
To learn how I made those, .

zebra print tote bag, making a tote bag
Once the bags were all finished I stuff them with other goodies!!!
More to come on that soon! :)personalized tote bags
Well, what do you think?
I REALLY hope the girls liked them…. And that they can use them.
For something. 😉
Again, stay tuned for more posts about bridesmaid gifts and other recaps from our July 9th wedding! :)
P.S. Visit my wedding blog, My Road to Mrs to see what those CUTE little gift tags tied to each bag are all about!!!
A SPECIAL thanks to is in order!! 😉

Little Girl Tote Bag Tutorial

I’m excited today to show you all the totes I made for the flower girls’ goody bags for our wedding!!! And as I say that we have been married now for three days!
I am off celebrating with my HUSBAND!!! 


Hope you enjoy this fun tutorial while I’m gone! :)


If you would like to see the goody bags I made for the ring bearers, you can click that link to visit My Road to Mrs, my wedding blog. 


Anyway… this is the GIRLIE version! :)
With a COMPLETE tutorial even! 

Cute Little Personalized Totes!


The items needed for this craft are:

Little totes (I got mine at Hobby Lobby $2.99 for a packet of four)
Fabric Paint
Small paint brush
Name stencil
Iron on decals
Iron
Old newspaper
Large paper plate


First, be sure to lay newspaper down on your table or other work surface!
Lay out your totes on the newspaper.


I used my hand dandy Silhouette SD to cut out the girls’ names in vinyl.
The Kristen font is a great one for a girlie but fun touch!


Vinyl, makes a PERFECT stencil!
It’s already sticky on the back, so peel away the backing, smooth your stencil over your little tote and your ready to paint.
Make sure if you have any a’s, o’s, or other letters with holes in the middle, that you peel the little circle cutouts and stick those in the center of your letters as well. More on this in a minute.


Next, choose your paint color, then squirt some fabric paint onto the large paper plate.


Now, use the small paint brush to fill in the stencil on your tote.
Since I used white paint on dark colored totes, I painted on several coats, allowing for some drying time in between.


Once you’ve painted all of the names, allow to dry for a few hours so the paint will set well.


Once the paint has dried peel the stencil off the tote.


Remember I mentioned earlier making sure you stuck the centers of your a’s, o’s and other letters with holes onto your tote? Well, here’s why…
If you stick those on, you can paint right over the top of those, like here on Taylor’s tote:


Then when you peel them off, your letters have holes in the middle instead of a completely painted in blob for those letters.
And that makes them look nicer! :)


Once you’ve finished your painting and removed your stencils, it’s time to fancy up your totes!
A SUPER easy and inexpensive way is with iron on decals.
The flower ones I used came from Wal-Mart for a few dollars a packet.

Follow the directions for ironing your decals on.
Mine included placing a cotton towel over the top, then iron to tack.
Turn the fabric inside out and iron to adhere.


Here you can see, I used a tiny little craft iron. 
(that KAYLI gave me for Christmas!!! Thanks Kayli!!)
It was perfect for this craft because it was small enough to stick inside the tote without the need for turning it inside out!


Tada!!
A cute little personalized tote for each lovely little flower girl!!!


What do you think??? The girls LOVED them! :)
Hope you’re having a lovely week!!
See you in a few days!


My First Vinyl on Glass Experience

Have you heard of Groupdealz yet? 
If not, you should just go ahead and go sign up. :)
I’ve gotten some great deals on some really fun items through their daily deal email alerts! 

One of my recent purchases was a Wedding Day Subway Art Vinyl Decal, 
a $20 value for ONLY $10!

*My Treehouse Treasures
I ordered my vinyl in black and patiently waited for it in the mail! 
Meanwhile, I bought a floating glass picture frame from Wal-Mart, also in black. 


When the vinyl arrived, I sat down to apply it to the glass… And realized it was a little harder and took a little more patience than I’d thought.
First, peeling of the backing without tearing the intricate lettering took awhile… 
And it was a large sheet, so it was kind of hard to place it on the glass, centered, all at once. 
But I finally managed. :)

Then came the problem of getting it all smoothed out. 
But once it was done… 


I LOVE IT! 
I am planning to use it on  the guest book table or somewhere as a decoration for the wedding… 
But for now it’s sitting on our less than exciting… but hoping to get better mantel. 😉


So… What do you think? Should I include an engagement picture of the mister and I behind the letters?
 I could do one in black and white?
Or leave it as is? 

Thanks to the it’s now 25 days away, 
instead of four… 
That means more time for lovely little wedding projects! 
See there is an upside!

Hope you’re having a FABULOUS week! :) 

Bloggie Bestie Blog Swap with Kym of Travel Babbles

Good morning lovelies!!!
We have a very special Bloggie Bestie to introduce you to today…
The FABULOUS Miss Kym of Travel Babbles!!!
Travel Babbles: Living the (hockey) Life
She has been a Bloggie Bestie for a LONG time… i.e. pretty much since the beginning of this little blog!
She is also a bride to be in the midst of planning her wedding…
A hockey fiance… Granted, that’s nothing like team roping… But I feel we’re kindred spirits following our guys around for the sports they love… heehee. :) And just an absolute sweetheart!!!
Also, before I hand it over to Kym…
You can see my Guest Post on her blog here. :)
Here’s Kym!!!


Hello everyone! My name is Kym and I am the author of Travel Babbles: Living the {hockey} Life. I am awfully excited to be participating here as a “Bloggie Bestie,” and I find it quite fitting since Kassi has been one of my Bloggie Besties since I first started writing eight months ago :o)


For those of you who haven’t been to my blog before – you will find a plethora of fun topics. From inspiration boards and wedding planning, to recipes, fashion, book and makeup reviews, and just a little bit of hockey here and there. 


Yes, hockey. I don’t have a favorite team, and I’m not even a big fan of the sport – but my fiancé is a professional hockey player. While his career absolutely does not define me {to learn more about me click HERE}, most people think that his job limits what I can publish on my blog. This is {almost} totally not true. The fusband only has two requests in regards to my blog: 1.} Never write anything that would prohibit him from finding a job in the future, and 2.} Don’t post anything I’m making for the wedding. The first request is self explanatory  The second request is because many of our family and friends read my blog daily, and he doesn’t want all of my DIY finds given away before the big day. I guess he just wants to keep some things exciting. Who knew he cared? :o)


So – I’m not breaking the rules, I’m simply bending them. TJ said that I can’t post ideas on my own blog, but he never said anything about having Kassi post them on Truly Lovely, right 😉 So, without further adou, here are a few of the fun finds that I plan on incorporating into our big day on July 7th, 2012.


Lace Votive Holders
 
{via}


Faux Peony Bridal Bouquets
{via}


Tissue Paper Pom Poms
{via}


Donating to the English Bulldog Club of America in lieu of wedding favors
English Bulldog Place Card- set of 30
{}


Birdcage Centerpieces
White-Birdcage
{via}


The Grooms Survival Kit
Picture of The Groom's Survival Kit
{}


I’ve been bursting at the seams excited to share these fabulous ideas with someone, anyone, in Blogland, and I look forward to hearing any feedback that you Lovely followers have to say!


{Also follow me on & }

Thanks Kym!!! She has some fantastic ideas, right?!?
Please lovelies, share your thoughts on her plans… Because like she said, she can’t post it on her blog for comments…
So show her some Truly Lovely love!! 😉

So… I LOVE the poms idea… I’m actually doing that myself.
Kym, hit me up if you want a place to order CHEAP tissue paper! 😉

And the bull dog donation… LOVE IT!!! (She has the cutest bull dog, Brutus!!)

Thanks again Kym, for swapping with me and for being this week’s Bloggie Bestie!!!

Recycled and Reused Team Roping Ropes
I’ve shared with you before that I am making rope vases for my wedding centerpieces.
But in honor of Earth Day tomorrow…
I want to re-share the idea with you… with a better explanation of how I actually make them.

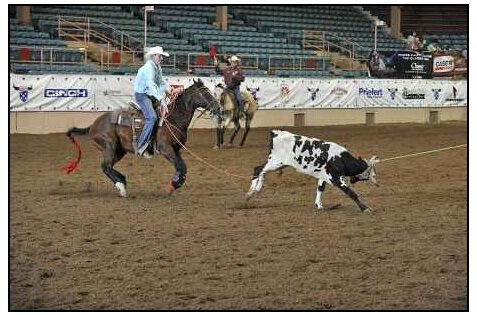
First, check out this HUGE pile of old team roping ropes.


This is what becomes of them once they’ve reached the end of their useful life.
Before you would’ve seen them in use by this guy, my fiance…
Like this… He’s a heeler, and a  pretty awesome one if I do say so myself! 😉


But once his ropes have been used several times they become too soft and pliable to stand up as a heel rope and they get discarded to the retirement pile in the backyard.


Again, in honor of Earth day…
I’ve discovered several ways to recycle and reuse these poor old discarded ropes. One way, that I’ve been doing alot lately since our wedding is less than two months away…


Rope Vases!


To make a rope vase you need an old, unloved, past its prime rope.
The ones discarded by my fiance are perfect!
Since they’ve become soft that makes them easier to shape into something new and once again loveable!


I picked one out of the pile with a pink tint to it so my vase will look slightly pink as well.

First thing to do is cut off the strings at the end of the rope, right below the bottom knot.
The knot will be used to start the vase.


To make the vase, I use a wood burner to melt the rope to itself.
You can see I wear leather gloves to protect my hands from the heat of the wood burner.
I also put newspaper down to protect my work surface from drips, etc.


I start by coiling the rope around the end knot and melting it together, like so…


Continue coiling the rope around itself, melting as you go.
Once you have the base the size you want it to be you can start coiling upward to form the sides of the vase.
Now it’s up to you how your vase will be shaped.
It all depends on how you melt the rope as you go up.


Once I come to the end of my rope (no pun intended…haha), I simply hot glued the loop I left at the other end of the rope to the side of the vase for a fun look.


So that’s how those old, no longer loved retired team ropes become a once again loved rustic/western home decoration, or wedding centerpiece.
Recycled and reused!


I’m linking this up to these awesome linky parties! 
As well as the AMAZING linky parties on my

 Hope you’ll check them out and link up too!

Visit thecsiproject.com 

Bride Tote Bag {Silhouette}

Well hello there lovelies!!!
Apologies for the lack of crafty posts here lately…
I have been crazy busy trying to get the paperwork together for our new home financing… YAY! :)
And I’ve been SUPER busy working on wedding planning…

So THANKS so much for sticking with us through this busy time!!!

As of today we are 101 days away from our June wedding!!!
Wedding Countdown Ticker
If you’d like to follow my wedding planning in more detail,
I have a ‘just for the wedding’ blog over here. :)

A wedding craft that I did just for me, just for fun, was my Bride Bag!

Every bride needs a handy little bag to carry around the wedding planning essentials!
So…
I am so excited to be able to share my Bride Bag tutorial with you today!
Materials Needed:
  • Plain Tote
  • Sticky backed Vinyl or other stencil
  • Fabric Paint
  • Iron on embellishments (I used my wedding flowers, daisies)
  • Cute little craft iron… Or a regular iron will do 😉

    (All these materials were Christmas gifts from my sweet sister, so thanks Miss Kayli for gifting me some awesome craft supplies!!)

First, I used my new Silhouette SD (Christmas gift from the hubs-to-be) to cut out the lettering, “Kassi’s Bride Bag June 2011”.

Next, I pulled the cutout lettering away from the vinyl sheet.
This became the stencil.
Then I peeled the backing off of the vinyl and stuck it to the tote.

*Tip Sticky backed vinyl is great because once the backing is removed you can stick it onto pretty much anything and it’ll last long enough to work as a stencil.

The only fabric paint I had at the time was puff paint… but that wasn’t the look I was wanting for my bag… So I improvised…

I just used a small paint brush to brush the puff paint onto the stencil… I used pink and turquoise paint, my wedding colors of course!

It took a few coats of the puff paint to get it dark enough on the black tote to pop, but once I got those coats on, I just left it to dry overnight.

The next morning I simply peeled the vinyl stencil from the tote and walla, insta-tote wording!! :)

To spice it up a bit, I ironed on a few daisies (my wedding flower of choice) using my nifty little craft iron! (Again, thanks Kayli!)

The next, and final step is to fill your new Bride Bag with all the wedding planning essentials!!

In went my wedding planning notebook, wedding ring brochures, hand written guest list draft, and our engagement pictures CD.

I literally carry this bag with me everywhere I go!!
At less than four months til the wedding, it’s so nice to have everything I need right on hand in my handy little Bride Bag!

 This picture was taken by my Maid of Honor, Miss Kayli of course, after a LONG day of trying on wedding dresses!!!
As you can see, it’ll wear a girl out! 😉
But the Bride Bag in tow means less stress for the bride-to-be!!!
Now it’s YOUR turn…
We would love for you to share any wedding planning or overall marriage advice! We can use all the help we can get! 😉
P.S. I’m linking this to the Spring Themed CSI Project!!
What’s more Spring-y than a Bag for a June Bride!! :)
 Visit thecsiproject.com

And here…

Save the Dates with My Silhouette

I promised last week to share the Save the Dates that I’ve been working on… Guess what!? They’re done!!
About 3/4 of them are even addressed, stamped and sent out!!!
There’s about 40 or so that still need to be addressed and sent, but we’re almost completely done with that wedding planning duty! :)
I had magnets printed at the print shop in the building where I work.
I think they turned out lovely. And SO me and Mr. M.
We used one of my fave engagement pictures taken by
Treehouse Photography.
What do you think??
I also purchased some square envelopes from the print shop…
Did you know the USPS has a MINIMUM mailing size! They do!
You cannot mail a letter smaller that 5″ by 3″ through the post office.

News to me.. but anyway…

That being the case… I didn’t think sticking JUST the magnet in a bigger than I wanted envelope was very classy…

So don’t laugh… But my initial thought was this…

I know… Cutting out backing by hand for 125 Save the Dates was NOT my brightest idea.. Luckily I only cut a few before coming to my senses and realizing this would be a perfect SILHOUETTE project!!

I bought a fun frame shape from the online store…
I actually got 4 frame shapes for $0.99 so that was awesome!!
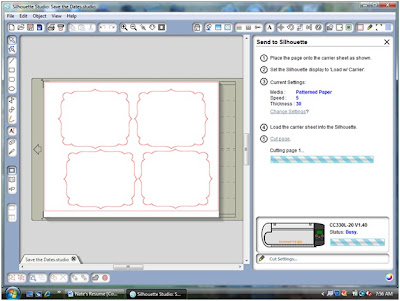
Then I figured out the size I wanted and that four of that size would fit on a page… This is a screen shot of my page…
Then I used my handy dandy Silhouette to cut out 125 of those shapes in different colors.
I had some trouble getting the correct cutting settings set up…
I used textured scrapbook paper purchased for $5 a book from Wal-Mart.
Since my paper was textured I finally used the Patterned Paper setting and that worked like a charm!

 Here you can see the four shapes cut from one sheet of scrapbook paper. To get the paper (the large square sheets) to fit in my Silhouette, I just trimmed them down with scissors.

I used double sided tape to secure the magnet to the backing paper.

Easy peasy! 😉
And they look much classier with some pretty paper backing, then just stuck in an envelope by themselves. I think anyway…
I know it was extra work to do this project than I could’ve gotten away with, but this is my wedding!
 A one time thing… My thoughts are to add as many extra details and nice touches as I can handle!

The funny thing is that the blogging world is giving me the inspiration to go ahead and add those extra details… Things to turn a plain ol’ project into something extra lovely!
So thanks to all you lovelies for helping me go the extra mile! :)
P.S. Linking up here…