Bloggie Bestie – Sasha of Creations by Sasha

Hello dolls! This week’s Bloggie Bestie is someone you’ve been seeing around here a lot lately… Places like our sidebar (large ads on the left), in recent Sponsor Spotlights, and in sponsor shout outs on our and pages!
Today our girl Sasha of Creations by Sasha is sharing a fun, easy DIY with you!

Hope you’ll leave her some bloggie love here, and be sure to check out her fun blog and shop! 😉

Take it away Sasha!!!! 

Hello Everyone! I’m Sasha and you may remember my face from last month. I’m excited to be here blog swapping with Kassi today! Kassi’s blogging over the Creations By Sasha blog today sharing a fun post, so I’m sure she’d love a visit over there when you’re finished here!’

I wanted to take the time to re-introduce myself. I blog but I also have my own store where my goal is always to inspire people – whether it’s through creative designs for your home, unique gifts for loved ones, or having a place for cherished memories.

Sasha at Creations by Sasha

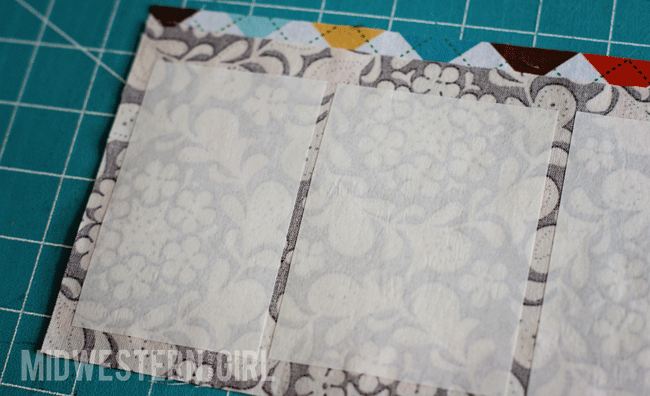
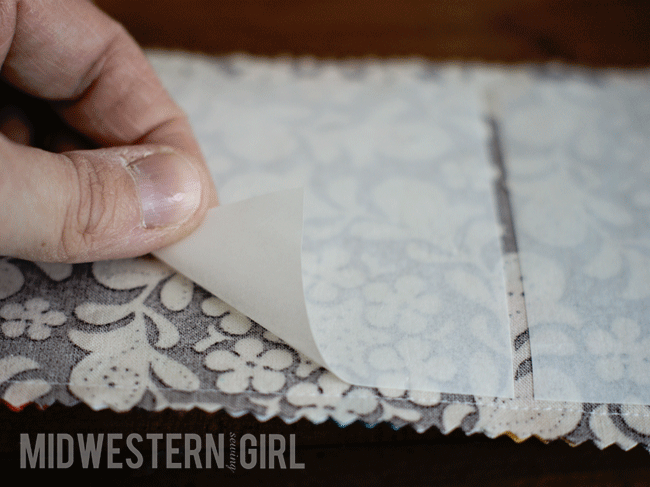
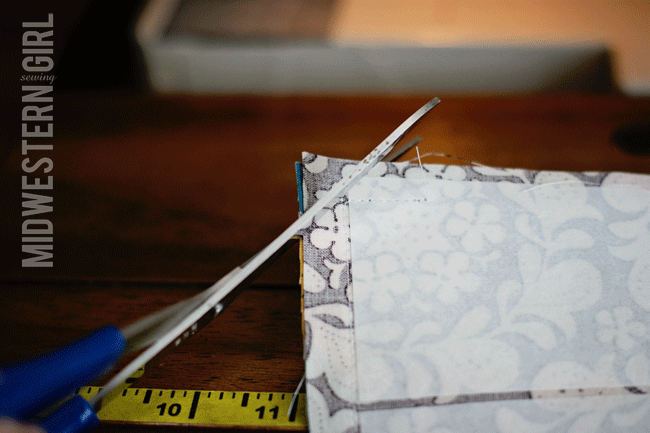
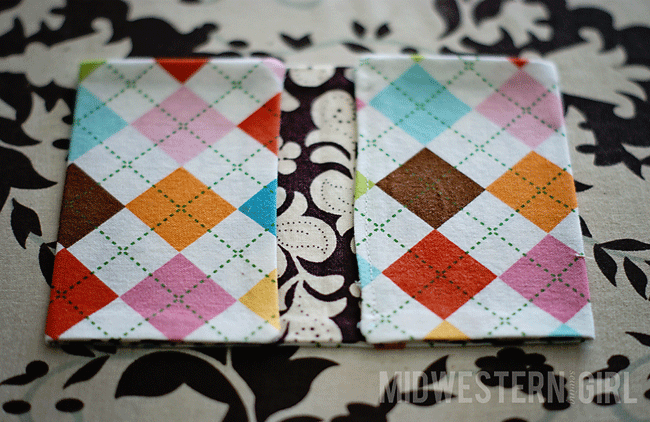
But today, I wanted to share with you one of my most favorite and super easy projects. I sell these in my store, but you can also make them yourself – DIY Coasters. These coasters are SUPER easy to make. All you need are:
– four 4×4 tiles
– scrapbook paper
– mod podge
– felt bumper pads (for the bottom)
– clear spray paint.

To make these, simply trim your paper of choice to 4×4, modge podge to the tiles, add the felt pads, and then spray with clear spray paint to seal. As so you can see, you can do some many different things with these!

World Travelers CoastersSpring Floral Coaster Set

So THANK YOU to Kassi for hosting me today and for guest blogging over at Creations By Sasha. I hope you guys will stop by soon!

Happy crafting!

Thanks so much to Sasha for blog swapping with me today and for being the Bloggie Bestie this week on Truly Lovely!
Hope you’ll stop over and see what I’m sharing at her place!

Have a lovely Thursday!!!

Bloggie Bestie – Kristine of The Foley Fam

Hi friends! Thursday already!? Where has this week gone!?! 
If you’re new here, welcome to our weekly Bloggie Bestie post! Every week we swap blogs with one of our Bloggie friends and take the opportunity to introduce you to someone awesome and new!
Don’t worry, it’s not an exclusive club, anyone can be a Bloggie Bestie! Just and scroll to the bottom for more info!


Today we’d like you to meet our girl Kristine of The Foley Fam!!!!


We just LOVE this chick and we’re positive that you will too!
She’s a sponsor here at Truly Lovely, so be sure to check out her blog and for sheer awesomeness! 😉 And enter our for a chance to win ad space on her blog!

Take it away Kristine!!!!


Hi there Truly Lovely Readers!

I’m Kristine and I blog over at The Foley Fam – {unedited}.

So thrilled to be here today! Kassi and I have become great friends thru this awesome thing known as the WWW, and I’m so grateful for her genuine friendship. One day we will be sipping margaritas in Viva Las Vegas together, I’m sure of that (wink)!

She is over at my casa today, so be sure to stop over there and say hello!

Over at my place I share {us}. The Good, the Bad, & the Dirty.You’ll also find some crafting, baking, my fashion style, and all the bits and pieces that make me {me}.
I can be a wee bit sarcastic, but try not to take offense mmmkay?
We might not agree on somethings, but no worries, we can still be friends! I promise!
If you want to know more about my cool little fam and I you can here.Here are some of my popular posts:
How I {try} and stay organized for my fam – Weekly at-a-glance Calendar
My attempt atRefashions
Bucket Lists – Let’s face it we should all have one!
I also own an !

is where I share my love for creating things and sharing with
others like yourself! You’ll find an eclectic mix of handmade goodness
for ladies and sprouts.

Use code: TRULYLOVELY20 to receive 20% off your order!

I would love it if you came over to our space and partied it up with us! Speaking of parties (wink wink), I host a link up party every Sunday!
Anything goes, and I feature my favs on my networks, so you should totally link up and show off your goods!

ALSO I’m hosting a Group GIVEAWAY every Sunday next month, to celebrate my 1 year Blog-iversary!! Be sure to stop by and enter to win the amazing swag that my lovely friends have offered up, even some goodness from Kassi and Kayli! 

Hope to see you over in our neck of the woods, sooner than later! If you stop by, please leave some comment love so I can follow your adventures too!

 Blog / / / / / /


Thanks to Kristine for being the Bloggie Bestie this week and for letting me share at her place!! My post over there is um… interesting to say the least! Would love if you would pop over and let me know what you think! 😉
Happy reading friends! 

Bloggie Bestie Blog Swap with Megan of Absolute Mommy

Hello lovelies! We’d like to introduce you to a brand new Bloggie Bestie today!

Megan of Absolute Mommy!


She’s also a small ad sponsor of Truly Lovely this month, so it would be great if you’d click over and get to know her! :) She has a fun tutorial to share today!!! I’m over at her place as we speak sharing my Week Seven in Kayli’s Ten Weeks of Thanks series! :) Hope you’ll pop over and check it out!

Here’s Megan!!

Hi I’m Megan otherwise known as Absolute Mommy.  I like to blog about everything.  Nothing is off limits.  So you will find some mama stuff, some life stuff, some possible fashion stuff, and some crafty business.  If you get the chance visit me some time.  I’d love to meet you.
Today I’m here with some crafty business.  Let me start by saying, I am not a good tutorial person.  I hate taking pictures.  Scratch that, I think my camera hates me… Also I’m a fly by the seat of my pants crafter.  I love to craft, but have more fails than I would like to admit.  Thanks to Pinterest, I have board and likes filled with crafts I dream about.  I also have a stock pile of crafting supplies that just sit in no mans land.  Yep, I’m a craft supply hoarder!  So now a days, when I see something on Pinterest, I challenge myself to make it with stuff I already have.
Let me introduce you to these lovely bracelets:

Pinned Image
Pinterest/Hellojenny/the pin market
Can be found at HenryHappened

Aren’t they the cutest?  Well I was bound and determined to make these, but knew if I went to Michael’s to get the cord required, I’d spend a million dollars on other crafting supplies that would go to the craft supply cemetery… See where this is going?  So I challenged myself to use what I already had.  Like embroidery floss, chillin’ all by it’s lonesome thanks to an abandoned embroidery project.

Here is what I came up with… Not as cute as the originals, but I like them…


Supplies:
Old Tshirt cut into strips
Embroidery floss/yarn/cord/ribbon
whatever you have will work like a charm
Scissors
Glue Gun
Xtra Large safety pin
To get started cut your tshirt strips into 12-14″ long strips.
You will need three.
Then repeat that process with the embroidery floss.
You will also need three.
Line your pieces up, and use a scrap to tie the top.
You will be braiding these,
each tshirt strip will be paired with a piece of embroidery floss.

It should start to look like this.
You may need to realign your floss with your shirt scrap.
It helps with the braided effect.

Once braided they should look like this.

Cut your ends, so that it looks like a little knot.

Then using another small scrap,
lay the ends together.
Make sure this bracelet fits to your liking first.
Then take your trusty glue gun,
and glue the ends together.
Next wrap the scrap over the ends to finish them off.

Once wrapped, add more glue, and fold over.
Cut any excess fabric.

And that’s it.
A nice and easy t-shirt bracelet that will take you all of 10 minutes.
Seriously, they were that easy.
This would be a great project for tweens at a slumber party.
Well, the tween in me thinks so!
Thanks to Kassi for having me over today!  If you are missing her something awful, go check her out at my bloggy.  We are swapping spots today!!


Thanks SO much to Megan for swapping with me today! And being this week’s Bloggie Bestie!
Hope you lovelies have a nice Thursday!!! Oh, and enter our ! 😉
 

Bloggie Bestie Blog Swap with Maggie of Midwestern Sewing Girl

Hey friends! We are so excited to introduce you to…

Maggie of Midwestern Sewing Girl today!!!

She is just lovely and we are sure you’ll enjoy her fun wallet tutorial! I know I’ll be making some of these ASAP! :)
I’m over at her place sharing a tutorial as well. Hope you’ll stop by and check out her blog… It’s one of my ABSOLUTE favorites!!!

Here’s Maggie…

Yay! I’m so excited to be here at Truly Lovely today! Kassi is awesome (as I’m sure you already know), and I was so excited when she agreed to “blog swap” with me!

Here’s a little bit about me…my name is Maggie and I blog at Midwestern {sewing} Girl. I love to craft, cook, bake, scrapbook and redecorate our home…I would love to have you come stop by sometime!

Now, I don’t know about you, but one of the things I hate doing during summer is carrying around a big ol’ purse. Not only does it get in the way, but I’m always so afraid I’m going to leave it somewhere. And I’m not even going to mention how hard it is to get sand out of it if I take it to the beach…yuck.

My solution? A tiny little wallet that holds just the essentials…wanna learn how to make one?

This is a great project to use up some of your fabric scraps…and the completed wallet can be shoved into your back pocket or beach bag without getting in your way…

Here is all you will need to make this little summertime wallet…

*2 pieces of fabric at least 12″x5″

*fusible interfacing

*a sewing machine (or a needle & thread)

*scissors

*a ruler

Now let’s get started…

First, cut your fabric & interfacing following the diagram below…

Next, take either your main fabric or your lining fabric, it doesn’t matter, and lay it right-side-down on your ironing board. Take one of your larger (3″x4″) pieces of interfacing and adhere it (per the manufacturer’s instructions) just to the left of the mid-point (6″ mark) of your fabric (right where the orange arrow is pointing). Leave about 1/2″ of fabric on both the top and the bottom of the interfacing…

Lay one of the smaller pieces of interfacing about 1/8″ to the left of the first piece…again leaving about 1/2″ of fabric on both the top and bottom of the fabric. Don’t worry about measuring the placement of these pieces…it’s really not necessary for them to be perfectly placed…”close enough” is good enough.

Now do the same thing with the other two pieces on the right-hand side of the fabric…

When you’ve adhered all of your interfacing, take your fabric (still right-side down) and place it on top of your other piece of fabric…make sure the fabrics have their right sides together…

Line up all of your edges and pin them together if necessary. Then sew around all four sides…using a 1/2″ seam allowance. Leave an opening of a couple of inches across one of your short sides (this will be where you turn your wallet so that the right sides are facing out).

Next, remove the paper from your interfacing…you should see a sheen where the interfacing sticky stuff has adhered to the fabric…

*Next, get me a manicure…holy cow, how yucky…*

Back to the tutorial…clip the corners of your fabric rectangle…making sure NOT to clip any of your stitches…

Now, turn your wallet right-sides-out, using a chopstick or something similar to push the corners out…

Bring your fabric back to your ironing board…iron the little pouch flat…and make sure to turn in the edges of the opening on the side, so that you have a nice crisp, straight rectangle…

Once your fabric is ironed, sew the open edge together…as close to the edge as you can…

Bring your fabric back to the ironing board (again), fold it in half (making sure to keep your main fabric on the outside), and iron it.

Open your fabric back up again…take each short side and bring it in toward your middle fold…not all the way to the middle, just close…leave about 1/2″ on either side…and iron again.

Almost done!

Sew down each long side of your fabric…with about a 1/8″ seam allowance…don’t forget to backstitch when you start and finish…


Now, fold your little wallet in half, and you. are. finished!

Woo hoo! Not so bad, huh?

These come together really quickly once the fabric & interfacing is all cut…

I think I’m gonna make some for all of my mommy-friends for Mother’s Day…

Fun and easy…and practical!

Thank you so much, Kassi, for letting me guest-post today!

Thank YOU Maggie for sharing your fun idea with our readers today! AND for being this week’s Bloggie Bestie on Truly Lovely! You’ll notice Maggie’s blog button over on our sidebar… It will be there ALL week, so if you don’t have a minute to check her site out today… It will be there when you come back by! 😉

Happy Sewing lovelies!!!

Bloggie Bestie – Heather of Finding Beauty in the Ordinary

Hello lovelies!

Today we’re doing the Bloggie Bestie a little differently.
We’ve asked Heather of Finding Beauty in the Ordinary to answer a few questions for us instead of our usual blog swap… She and her hubs, Joshua, are about to become first time parents here in just a couple of months.

I’ve been following along with her blog since before they found out they were pregnant. Through their adorable announcement video… And the sweetest gender reveal idea… I just love seeing her excitement at becoming a mom.

Now here’s where I drop a bomb on ya… I’ve been having some serious baby fever. I know at least a few people that will be just delighted to hear that…

My SIL, Stephanie who’s been trying to coax a niece/nephew since we got married…
Kayli who’s been wanting a niece/nephew so she has a baby in the family and doesn’t have to ask strangers if she can hold their little bundle just for a second ;)…
My SIL, Arina, who’s already purchased and given us our first baby blanket (zebra print and pink… hoping for a girl, eh?)
My mom who keeps saying, “Don’t let them rush you. That’s your deal.”  But secretly can’t wait for a grandbaby.  The list goes on….

SO. That’s where Heather comes in. :) She’s here to answer a few questions about becoming a mommy….

1. Please tell us a snippet or two about you that everyone should know. :)

Hi everyone! I’m so excited to be here on Kassi’s lovely blog! My name is Heather and I blog over at Finding Beauty in the Ordinary. I’m 27, have been married for 5 wonderful years, am expecting my first baby in August (a GIRL!), I’ve played the piano for as long as I can remember, I’ve traveled to a lot of different cities/countries, and have a degree in Paralegal Studies (which was the worst major decision of my life, ha!).

2. How about another snippet just about your blog that everyone should know?

This is a hard question! I don’t have a real agenda for my blog other than to share thoughts about my life with my amazing husband, our baby-to-be, our faith, and our life in our new city. My blog started as just an outlet, and now it’s turned into something I’m really passionate about. And it’s led me to work with Casey Wiegand, which is so fun! I had no idea what a cool adventure I was in for :)

3. Did you and your hubs officially decide to start a family? And if so, what helped you make that decision?

Yes, we did– we definitely planned this munchkin! We came to a place where we realized our ducks will “never be in a row,” but yet we had more stability in our lives than ever before. We prayed about it and asked God for His favor. My husband also really wanted to have a baby before his 30th, so ironically, we are expecting 2 weeks before his birthday :)

4. What are you loving most about pregnancy? 

Everything! It is the best thing I’ve ever experienced! I love feeling the kicks, the punches, & the movement. I also love the doctors appointments where I get to hear her heartbeat and see her posing for the camera! Also, just preparing and getting ready for her arrival is so fun! Who wouldn’t enjoy creating a nursery? :)

5. What are you loving least about pregnancy?

I will admit that I’ve had my share of leg cramps, hip pain and back pain– but it’s all so worth it. Oh and really bad morning sickness.

6. What are you most looking forward to after becoming a mother?

I can’t wait for trips to the park and little vacations with her and my husband as a little family. I can’t wait to go with my girlfriends and take all our newborns (we all seem to be expecting right now) to the lake & on lots of little adventures. I am looking forward to watching her become a daddy’s girl and chasing her dreams!

7. So you’re having a girl:) Name two girl items you are most excited to purchase (or that you have already purchased)?

I have to say that I am so excited to purchase her first little swimsuit! I mean, how cute are baby swimsuits?! I am also really excited to purchase the crib once we move into the house– it will make it all that more real.

8. Have you thought of a name for your little miss and if so will you be sharing it on your blog? Why or why not?

Yes, she has a name! We both agreed on it almost immediately and it has stuck with us. I bought a baby name book and probably shouldn’t have because we’ve never cracked it open! I always thought I’d choose a popular name like Sophia or Emma, but this name is not something you hear everyday. It’s not weird and yet it’s unique. You’ve probably heard it before but not often. And yes, as you probably already can tell, it will be a surprise when we announce her birth :) Since we decided to find out the gender after all, we thought it would be fun to keep something a surprise.

9. What are you most worried about after having your little lady?

Lack of sleep and being too hard on myself. Mommy guilt. Comparing myself to other moms. But I know I’ll be a good mom and God will give me strength and wisdom!

10. Anything else someone who’s looking to start a family should know? Or anything else you just want to share?

Of course, making a baby really isn’t up to us. It’s a complete miracle from God. If you’re looking to start a family, make sure you’re 100% on the same page with your spouse. Take the pressure of “trying” off one another and enjoy the ride 😉 They say that the best gift you can give to your future child is a strong marriage.


Thank you Heather for taking the time to answer my questions and being a constant source of delight as you share your own pregnancy on your blog!!! Can’t wait to meet Baby D!!! :)

So. What about you moms out there!?!? Anything you’d like to add on becoming a mother??
Any tips for Heather since she’s only a few months away from mommy?

Bloggie Bestie Blog Swap with Nina of Momma Go Round!

Happy Thursday pretties. Real quick I want to remind you to . :)

Today we’d like to introduce you to Nina of Momma Go Round!!
She is a huge source of fashion inspiration for me, and I’m positive she will be for you too!!!

Here’s Nina!

Hello there Truly Lovely lovers! I’m so excited to be here at Kassi and Kayli’s place today. These two are always so sweet and positive…they just make me smile!
I’m Nina from Momma Go Round, where I experiment with real style, for real women, on a real budget.

I didn’t always use to be fashion conscious. In fact, after my son was born in 2009 I looked like a frumpy mess most days. One day, simply decided enough was a enough, that I matter too, and vowed to spend just a few minutes each day making myself feel great too.

While not every outfit is a winner, and there are still days I go out in sweats and a baseball hat, I’m working on it. And that is all that matters!
Today, I would love to share with you a little about my process of picking out a killer outfit.

Step 1: Pick Your Statement Piece

Your statement piece doesn’t necessarily mean the loudest/brightest/colorful piece in your outfit, it simply means the piece that is speaking to you at that moment.
In this outfit, most people would think that my statement piece was the blouse, but it was actually the skirt. It was a beautiful day and that gorgeous red skirt was just calling to me. Your statement piece can be whatever, a ring, blouse, necklace, shoes…. it will just be what you build your outfit around.

Step 2: Build The Base

Depending on what your statement piece was, fill in the basics next. In this outfit, my statement piece was the necklace and apparently wearing just a necklace out in public isn’t acceptable, so pants and top it was.

Step 3: Make It YOU!

As a mom, I have to make every outfit work for that day. Sometimes I can get away with my favorite wedges, others it’s TOMS and capris for the park. Whatever you wear, you have to make sure you are comfortable. I’m notorious for changing my entire outfit cause I have to wear flats that day. Don’t settle, you can have great style for every situation.

Step 4: Balance
Everyday, I try to keep a few things in mind as I pick out my outfit.

Does it have color?
Does it have texture?
Have I accessorized?
Does it work for my day?
Am I pushing myself, or am I pushing too far?
Do I feel like me?
 

The biggest lesson I’ve learned is to simply give it a try. You would never know now that just over a year ago I had never belted anything, ever. Now, I have to remind myself that not every outfit needs a belt.
Sometimes you will knock it out of the park, other times you will wish you had stayed home. In the end, it’s just fashion, not world peace, HAVE FUN!!!
I loved sharing my outfit creating process and hope you’ll stop by Momma Go Round for more fashion and tutorials including my newest tutorial on How To Photograph Sun Flare, and my all-time most popular Flutter Flower Shirt.
Thanks so much for having me today Kassi and Kayli!

Our thanks to Nina for being the Bloggie Bestie at Truly Lovely this week! I’m over at her place today sharing a post on a brand new accessory I just made… :) Hope to see you there!!!

Bloggie Bestie Swap with Kim of A Girl and A Glue Gun

Hey lovelies! We have a treat for you today!
Do you know Kim of A Girl and a Glue Gun??? She’s this week’s Bloggie Bestie here at Truly Lovely!
So WELCOME Kimbo! 😉 She’s been on my blog reading list since… Well, since I started reading blogs!
SO I am super excited to have her here today!

And as always, it would be super awesome of you to come visit me over at her place today… If you wanna… 😉

wazzup! i’m kim.

i usually glue crap together. today i’m sewing. don’t worry though.. it’s a straight basic stitch that anyone can do! i’m super excited to be blog swapping with kassi today! (make sure to check out the yummy thing she’s cooking up over at my blog!)

so while patrolling through blog land…
i came across this tutorial….
and immediatly decided that lace is one of my favortiest things. like chevron. ruffles. pink. chocolate. hot glue. polka dots. just somethings that makes me instantly happy…
and i thought i have got to make me one. and justsohappens i had this blue shirt in my take back to the store pile. i just couldn’t justify spending $8 on a plain shirt..when i literally have a drawer full….so i was going to take it back. instead i want to joanns and bought a yard and half of pretty lace….

since it was straight on one side i decided to do two strips…(and that 1 1/2 was perfect. i literally had like 2 inches left)
(so i guess it wasn’t perfect. 1 yard and 16 inches would have been perfect.)

lined them up..

pinned them on..

(the ends were tucked underneath and sewed so no raw edges were visible from the front!)

and sewed. i sewed along the stright and the curved side (4 times total)

another reason to love lace…you can’t see your mistakes (aka stitches)

that t is on a very uncomfortable part of my bum.

anyways..thanks mucho to the cute k sisters for having me!!!!

:) She’s AWESOME right!?! Lace!?! Yep, we kinda love lace too… You know… In case you didn’t notice… i.e. look either left or right on our blog design. 😉 THANKS so much to KIM for swapping with us this week! :) AND for being the Bloggie Bestie at Truly Lovely!
You know… we want to be your Bloggie Bestie too! 😉 Just hit us up!

Happy sewing lovelies!

Bloggie Bestie Blog Swap With Janine of 3 Wishes

Hello there! Today we are thrilled to introduce you to

Janine of 3 Wishes!

She’s sharing a fun post on enjoying the simple things in life! A little something we ALL need to work on! :)

Take it away Janine!!!

Hello, I am so excited to be here.  Today I wanted to share on the topic of simple pleasures.  Isn’t it something when the smallest of things or moments can make us smile? Like meeting new bloggers.

Here are a few of my simple pleasures…

I adore reading devotionals…This is my quiet time with the Lord.  To ask for guidance with my words and steps.  To give thanks for a brand new day.

I love tea…I gave up caffeine for my health about 6 weeks ago so I have been enjoying organic caffeine free teas, and herbal teas.  I also gave up most defined sugar so I sweeten my tea with agave.  I am in love.

I love trampolines. I have always wanted one.  My 3 precious kiddos love jumping also,  we were able to purchase one for this spring break. We are having a blast and getting some exercise is a bonus.

I swoon over our view every day. No matter the season, our view is so breathtaking to me.  I go and stare out at the lake and daydream about where the boats are going or about summer plans of soaking up the sun on Moonshine Beach.

I am crushing on our hammock in the backyard. I could just lay here all day and watch the humming birds in summer and in Missouri we get cardinals all year long.

I love to write and this blog has really opened the door to journaling in an entirely new way.  I have considered this little blog to be a love note to my family but, if I can touch others in some small way, or be helpful at all, well that just makes my heart happy.

These are a few of my simple pleasures…Would love to hear what yours are.

Have a wonderful day lovelies!

Our thanks to the lovely Janine for being this week’s Bloggie Bestie and for sharing her simple pleasures! 
Did you know we have a page JUST for Bloggie Besties now! :) Hover over the Contact/Advertise page and the Bloggie Bestie page will appear! :) Hope you’ll check it out and click through some posts from our other fabulous blogging friends!

By the way, I’m over at 3 Wishes sharing a post today as well! I’d love to see you over there!  

Bloggie Bestie Blog Swap with Brittany of Love Stitched

Hello dolls! We’d like you to meet the lovely
Brittany of Love Stitched!!! 
She’s always been one of my fave bloggers, so it’s a pleasure to have her sharing here with us! I’ll be posting over at her place on Monday, hope to see you there!!!
Here’s Brittany…
Hello Truly Lovely readers! I’m Brittany and I blog over at Love Stitched!

I like to chat about my life, fashion, DIY ,tips and tricks, home decor and anything else my random brain thinks of 😉
Today I am sharing with you, 10 fashion tips. Enjoy!

10 fashion tips from Love Stitched

1.) Dress to fit YOUR body….There have been SO many times I almost grabbed that pair of high waisted jeans. They were calling my name and I had seen SO many people wearing them. The only thing is THEY DO NOT Look good on me! I have short legs hips, and no waist. that equals for one fashion mess! It is much better to pass on a trend than to wear it and have you look…well….not so good! case in point : Jessica Simpson {sorry girl}
2.) Don’t play the name game- it’s ok to buy OFF LABEL items…in fact it’s better! why buy that $100 pair of shoes from nordstrom when you can buy knock offs from target for 1/3 the price. Shop around for latest fashion trends before you buy the first one you see!
3.)Dress for you – you have to be comfortable in your own clothes. Don’t buy something if you are just going to feel awkward and uncomfortable the whole time. Trends are fun but only if you can rock them with confidence. If you SHINE your clothes will too…it’s good to go out of your comfort zone a little but don’t try to be someone your not!
4.) Classic, not trendy – Try to buy mostly all CLASSIC pieces and just throw in a few trendy items here and there. They will not last more than a season and why waist your money on something you are only going to wear once.
5.) One mans trash is another mans treasure – GO THRIFTING. Not only is it fun but you can find some great vintage pieces to spice up your wardrobe for next to nothing. How many times have you gotten rid of something will tags still on it just cause it didn’t fit you right, or it wasn’t “you” – exactly! Just cause it is THRIFTED doesn’t mean it is trashy….but there are a lot of stuff to weed through so be sure you find items that are really YOU or can be refashioned! Don’t bring home junk!
{my cousin Caitlin refashioned this thrift store dress and look how cute it turned out! you sould see the before…click here for the post}
6.) Dress to impress – As I was told once…dress for the job you WANT not the one you HAVE. Well maybe your not out looking for a job but why be labeled the frumpy housewife when you can be labeled the HOT housewife 😉 Dressing up will make you feel better about yourself – promise
7.) Color is your friend – don’t be afraid to add color to your wardrobe! Start small…working your way up. If your afraid of color be sure to pair it with basic and classic pieces for a more subtle look.
8.) Accessorize – shoes and purses can be your best friend or your worst enemy! A ratty old pair of shoes can ruin a whole outfit. By adding a statement necklace it can change the whole look of your outfit as well….be sure you finish off your outfit!
9.) Be the whole package – don’t stop at your clothes…do your hair and make up too. Be the whole package from head to toe…match your make up to your outfit…are you feeling flirty? try red lipstick…going more classic chic…add a pop with a smokey eye!
10.) Don’t be afraid to try new things – I normally would never buy a poncho or think to buy one but I actually LOVE this piece. I only spent $14 on it KNOWING it was a seasonal trendy item but had fun with it and made it mine, now I look forward to my more relaxed dressing days and can where my fun poncho!
Thank you SO much for having me Kassi and Kayli! I hope ya’ll enjoyed my fashion tips!
Be sure to stop by LOVE STITCHED and say hello!
THANKS to Brittany for being the Bloggie Bestie at Truly Lovely this week!
She definitely shared some tips that we could all use, right!?! :)
Be sure to leave her some bloggie love below!
Thanks again girl!
Happy Thursday lovelies!!!

Bloggie Bestie Blog Swap with Jen of The Arizona Russums

Good morning lovelies!! 
Today we’d like to introduce you to a fellow Arizonian… 
Jen of The Arizona Russums!
I’m over at her place sharing a new post as well! 
Hope you’ll pop over to say hello after leaving her some love here! :) 

Take it away Jen…. 

Hi y’all! I am so honored to be the blog bestie on Truly Lovely this week! Since Kayli is about to become a teacher, these sweet sisters asked me to share a bit about my own personal teacher style.

I have been a teacher for seven years now. My first two years were spent at a Title I public school in Texas. I was a coach and I was literally allowed to wear warm-ups to class if I wanted to! Next, I taught at a private school in Seattle, where the dress code was more stringent and all the females {staff and students} had to wear a dress/skirt every Thursday for chapel, which was not very fun when it was particularly cold and rainy outside. Now I teach writing classes at Arizona State in the middle of the hot, hot desert. It’s usually over 100 degrees for the first two months of every school year and I trek across the campus of the nation’s largest university trying to stay cool anyway I can. Basically, when it comes to teacher style, I’ve encountered every climate and dress code possible!

My number one tip is this. Dress professionally. Follow the dress requirements at your work place and dress as well as you can for your job. I think this applies to everyone, not just teachers. I don’t think fashion is the most important thing in the world, but I do think we show respect to our profession by dressing well each day. Also, for teachers and others who work with children or teens on a daily basis, remember that the way you dress influences the young people you work with. I like to show my students, especially the girls in my classroom, that it is possible to dress modestly and still look cute.

So now for the fun part. My practical tips for dressing as a stylish but modest teacher…
Cardigans are your best friend… Get yourself a fun collection of cardigan sweaters. I recommend having a few print cardigans to wear over solids and a few solids to wear over prints. Make sure some of them are longer {it’s nice to be able to cover your bum sometimes,  but cropped ones are perfect for other outfits. I like to have cardigans of varying sleeve lengths as well. Long sleeved cardigans were perfect in cold Washington and sometimes are still perfect for AZ classrooms with arctic air conditioning. Sometimes though, it’s nice to wear a short sleeved cardi here, because I like to cover up with an extra layer without feeling like I am going to burn up while walking in the sun.
Choose your layers wisely… One of my worst fears as a teacher is accidentally flashing an adolescent boy. Make sure your skirts or dresses are long enough. They should probably touch your knee cap to be safe. Tights are helpful for avoiding an unwanted flashing in the classroom {and are also a cute way to spice up an outfit}. Also, wear modest underwear to school if you are wearing a dress. I hope to never fall in front of my students or do the ol’ tuck the skirt into the underwear after going to the restroom, but if I do, the teenage boys in my class will see full granny panties in action. And that’s the way it should be. When it comes to shirts, wear a tank or camisole under anything that could possibly reveal cleavage. Sometimes shirts seem fine when you put them on in the morning, but when you move or bend over, little gaps are created that show off the ladies beneath. Not good. Figure out which shirts need an added layer beneath. A cute scarf is another fashionable way to keep things modest up top.
Find cute pants that fit you well… Although I like to wear skirts and dresses when it’s exceptionally hot in Arizona {built in air conditioning system!}, dress pants are a staple of my wardrobe. A pet peeve of mine is when teachers have only one or two pairs of dress pants and wear them until they are all shabby and raggedy looking. Remember, the goal is to teach students to dress well. Looking all frumpy in faded dress pants is not dressing well. Try to get enough pairs of dress pants to create a nice rotation so you never have to wear a pair more than once a week. I recommend a black pair, a dark brown pair, a light brown/khaki/tan pair, and a gray pair. Also consider buying a pair with a print on it, such as pinstripes or plaid. I love having a variety of pants in my closet because it makes getting dressed a little more exciting and encourages me to mix and match lots of different tops and accessories with my variety of work pants. Also {and I can’t stress this enough} please make sure your pants fit correctly. Don’t wear excessively tight pants to school – that ruins the whole modesty factor and/or looks completely unflattering. Also, don’t wear pants that are too big. The worst is when I see a female teacher wearing pants that gap along the waistline with no belt, and suddenly get a view of way too much thong in action. Nobody wants to see your thong {except for maybe some immature teenage boys}. Buy pants that fit and wear a belt if needed.
Thanks for hanging out with me today! If you want to see more of my teacher style posts go here, here or here! You can also visit me at the following places – I’d love to meet you!
Blog //  //  //  
xoxo,
Jen

THANKS so much to Jen for sharing her insight on dressing like a teacher (and modesty in general!!) Great tips!!! 
Kayli, our teacher in the making, has taken notes for sure!!! 
Hope you lovelies will pop over and visit me at Jen’s place and check out her other awesome posts!