WIWW – Lilla Rose Hair Clip Review and Giveaway!

Hey there dolls! Today my WIWW post is centered on hair! I have a LOT of hair… Every time I visit a new hair stylist, without fail, they comment on HOW much hair I have… It’s not really that it’s thick, it’s just that there is a lot! So needless to say I have always been fairly skeptical of those hair clips that are supposed to hold all of my hair in place all day long. So skeptical that I don’t ever wear them….

But then Kendra of A Proverbs 31 Wife approached me about reviewing a Lilla Rose Hair Clip… She even picked out a few specific clips from their extensive collection that reminded her of me! How could I say no to that!?!

Lilla Rose Hair Clip Giveaway

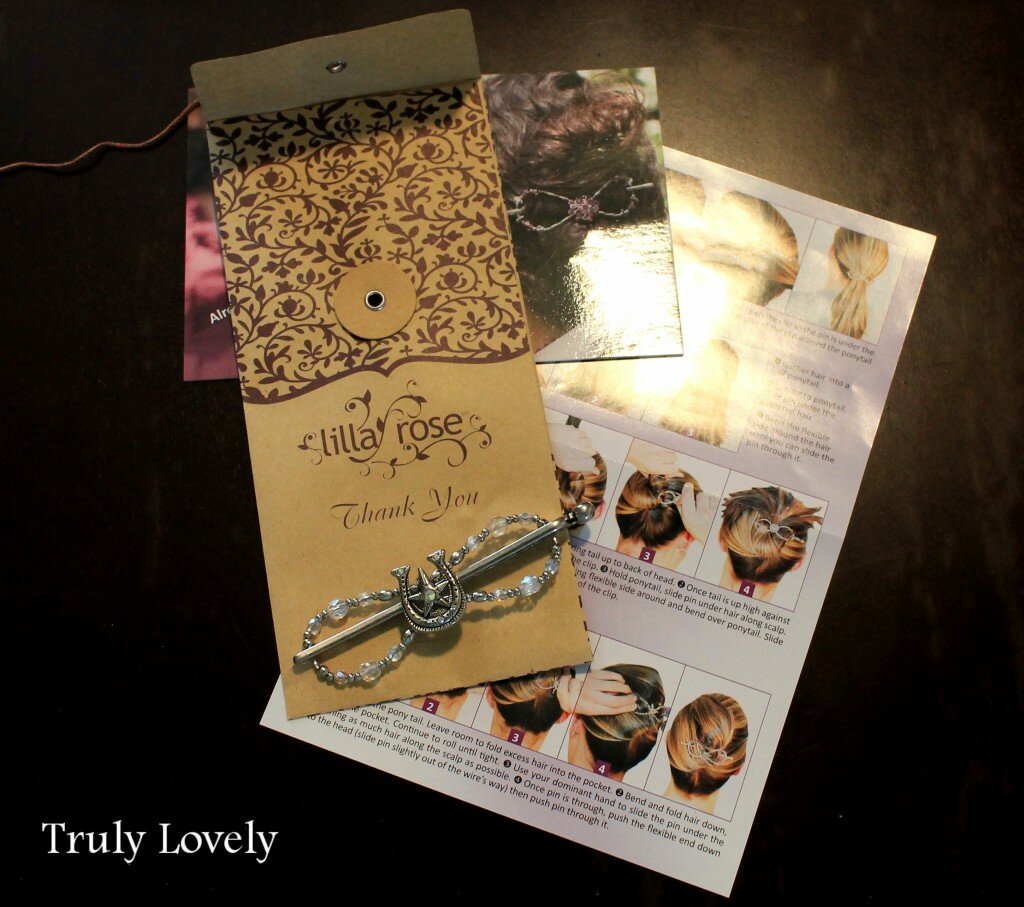
So I went in skeptical, but when this pretty Bright Start Within a Horseshoe flexi hair clip arrived at my door packed so prettily, with instructions, thank goodness, I was excited to try it out!

Lilla Rose Hair Clip review

The one I received is a Medium – they come in Mini, Extra Small, Small, Medium, Large, Extra Large and Mega sizes. Like I said before, I have a LOT of hair, but the medium was the perfect size to hold my hair in both a half up do like this one…

hair clip idea

Or even an entire ponytail!! I was very pleased to find that it was really easy to use (there are instructions included with your order, or they have videos available on the website) and that it held my hair in place! Phew! Skepticism deterred!! Plus, it’s WAY gentler on my hair than a run of the mill hair tie and adds a little something to an everyday outfit!

Lila Rose Flexi Clip

Lucky for you ladies one Truly Lovely winner will WIN their very own Lilla Rose Flexi Clip this week!! Kendra has generously offered one flexi clip of the winner’s choice valued at up to $15! Enter to win using the Rafflecopter form below. The giveaway will close one week from today and the winner will be announced on June 6th. The giveaway is open to US and CA residents only; winner must not have won a Lilla Rose giveaway in the past year.

a Rafflecopter giveaway

Disclosure: I received a Lilla Rose clip in exchange for my honest review, as always opinions shared here are 100% my own!

WIW – Crochet Headband from Stitch Sense

Hi there friends… Has the shock worn off yet from yesterday’s confession? 😉
Or maybe you weren’t even shocked at all….
I’m sure I’ll be hearing about it all weekend regardless {family in town}… but that’s ok. haha.

So, you know our rocking sponsor, ?
Of course you do! Cause you know ALL of our lovely sponsors over there on the left, yes? Awesome!
She sent me a to review recently!
I’ll be honest, I’m not a big headband wearing girl…
Like I told Nadir, it’s not because I don’t like how they look, I’ve just never really had any!

I can honestly say I am so glad she sent me this little lovely to try! It goes perfect with several outfits! The pink/purple tones are great paired with almost anything!

I’ve worn it twice just this last week!
The first day, with curled hair, to a team roping with the hubs and some friends.
I got several comments on how cute it was! The hubs even liked it and he’s usually hesitant whenever I try something new “fashion-wise”. 😉

The second time I wore it to work with a more casual outfit and straight hair.
Having a cute headband really gives an everyday outfit more of a polished, ‘I actually tried’ look.

This headband specifically features three hand crocheted rosettes in light pink and purple colors. It’s available, among other choices, in the . Nadir will also gladly create a for you in the colors of your choice!
I’d love to have a few more in varying colors to create other fun looks!

My thanks to Nadir for the lovely headband!
As always all opinions and thoughts about products featured on Truly Lovely are strictly my own!

Linking to these fun parties by the way! Hope you’ll check them out! :)

pleated poppy

What I Wore

Hey dolls! Haven’t done a WIW (What I Wore) post lately, so here’s what I’ve been wearing throughout the last month or so… I always feel so weird taking these pictures, but for the sake of the blog…. 😉

I wore this to the Diamond Rio concert we went to back in March.
Jeans – Cruel girl, Top – Old Navy, White Cardigan – Old Navy
Boots –  NRS doesn’t carry them anymore it looks like, but you can get them here.
(Which you can’t even really see in the picture…)

Did you notice my white and purple crackle nails?? My mom got the white . I love them! The mum ring is a giveaway win from !

I’ve been trying to do better at keeping my nails painted pretty and changing up my hair… I went for a sort of side bun here with a headband.

Blue shirt – Overstock.com, Shine Necklace

I say that then there’s no nail polish in that one… Oops. 😉 So what do you think?
The cardigan was on sale, so I talked myself into it… Something I wouldn’t have gotten otherwise probably… Keeper?
And the side bun?? I think I like it with the headband?

Linking this to these fun parties. Hope to see you there!

pleated poppy

Flower Clips: Dirt Cheap AND Cute! And a Dance Story.

*EPIC NOVEL ALERT* The point of this post is to learn how to make a flower clip for no more than pennies, but I included the back story of this craft too. I thought I’d give you fair warning that if you’re just in too much of a rush to read the story, feel free to skip over the first paragraph. I do really hope you read it though :)


Well lovelies, it’s Kayli again! I feel like every time I post I have a new list of excuses for NOT posting…. And this time is no different! :) However, what is different is that this post actually has something to do with one of my excuses. See, I belong to this great church that has an AMAZING youth program- and every summer they have some awesome event that we get to participate in. This year my area decided to host a Dance Festival. The plan was to have youth from six different areas (about 800 kids ages 14-18) be separated into six different dances and learn them.. Then we would all get together the first weekend of June in Eagar, Arizona and perform for a crowd. So in March, we were all separated into our dances (Waltz, Tango, Cha-Cha, Jitterbug, Foxtrot and Rumba) and all through April and May- we met with the other youth in our different areas and practiced. The whole thing was a hit by the way, it came at a pretty intense time though- the Wallow Fire had just started. If you want to hear about the outcome and get the FULL story, go HERE. (I’m on the right side of the U in the U.S.A picture.) haha Anyways! I was chosen for the Jitterbug! (Which I love, by the way) The catch was, to participate- you had to have a costume- and you or someone you know had to make it with the directions given to you by your dance leader. My costume required a circle skirt with ruffle and matching sash as well as a white t-shirt, white socks, and you guessed it- a flower clip. I had to have it all really quick like and between worrying about sewing a skirt and sash, the flower hit the back burner. In the end, I had almost NO materials to work with, BUT I wasn’t about to let that get in my way. So I whipped this up in just a few minutes!


I started with a fake flower. Yeah, not the flower petals you can buy just for things like this but an honest to goodness, full, fake flower. (told you I had limited materials) ha! So I took the flower off of the stem and took the center out like so…


I removed the entire center and as I placed the different layers the way I wanted, I hot-glued them together.


Then, I took some “pearl” beads and hot-glued them into a pattern in the center. (Be careful not to add too many so that your flower isn’t too heavy) <– Because I almost did! haha


Once my beads were set I flipped the flower over and glued a barrette to the back. (yes, I know, most people use felt in these situations. Let us not forget, LIMITED SUPPLIES)


And just like that, you have a flower clip! Perfect for dancing, or in my case Jitterbugging, the night away!


I still wear this little pretty and love it so much, not bad for fake dollar store flowers. Let’s call it an upcycle, yes? :)


If you try it- let me know how it goes- nothing better than a dirt cheap and STILL cute accessory right??


Happy Crafting!


Felt Flowers

A week or two ago I found a felt flower tutorial on fun little blog, Killing Time by Tiffany! And then I lost it… So my original post left out the credit to Miss Tiffany… So here you go ma’am!!! So sorry to have left you out in the beginning! To see the inspiration for my felt flowers, you can go here. And just for good measure, here’s a photo from Tiffany’s post!!! Good work lady! :) You have now been featured on Truly Lovely!

Don’t you think they look like a great idea?? While home for the Thanksgiving holiday, Kayli and I tapped into our mom’s felt stash to try it out. Here’s our version. As you can see Tiffany used five petals instead of four… Note to self, that might make our next trial better!
Felt Flower Clip Tutorial
First I traced a large circle onto my base colored felt, in this case I chose purple. I just traced a measuring cup.
You can use any circular object of your choosing.
I then traced a smaller circle onto the top colored felt, in this case yellow (for a purple and “gold” flower, Kayli’s school colors). I used a smaller measuring cup for those. Again, your choice on size.
I hot glued a smaller circle onto each of the larger circles, right at the bottom of the larger circle.
Then I folded each set of circles in half and ran a sewing needle and thread through the bottom of each folded piece to sew the circles together.
(I thought I took a picture of this step… but can’t seem to find it. Sorry!)
You can fluff out the petals in the shape you want them to be. Then I hot glued a barrette on the back of the flower so that you can wear it as a hair clip! Now that I think about it, it may have been wise to glue a flat piece of felt to the flower, than glue the clip to that just to make it more uniform…. but you live, you learn! :)
I hot glued a cute button from Granny’s button box onto the middle just for an extra shot of pizazz! And now Kayli has a fun accessory to wear to ball games at school in her school colors.
I made one for myself in black and white, just for fun. :) These ones are kind of big… To make them smaller just trace smaller circles!
Right after I made these I found a tutorial on Tater Tots & Jello for a slightly different method that seems a little easier and comes out looking a little fancier… But these were fun. I might try the other method sometime soon…
So what do you think?? What fun things have you made out of felt?
Have you seen the felt bows Kayli made? If not you can check them out .