Painted Gift Tins

Today I’m going to share a fun gift ‘wrap’ idea with you!!!

Painted Gift Tins!

My mom received a huge stash of those Christmas cookie, treat tins from a friend awhile back… It was actually her idea to paint the tins and add some vinyl cut outs to fancy them up! (Obviously where we get a lot of our craftiness from, thanks Mom!!!)
We laid them all out on some newspaper outside and spray painted each tin with a couple of coats of paint.
We used a few different colors and let them dry really well…


Once the tins are painted and dry, it’s time to embellish.
I made this small light pink tin into a birthday gift ‘wrap’ for my niece.

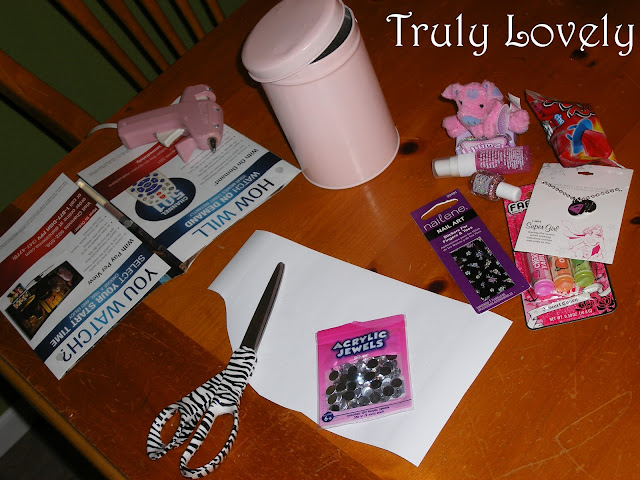
I used white vinyl cut out in her name and some flowers plus little acrylic diamonds to pretty it up.
If you use the sticky back vinyl you can stick the cutouts on just like stickers.
The little jewels were attached with hot glue.

If you don’t have sticky backed vinyl, you can just use regular stickers too! 😉
I filled the tin with several little treats tied it with a ribbon and gave it to our niece for her birthday.
She loved having her own little tin she could fill with her treasures!

We have since made several of these for different gifts… You can use any shape or size of tin and decorate with paint, vinyl, stickers, anything you have on hand to fancy it up!

Happy Crafting!!!
Linking this hereherehere and .

Valentines Gift Swap

Again, Happy Valentines Day lovelies!!! 
Have you entered Day 1 of our 500+ Followers Giveaway Celebration??
Just scroll below or . 

In the meantime, I joined another gift swap! :) 
This one was a Valentines Day Swap hosted by Caroline of Good Times Never Seemed Sew Good and Alissa of Rags to Stitches

I was partnered with the lovely Chelsea of Live Laugh Lynae
Her post is already up if you’d like to click over and see what I sent her. 😉 
Here are the pretties that I received…  
A lovely scarf from Old Navy, a turquoise necklace from Charming Charlie, a pretty heart headband, 
a sweet card and some fake mustaches for fun! 😉

You can clearly see what item was my nephew, Chancey’s, favorite…. 😉
Might as well sneak in a What I Wore… eh?! :)
The scarf is of course from Miss Chelsea (Old Navy). 
And yes, I’m standing in one of the hubs ropes… 
He cleaned out his horse trailer and everything went in the guest room (with the mirror) until he could put it back. :)

THANKS SO MUCH for the LOVELIES Chelsea
And THANKS to Alissa and Caroline for hosting!

Have a lovely Heart Day dolls!!!

Christmas Ribbon Candles

Hello lovelies!!!
I am really enjoying fancying up these pillar candles for my two candles stands!!!
It’s fun to take something you use year round and adjust it for each holiday/season, don’t you think?!?


You can see my here and my Thanksgiving Candles here. 


For Christmas here’s another (EASY and CHEAP) candle decorating idea!!!
First seen on An Irish Italian Blessing! Thanks Katherine!!!

Christmas Ribbon Candles

Materials needed:

1-2 (or more) pillar candles
Ribbon of your choice 
(You could make these for anytime of year depending on the candles and ribbon you choose, by the way!)
Scissors
Spray Adhesive
Glue gun

Eyeball Carefully measure around your candles, then cut your lengths of ribbon. 
I cut three ribbons for each candle for a total of six ribbons, alternating the colors. 

Spray the adhesive around the inside of the ribbon then attach to your candle, pressing down so it adheres. 

Then to make sure it stays put… 
I just dabbed a little hot glue on the outside end of the ribbon. 

Match your ribbons on both candles if you want a cohesive look. 
If not, you can alternate ribbon placement.
And viola! 😉 
Really, this whole tutorial is a glorified set of instructions for glueing ribbon onto some pillar candles to spice them up! Easy peasy, right?!? Haha. 
We like easy and inexpensive projects here in case you haven’t noticed… 😉

What easy Christmas decorations are you/have you been working on?
Or not so easy… We’d love to hear about those too!
Linking this here and here and .

Personalized Initial Tote Bag

Hello dolls!!!
Looking for a fairly easy sewing project/Christmas gift idea?
How about a personalized initial tote bag???

personalized tote bag
I made two of these for my sisters in law so far and each one was fairly easy to put together.
(They were birthday gifts that they’ve already received… so no worries on a spoiler alert! haha)
Each one was also completed in just about half an hour.
You could easily whip up several of these for your loved ones this Christmas!
First, I used some of the sew-able interfacing from Silhouette America, cut it down to the size of my fabric and ironed them together per the instructions on the interfacing package.

iron on interfacing
Then you can use your Silhouette SD, Cameo, or other cutting machine to cut out your fabric initial. Or if you don’t have a cutting machine, you can trace then cut an initial with scissors.

Silhouette SD cutting fabric

Once it cuts the initial out and you peel away the extra fabric, you’ll have your letter to sew on to your tote.


The interfacing is meant to be ironed on to hold down whatever you are planning to sew on, until it’s sewn of course.
So… you’ll need to iron the initial to the tote, then you can start sewing.

iron on interfacing
Be careful while sewing not to sew one side of the tote to the other… Not that I’m speaking from experience or anything… I may or may not have done that with a pillow cover recently… 😉

sewing an initial tote bag
Once your initial is sewn on you can add some pretty embellishments like rolled fabric rosettes or ribbon around the top. For the ribbon I just hot glued one end on to hold it in place, then sewed around the top and bottom of the ribbon.
I used for my rosettes, but here’s a little tip I just figured out…

fabric rosettes
If you want an idea of how the rosettes look before gluing or sewing them on… Pin them to your tote first, then you can rearrange them to your liking BEFORE affixing them! 😉
That may sound silly to some of you, but to me that was monumental! haha

personalized tote bagpersonalized tote bag
There you go! :)
You can now stuff with goodies or gift as is for a fun personalized gift your recipient can use all year round!
What are you hoping to receive this Christmas???
P.S. Linking this here and here and .

Saturday Sponsor Spotlight – November

Hello lovelies!!! 
We wanna say a HUGE thank you to the FABULOUS peeps
that Sponsor Truly Lovely!
So here we go, November’s Sponsors!
(Click the picture to visit the sponsor!! 😉


*********


Digital Scrapbooking Albums
Click the image to view a couple of FUN videos on Liz’s Picture Perfect Children’s Storybooks! A GREAT way to share those special memories and moments you remember with your kiddos!
Moms! You’ll wanna check this out… 😉

Click here to join Liz’s Newsletter and receive a FREE Double Layout EVERY Friday evening! It’s as easy as entering your name and email!


*********


Aleks Handmade
Miss Aleks JUST restocked her Etsy shop with some fun new clutch bags and SUPER cute onesies!!! 
Think fun Christmas gifts!!!


*********


Bobbi of Dats So Cute!
One of my fave bloggie reads!!!


*********


Sew Obsessed Designer Fabric Shop
FYI: They’ll be hosting a GIVEAWAY here on Truly Lovely next week!
So be sure to stop back by to enter! 😉
AND receive a special Truly Lovely discount code!!!


*********


Rachael of Lovely Crafty Home
She shares some AMAZING home DIY projects.
A few of my faves are shown in the photos below.
She is also the Rachael of “brown paper flooring” fame (middle photo)! 😉
She will be writing a complete step by step guide for those lovely floors soon, so be on the look out for that!

*********


Simply Sweet Creations
Miss Jerri just added a few new items to her lovely Etsy shop including those pictured below!
Be sure to check it out for Christmas jewelry shopping!

*********


Carlee of Ladybird Ln.
Miss Carlee won a FREE ad space for Nov. as Top Commentor #2 on Truly Lovely last month!! She’s hosting Turkey Daze this month over on her FUN blog! 
Oh… and guess who’s guest posting for it… 😉

*********

Ami of AliLilly
Handmade pretties for the holidays!!!
Ami just added some fun new items to her shop inlcuding holiday wreaths!!!
*********

There you have it lovelies!!! 
Each one of our amazing sponsors! 
We also want you to know that each of these ladies is the sweetest, easiest to work with lovely! 
You will want to be friends with them! 
We promise! :)
So… get your holiday shopping started ASAP and save the stress and worry you would’ve had later! 
You’ll be glad you did!!! 

A SPECIAL thanks to all of our sponsors for your Truly Lovely support!

and
P.S. Interested in becoming a Truly Lovely Sponsor? Learn ! 

Measurement Conversion Platter

We’ve talked before about some of our Bloggie Besties… 
And I’ve mentioned Ami of AliLilly before… 
But let me say again, she ROCKS!!! Love that girl! 
We met through blogging of course and have become GREAT friends!


After our wedding, I received this little lovely in the mail from my sweet friend Ami!
The vinyl and earrings are both from . 
The vinyl is meant for use on an electric mixer, but I wanted to put my own spin on it. Of course! haha.

So I whipped up my own measurement conversion platter for my kitchen!
The red platter was purchased at Wal-Mart and matches my red, apple themed kitchen perfectly! 

Simply peel the vinyl from the backing and using the transfer paper included to position how you’d like. 
Then smooth!


Easy, peasy! :) 
I used a little metal easel stand from Wal-Mart, the same one I used , and just bent it a little to hold the extra weight of the platter to display. 
I LOVE IT!!!

It’s already come in quite handy for converting measurements on a few of my recent baking endeavors. :)
THANKS so much to Miss Ami for the lovely gift! 
Makes me think of my lovely friend every time I see it!
And thanks to Krystin of My Lil Luna for including those lovely earrings!!!
Watch for a post including them tomorrow!!! :)


Linking this here and here and .

Painted Pyrex

Hello friends!! 
A couple weeks ago my sweet friend, the new Mrs. Knight, got married. 
The same sweet friend who did MY hair at my wedding!
So I wanted to make her something special for a bridal shower gift. 


She had a set of Pyrex bake ware on her registry… 
But naturally, they needed a little Truly Lovely spiffying up. 😉


This was a project that plagued me for weeks.
I had two FAILED attempts before I found something that worked, and turned out the way I wanted.


First… Don’t buy this stuff. It doesn’t look like glass etching at all.
More like gunk just globbed on there. Unless that’s the look you’re going for of course…
And it my case it wasn’t… So off it came!

Second… If you’re going to paint glass… You have to be very careful and very patient.
Otherwise it leaks and streaks and just looks yucky.
Those pictures up there really don’t even do justice to the craft fail that they actually were… haha.


Mrs. Knight’s kitchen and home in general has a western/country look and feel to it.
Her kitchen is red and brown.

So, in the method that worked out the way I wanted, I used brown glass paint and Silhouette cut vinyl stencils to add her new last name to a set of Pyrex dishes. 

What saved me SO much time and trouble was using a foam sponge (makeup dept.) to dab the paint onto the glass dishes instead of using a paint brush. 

Foam sponge and after math of my other attempts… :)


I also used the stencils as the INSIDE of the letters so that it didn’t have to look so precise. This is one of those projects where exact perfection isn’t going to happen… BUT that was perfect in this case leaning toward my rustic-y theme.

Following the directions on the paint I used, I let the painted dishes dry for several hours, then cured them in the oven. 


In the end… I really like them! 
I think they have a rustic-western-y quality to them. 
Plus, they’re different, and personalized. Can’t go wrong with that! 


All wrapped up and ready to be boxed and sent to the bridal shower! 
Mrs. Knight says she likes them too! 
Guess all that crafty trial and error was worth it!
P.S. I’m sharing a quick and EASY Halloween craft over here today! 😉
P.P.S. Linking this here and here and .
P.P.P.S… I am sharing my picks from the Take a Look Tuesday party at Sugar Bee Crafts over here today too! :) Check out Mandy’s blog by the way… I LOVE it! :)

My First Printable!

I’ve mentioned it before… A time or two… 
But in case you missed it, Miss Kayli, my baby sister, started to college last month! Whoot!! 

Mr. M and I bought her a new bed set for her graduation gift. 
This lovely from Target. Cute, right!?


So I wanted to make her a little something to match her bed set that she could display in her new room. 
I used Microsoft word to create a FUN printable to match her bedding, then saved it as a image file in Paint. 
It features one of her favorite quotes. One that I think is quite befitting a young lady about to start to college, but any young lady in general. 

“Be strong and of good courage. You are truly royal spirit daughters of Almighty God. You are princesses, destined to become queens. Your own wondrous story has already begun. Your once upon a time is now.”
~Deiter F. Uchtdorf


So, if you’d like, please feel free to click on the picture to enlarge, then save to your computer.
*It’s not blurry when you enlarge it FYI! 😉

You can make a lovely for the young lady in YOUR life! 
Courtesy of Truly Lovely! :)

I framed it in one of the frames I made for our wedding. I’ll share those sometime… 
But until now, here’s how it turned out! 


Have a lovely day sweet friends! 


P.S. Today I’m sharing a GUEST POST over at THE IVY COTTAGE BLOG
I would LOVE it if you would pop over and say hello!! :)


Mr. and Mrs. Aprons

Aprons are all over blog land lately… People have been sewing them up in all kinds of different ways!
Well, have you heard of Aprons and Smocks???
They have a sweet website where you can order aprons, chef apparel and even custom aprons at a GREAT price!!
After our wedding I received a Mr. and Mrs. apron to try out and review! 
They even stitched my new last name on each one!
Black for the groom and white for the bride of course! :)
So fun, right?!?


Here I am in our new backyard, about to grill up some steaks in my new apron!!! 
Mr. M is a good photographer, eh?! 
He wasn’t so keen on getting his picture taken in his apron, so he just took mine with them both. :)


The Mr. M apron is just manly enough that Mr. M might actually wear it! 
The only downside to these aprons is that they’re a little on the shorter side and since he’s so tall, they don’t cover as much on him. Mine however, was just right. 
They fit right in my kitchen with my other aprons don’t you think?! And being that mine is white, it’ll be easy to bleach if I get a nasty food stain! 
I also enjoyed having the three pockets in the front to hold my kitchen utensils as I went in and out of the house to the grill!

At Aprons and Smocks you can choose to customize with embroidery or screen print. 
I like the simple embroidery on the aprons I received. It looks quite professional if you’re looking for aprons for your restaurant staff, chefs, or just to use at home. 

Customizing a Mr. and Mrs. apron set (like the two I received) would make a GREAT wedding gift! 
Or even anniversary gift!
There are variety of colors and styles to choose from as well!!

Hope you check out their site next time your looking for an expensive, but unique gift, or just want an apron to use at home! 


Thanks to Aprons and Smocks for giving me the opportunity to review two of their three pocket bib aprons! 
I was not monetarily compensated for this review. All opinions are my own. 

Easy Fleece Blanket Tutorial

Hey pretty friends! 
You might have seen this tutorial floating around blog land awhile back…. I hadn’t posted it here yet because it was a SECRET!!! Why a secret you ask?? Because I made these for my bridesmaid gifts for our wedding!!!
So today I’d like to share the tutorial for an easy fleece blanket that makes a great gift! Especially for a bridesmaid or two!
The materials needed are:
2 yards of fleece fabric
1 package of coordinating satin blanket binding
Coordinating yarn
Coordinating sewing thread
Pins
Yarn Needle
Scissors
Sewing Machine
In this case I went with zebra fabric and all red coordinating materials.
First trim your fleece fabric of any uneven edges or those funky white labeled edges… You know what I’m talking about… :)
Then, using the Yarn Needle, stitch your thread down the two length sides of your fabric like so… I spaced each stitch about a half an inch apart…

Next you’ll pin and trim your satin binding to the two width sides (the two shorter sides)… The binding will have a fold down the middle, simply line that fold up with the edge of your fabric, making sure it’s centered so there’s an even amount of binding on both sides…

binding a blanket

Fold over the edges of the binding to make your four corners and pin those as well. You can either trim or fold the extra binding inside to make your corner.

pinning binding on a blanket

Once you have the binding pinned onto both sides, get out the sewing machine. I used red thread to match the binding…

If you sew really well, you can use a varying color of thread for added pop!!!
I don’t so much… SO matching thread hides my inexperienced sewing skills. :)
(I’m a little addicted to zebra print… can you tell?!?)

sewing binding

Simply sew the binding to the fleece pulling pins as you go.

And TaDA!!!! A SUPER EASY fleece blanket made by you!
They make great baby gifts, or gifts for friends or family!! :)
And most especially, GREAT Bridesmaid gifts!!!

zebra print blanket

You can see… I made six of these blankets, then each blanket was rolled up and tucked inside a personalized tote bag for each of my lovely bridesmaids for my wedding a few weeks ago!

personalized tote bags

For the personalized tote tutorial, you can . :)

Have a lovely rest of the week!

Happy Sewing!!!!