DIY Halloween Fabric Table Topper

Hey dolls! It’s been awhile since I shared a tutorial for anything… This baby momma business really changes the way you spend your time. :) And that’s perfectly ok with me! I love every minute of it… But I DO happen to have a sewing tutorial to share with you before Halloween rolls around! So here we go…

DIY Halloween Table Topper

The fabric for this table topper came from Joann’s. I chose four different Halloween fabrics for the top of my table topper and I used some purple fabric from my stash as the bottom. Then I cut a long triangle out of cardboard for my ‘stencil’.

Step 1: Cut three triangles of each Halloween fabric.

Halloween Table Topper Tutorial

Step 2: Sew each of the triangles together alternating the direction in which they’re pointing to keep a fairly straight strip of fabric. To do this I laid two triangles together one on top of the other. Have the designed face of the fabrics touching while the base of one triangle meets with the point of the other. {Hope that makes sense… If I can clarify something just let me know in the comments.}

DIY Halloween Table Topper 2

Then sew the two together, again, with the design facing inward you’ll be sewing along the underside of the fabric so that each of the seams is on the underside of the topper when you’re finished. The finished strip of triangles will look like so… This is the top side of your Halloween table topper.

Halloween Fabric Table Topper

Step 3: Trim down the two end triangles so that your top strip becomes an even rectangle.

Step 4: Cut a rectangle of your bottom fabric to match the top fabric (the sewn together triangles). Pin the bottom fabric and top fabric design faces together. In other words, pin them together insides out.

Sewing a Halloween Table Topper

Step 5: Sew around your two pieces of fabric, sewing them together. Leave a small opening so you can turn them right side out. Then sew the opening closed.

Step 6: Top stitch around the edge of your table topper. I did a zig zag stitch in bright purple thread to match my Halloween fabric.

Tutorial for a Halloween Table Topper

Step 7: Top your table with your new Halloween Fabric Table Topper! Preferably paired with a fun No Tricks Just Treats Jar! 😉

Halloween Table Topper

So tell me lovelies, have you decorated for Halloween yet? DO you decorate for Halloween? It’s one of my favorite holidays to decorate for! As soon as October 1st rolls around my decorations are out!!! 😉

Happy sewing and happy decorating!!!

Check out where we link up on our Party With Us Page!

Turkey Pillow Cover

Cute pillow covers for the holidays, and just in general, have kind of become my thing as of late… Making the pillow cover itself is super easy, especially if you use this Envelope Pillow Tutorial that I always use from Marissa at Rae Gun Ramblings. I made a western welcome pillow and a team roping pillow cover for everyday, then I made puffy paint Halloween covers for Halloween of course… Which brings me to the next holiday on my list, Thanksgiving.

Thanksgiving throw pillow

I initially made this turkey pillow cover last November, but missed getting around to posting it before Thanksgiving 2011.
{Thus the horrible pictures for the tutorial steps… so please be forgiving of the blurriness.}

To make your own turkey pillow you’ll need:

  • Turkey body stencil
  • Turkey feather stencil
  • Fabric for your pillow cover (I use half a yard for a 16 inch pillow, following the tutorial mentioned above)
  • A few different fabrics for your feathers (I got a 1/4 yard of four prints that I thought looked fall-ish)
  • Fabric for your turkey body (I used brown)
  • Googly eyes
  • Glue Gun
  • Sewing machine

To make the cute turkey I designed the body on my Silhouette software using ovals welded together. Then I designed a turkey feather shape just modifying an oval to have sort of a feathery point. I cut those shapes out on vinyl to make my stencil.

I cut the turkey body out of the brown fabric.

making a turkey throw pillow

And then the feathers from the varying fabrics prints. I just laid my feather stencil on the fabrics, traced a few feathers with a pencil and then cut them out. Sorry for the blurry photo, but you get the point, right? 😉

vinyl turkey feather stencil

I decided where I wanted my turkey to be (the center of my pillow cover), then pinned each of the feathers where I wanted them making sure the turkey body covered the points when laid on top. Then I sewed around the edge of each feather.

making a turkey throw pillow

I pinned and sewed around my turkey body next adding a little orange triangle for the beak, a little red for the waddle, and hot glued on two beady eyes.

Now… that was where I stopped last year… but this year when I got it out to decorate I felt like it needed something more. An added touch of cuteness.
So I cut out a little orange bow to make it a cute ‘girl’ turkey and cut a strip of orange leaf fabric for her to ‘rest’ in. 😉 Again, I just used my sewing machine to sew around the edges.

With a good washing the cute feathers now have ‘feathery’ edges.

Thanksgiving pillow

Tell me lovelies? Do you decorate for Thanksgiving?
I only have a few items…but I think it’s fun to decorate for every major holiday.

Linking this here and here and .

P.S. Hope you enjoyed this post! If so, we’d love if !

Halloween Puffy Paint Pillow Covers

Glow in the dark pillow covers

So the month of October is admittedly my favorite…
My birthday was last week, Pumpkin Spice lattes are back and Halloween is right around the corner!
Before October even rolled around I already had my Halloween stash out and scattered all over the house! Turns out though, I don’t really have all that much in the way of decorations… Needless to say I was pumped when I received a fun set of Glow in the Dark Puffy Paints via iLoveToCreate to try out!

I don’t know about you, but glow in the dark screams Halloween decorating to me! 😉

materials for Halloween pillowcases

Materials Needed for Halloween Puffy Paint Pillow Covers:

  • Glow Puffy Paints
  • 1 yard of black fabric
  • Glow in the dark spider rings
  • Glue gun
  • Scissors
  • Sewing Machine

{If you don’t want to sew your pillow covers, you could easily purchase some pre-made from the craft or department store.}

I always use this tutorial when making simple envelope pillow covers. I made two 16′ pillow covers so I cut and measured my fabric accordingly and pinned the two sides and seems.
Then I sewed the top and bottom edges of my pillow face so I would know where to paint on my Halloween pictures.

pinning an envelope pillow cover

For pillow cover #1 I decided on a spiderweb. I used the Gray Glow Puffy Paint to freehand my web. Drawing (in this case Puffy painting) a spider web is fairly easy. Start with several crisscrossing lines, like so…

making a spider web with puffy paint

Then draw paint curved lines between each of your crossed lines… Like so….

Halloween Spider Web pillow

For pillow cover #2 I hand wrote the words Happy Halloween using the Orange Glow puffy Paint. Each of my pillow faces were left to dry overnight… The Puffy Paint dries in four hours according to the package, but I wanted to be on the safe side.

Each pillow received a couple of glow in the dark spiders… I just cut the ring part off each spider ring, then hot glued them where I wanted them.

The final step was sewing the sides of my pillow covers closed then flipping them inside out. I stuffed a 16′ pillow inside each one and viola!

Glow in the dark Halloween pillow covers! And more fun Halloween decorations for casa de Kassi!

You can find all kinds of fun craft supplies and ideas at iLoveToCreate!
Find them on , and as well!

Disclosure: I received the product mentioned as part of a campaign via iLoveToCreate and The Blue Print Social. As always the opinions shared are 100% my own!

Check out some of the other fun ideas shared through this campaign below!


Happy 4th of July! Plus a Pennant Rope Wreath

HAPPY FOURTH OF JULY LOVELIES!!! 

I hope you’re enjoying the day with your family and friends!

I wanted to share my patriotic wreath with you dolls today, just for fun…

Fourth of July Door

Here’s my front door – one patriotic rope wreath, two flags from Wal-Mart and a cute doggie later. 😉

To make the rope wreath I used one of the hubs’ old discarded ropes. I’ve talked about them before here.
Then I used some old denim jeans and some red/white bandanna paisley fabric to make the pennants.

denim and bandanna fabric

You can see my “pattern” in the above photo. I just cut a triangle out of cardboard then cut around it through the fabric.
I placed two pieces of denim for one pennant then two pieces of the paisley front to back to make each of the alternating pennants. Then I sewed up the sides leaving the top quarter inch on each side un-sewn.

sewing denim pennants

I used some red cord and sewed the top of each pennant closed with the cord towards the inside. See the photo above.
I sewed a hanger from the paisley fabric, wrapped it around the rope and sewed it closed by hand.

That’s it! Super easy and fairly quick!

Denim and paisley pennant rope wreath

Please ignore the scratches on the door… They’re from my barbed wire wreath…
Guess the door needs .

Enjoy the rest of your Fourth celebrations friends!

Linking this here and here and .

P.S. Hope you enjoyed this post! If so, we’d love if !

Market Tote and Clutch Set

Since Mother’s Day is long gone for 2012 and we’re actually approaching Father’s Day, I decided it would be safe to share the gifts I made for my Mom and Tammy  (hub’s step-mom).

I have really been enjoying sewing lately and was excited to create a handmade gift for each of the mothers in our life!

zip top clutches

I sewed two zipped clutches based off this Michelle Sewing Pattern. The only difference in the two was the color of the zippers. One was black, one was white.

I also made my mom a market tote using a Market Tote Simplicity Sewing Pattern.
I was excited that the black paisley fabric and purple floral accent fabric paired so well together!
The lining of both the clutches and the market tote was the purple floral.

fabric tote

Inside each clutch I also included a brand new Layers by Scentsy shower gel for an added surprise!

These were so fun to make! I really enjoy giving handmade gifts!
Hopefully they were as gladly received as they were lovingly made! 😉

handmade tote and clutch

So what about you? Do you like to sew? Enjoy gifting handmade?

Happy sewing lovelies!

Linking this here and here and .

P.S. We’d love if ! Thanks new friend!!

My Handmade Market Tote

I have been doing a lot of sewing lately… So, today, I would love to share my most recent sewing endeavor with you dolls!!! I made this tote a few months ago and have been carrying it with me everywhere! :)

This post was first shared on Momma Go Round. Thanks Nina! :) 

My favorite accessory is always a good bag! I carry a purse or tote with me every single day! :)
I’m also really, really picky about the bags I carry… If I find one I love I will wear it completely out before going on the hunt for a new one!

So, I was due for a new bag… but instead of shopping around for weeks, I whipped one up! :)

I’m not going to give you a rundown of how it was made… If you want to make one, the pattern is available in most craft stores or online (Simplicity W2420).
But I am going to tell you that with a couple yards of fabric and my sewing machine I made myself an accessory that I’m just as proud to carry as any $100 bag!

The reasons I’m so proud of this tote? I saved my family the money it would’ve taken to purchase a more expensive bag… I made myself something that I can actually use and enjoy! All while staying in my budget!
We’ve all read how Nina (of Momma Go Round) stays within her shopping budget by carefully shopping for just the right item. Well in this case, I MADE myself just the right item! :)

Maybe you’re not a seamstress… But you can just as easily make yourself a beautiful beaded necklace or dye that faded pair of blue jeans into a bright pink pair that’s become so popular. 😉 It’s totally doable friends!

I’ll be back next week with the market tote I made for my Mom as well as a little something extra! :)

Happy Sewing Sweet Friends!!! 

Linking this here and here and .

P.S. We’d love if ! Thanks lovely!!

Painted Throw Pillow

Hello lovelies!!!

Did you know you can paint fabric?
Don’t laugh all you crafty smarties out there… I just had this revelation recently, so if it’s old news to you…
Don’t judge… haha.

With my new found fabric painting knowledge I made a Painted Throw Pillow Cover for our living room!!!

This tutorial isn’t about sewing an envelope pillow cover, but if you’re really looking for a few instructions this tutorial from Rae Gun’s Ramblings is a really good one.

To make a painted throw pillow I go ahead and hem the top and bottom (for the edges of your envelope) as well as sew the top and bottom of the pillow cover so that you’ll know where the ‘face’ of your pillow will be.

Then I used my handy Silhouette SD to cut a stencil out of some sticky backed vinyl. If you don’t have a craft cutter (Silhouette, Cameo, Cricut), you can always make your stencil using freezer paper and scissors.

I chose some team ropers for my team roping hubby and because our living area is western themed/decorated.
{Stay tuned for a full reveal of our entire made over living room coming soon!}
I centered the stencil on what was to be the face of my pillow cover. Using a soft bristle paint brush and some brown Enamels paint, I carefully filled in my stencil.

I let it dry completely overnight, then went back to the sewing machine and stitched up the sides of my pillow cover.
Note – It’s SO much easier to paint the stencil on before finishing your cover!!!

That’s it! Now you can display your pretty painted throw pillow in your home! 😉

You could do this with any shaped pillow cover, any stencil, and {it would appear} any paint…
If it’s going to be washed often, I would make sure to get fabric specific paint so that it can be washed frequently.

 Happy crafting lovelies!!!

Linking this here and here and .

Visit thecsiproject.com

Fancy This Features 68 and a NEW Pinterest Board

Hello lovelies!! So I’ve had a thought…
How about from now on, we pin every feature to our , !?!
I’ve made  so when she does the featured post hers will go there as well.
We actually have a LOT of followers there… I guess we got in right as it was getting popular…
So most things we pin get liked and repinned like crazy. That means, your featured project will hopefully get liked and repinned like crazy from now on! :)

So here we go… Featured from Fancy This Features 68!!!

I adore this pretty pleated bag  from Esther at Happy in Red!! :)
We’ve been doing some sewing lately and this fun bag is on our to do list!

Covering your ugly old mouse pad and wrist rest with fabric!?! GENIUS thanks to Carmie of The Single Nester!

Just being honest here… I can’t even drink coffee without disguising it completely in coffee creamer… :) But I LOVE my creamer with a little coffee… :) This Irish Cream Coffee recipe from Rosie at A Rosie Sweet Home sounds scrumptious!!!

All of these fun features have been pinned to our ! :)
Hope you’ll pop over and follow us there if you haven’t already!

Here’s a featured button for you dolls mentioned above! :) It links right to this post so your friends will know where to find you!

Oh, by the way, have you yet?

Have a happy week friends!!!

Bloggie Bestie Swap with Kim of A Girl and A Glue Gun

Hey lovelies! We have a treat for you today!
Do you know Kim of A Girl and a Glue Gun??? She’s this week’s Bloggie Bestie here at Truly Lovely!
So WELCOME Kimbo! 😉 She’s been on my blog reading list since… Well, since I started reading blogs!
SO I am super excited to have her here today!

And as always, it would be super awesome of you to come visit me over at her place today… If you wanna… 😉

wazzup! i’m kim.

i usually glue crap together. today i’m sewing. don’t worry though.. it’s a straight basic stitch that anyone can do! i’m super excited to be blog swapping with kassi today! (make sure to check out the yummy thing she’s cooking up over at my blog!)

so while patrolling through blog land…
i came across this tutorial….
and immediatly decided that lace is one of my favortiest things. like chevron. ruffles. pink. chocolate. hot glue. polka dots. just somethings that makes me instantly happy…
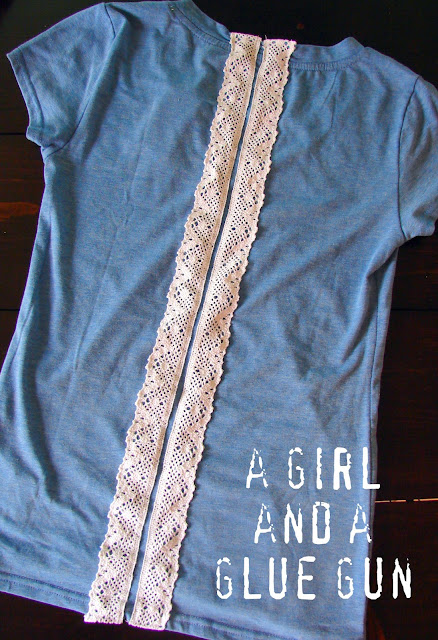
and i thought i have got to make me one. and justsohappens i had this blue shirt in my take back to the store pile. i just couldn’t justify spending $8 on a plain shirt..when i literally have a drawer full….so i was going to take it back. instead i want to joanns and bought a yard and half of pretty lace….

since it was straight on one side i decided to do two strips…(and that 1 1/2 was perfect. i literally had like 2 inches left)
(so i guess it wasn’t perfect. 1 yard and 16 inches would have been perfect.)

lined them up..

pinned them on..

(the ends were tucked underneath and sewed so no raw edges were visible from the front!)

and sewed. i sewed along the stright and the curved side (4 times total)

another reason to love lace…you can’t see your mistakes (aka stitches)

that t is on a very uncomfortable part of my bum.

anyways..thanks mucho to the cute k sisters for having me!!!!

:) She’s AWESOME right!?! Lace!?! Yep, we kinda love lace too… You know… In case you didn’t notice… i.e. look either left or right on our blog design. 😉 THANKS so much to KIM for swapping with us this week! :) AND for being the Bloggie Bestie at Truly Lovely!
You know… we want to be your Bloggie Bestie too! 😉 Just hit us up!

Happy sewing lovelies!

Bloggie Bestie Blog Swap with Becky of Reinventing the Ordinary

Hello dolls!!! 
We have the first Bloggie Bestie of 2012 to introduce you to today!!! 
Becky of Reinventing the Ordinary

How cute is her pup there on her blog button (above)! 
She loves her pets as much as we love ours! 
Today she has a fun pet idea to share with you! 


Take it away Becky!!!


Hi, I’m  Becky from Reinventing the Ordinary

 I want to thank  Kassi  here at   for allowing me toGuest Blog and also for her agreeing to Guest on  my little site.
A little about me
With degrees in Art Architecture & Interior Design I have always enjoyed
rebuilding reworking and restoring.
I absolutely hate boring and really like to shake things up whenever possible
of course I gotta do it myself and always on a budget.
  features things I’ve made for my own home and pets … then decided to share with others.Today I thought I’d share with you my latest addition to the shop.
I’ll be adding this  Fleece Crate Cover  next week  so I thought I’d share a quick DIY for you guys.
Materials Needed:
1  1/3 yard fleece Color 1
1/2 yard fleece Color 2
*** this is for a small 12″ x 14″ x 18″ crate***


From  Color 1
                                        Piece A)   Cut one piece  26″ x  48″ (sides and bottom)
                                       Piece B)   Cut one piece  20″ x  20 ” ( liner for front door)
From  Color 2
                                        Piece C)   Cut one piece 52 ” x 20 ”  (back, roof, and front door)


Piece A
At corners  cut out 4″ x 4 ” squares  as shown.


Fold under one long edge of Piece A for a 4″ hem.This will be the front of the cover.
On the other 3 sides cut slits 2″ wide and 4″ deep.


Sew Piece B to front short end of Piece C.
Cut 4″ x 4″ square from corners on Piece C as shown …
then fold under  a 4″ hem.
On the remaining  3 sides slits cut 2″ wide and 4″ deep.
Wrap Piece A  around bottom and sides of crate.
Hemmed edge should butt up along front edge of crate.
Wrap Piece B/C  across back/top/front.
Align the top and back of the two sections.
Tie the top section to the side section.

As you can see I also used the same tie method to make a pillow.This is just only a short tutorial.  I just gave you a thumb nail explanation. It’s is a quick project about 1 hour. If you have any questions you can leave a comment atreinventingtheordinary.com…  and I’ll be happy to give you further directions.Starting next week this crate cover will also be on my  . 
 I hope you get a chance to visit my little  blog  some time. 
Thanks again .


Thanks to Becky for sharing her cute crate cover and pillow with us today!
AND of course, for being the Bloggie Bestie at Truly Lovely this week!
To learn more about being a . 

Have a lovely Thursday!